|
|
Post by curufin on Mar 22, 2015 14:07:37 GMT
D&D 3.5 Magic Item Compendium has 'augment crystals' for weapons and armor. They are crystals that can be attached to weapon and armor of masterwork quality or better. They basically add magic abilities to the item it is attached to. The crystals come in 3 power levels (least, lesser, and greater). You could adapt these for your own game.
|
|
|
|
Post by curufin on Mar 22, 2015 11:35:24 GMT
I started working on some armor display stands (scale mail and chainmail). I also made another fur cloak...this time a little closer to scale and a two-handed sword. 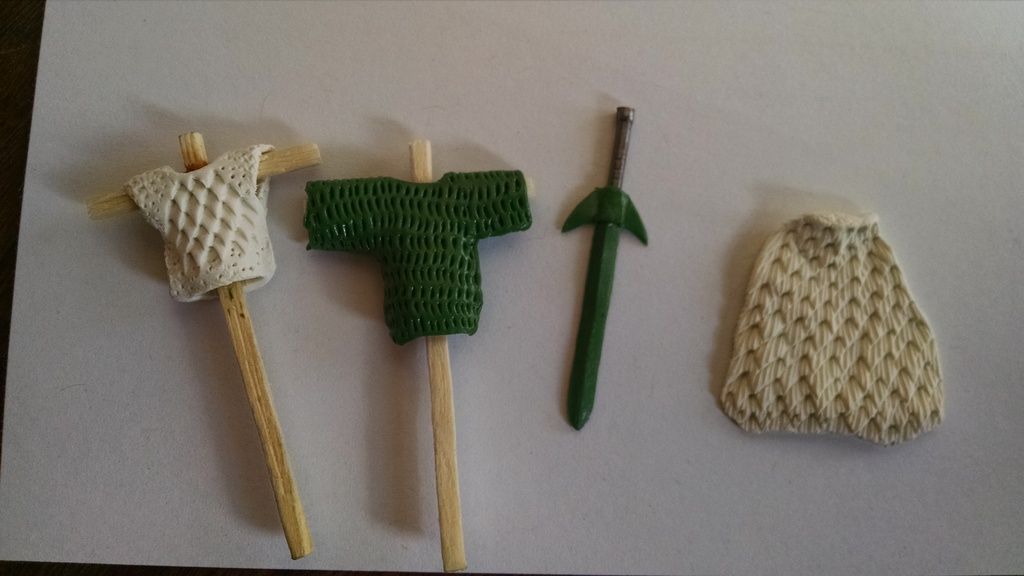  |
|
|
|
Post by curufin on Mar 20, 2015 20:23:27 GMT
Welcome aboard! And don't forget to show us what you are working on...
|
|
|
|
Post by curufin on Mar 20, 2015 17:34:11 GMT
I see. Thanks.
|
|
|
|
Post by curufin on Mar 20, 2015 14:53:32 GMT
It looks like there is a new tab in the profile page labeled "Alters". What is an alter?
|
|
|
|
Post by curufin on Mar 19, 2015 19:17:53 GMT
I got up very early this morning to get some sculpting in before work. Yes, Im enjoying it that much. I think it's going to take me a while to figure out working with the green stuff. I managed to make a chain shirt, a few more books, a stack of documents, and a belt. I added a mini for scale. And yes, things may be a little on the large scale...  I made the fur cloak, by just following along with this Youtube video. Of course, I didn't have the special tool he was using.... so I made one. It is nothing more than a series of pins with the heads cut off soldered together and epoxied into an old paint brush handle. Once the epoxy was dry, I bent the ends and filed it to a point.  |
|
|
|
Post by curufin on Mar 19, 2015 14:51:02 GMT
I have been thinking about attempting to do some sculpting for a while now. Sculpting is something that I have never really tried with any success. But after seeing Michka's Stone Giants, I felt inspired to give it a go. I bought some green stuff and dusted off some old Sculpy that I never used. I watched a bunch of tutorials on youtube and began sculpting last night. I am very interested in expanding my skill set and getting away from my 'comfort zone'. I am finding it very challenging... but fun! This is what I made:
Fur cloak, sealed scrolls, books, and a skull.

I will be continually adding to this thread as I create new things. For now (at least), I am going to be working mainly on inanimate objects to 'learn' some of the techniques. I hope eventually to be able to sculpt some minis (figures)....but that is likely a ways away...if ever. As always, I appreciate any comments, advice, critiques, or questions. |
|
|
|
Privy
Mar 18, 2015 19:29:57 GMT
Post by curufin on Mar 18, 2015 19:29:57 GMT
curufin: For the last year I have struggled and struggled to get wood textures that look the way I want. Tried washes, different base colors, different materials, you name it. Never looks how I want it to. I tried your gouge method, bought the paint colors your prescribed, and finally, FINALLY have a product that I am satisfied with. Thanks very much. No problem. Im glad I was able to share some techniques. That makes it all worth it. |
|
|
|
Post by curufin on Mar 18, 2015 15:57:39 GMT
You sure aren't pulling any punches. Great looking additions.
|
|
|
|
Post by curufin on Mar 18, 2015 1:19:58 GMT
Man, you made some great progress! The "L" shaped building is cool. Love the zen garden. Very nice mods on those minis. We really need a 'top drawer' emoji.
|
|
|
|
Post by curufin on Mar 16, 2015 23:56:14 GMT
Amazing job! It is absolutely perfect!
|
|
|
|
Privy
Mar 15, 2015 12:42:04 GMT
Post by curufin on Mar 15, 2015 12:42:04 GMT
so basically, you never put water onto your paints, you always pour them into your palette and just apply them 100% strenght. ok that sure as hell explain a bit of stuff to me, thanks for the info. those looks ridiculously well made. nice colors, nice textures, nice everything. Yes, that's right...no water. After I put a little paint on the brush, my first brush strokes are always on a paper towel, so I know exactly how much paint is on the brush. |
|
|
|
Post by curufin on Mar 15, 2015 3:10:01 GMT
Holy Snarking Wowsers!!! Absolutely beautiful work. You don't do anything halfway, do you? Thanks! And you are one to talk.  |
|
|
|
Post by curufin on Mar 15, 2015 3:01:10 GMT
I think dry brushing is all about adding depth through shading. The amount of surface detail something has is irrelevant. Dry brushing is all about three things: The amount of paint on the brush, the amount of pressure you apply on the brush, and the amount of coverage (opacity) you apply with the paint.
When I dry brush I always use the "rule of halving"
In the case of painting wood, I start with the piece spray painted black. I apply my first brown (burnt umber). I use a little paint on the bush, I use enough pressure to paint the wood BUT not enough to get paint in the grooves. I don't worry about 100% coverage... just 80-90%.
The next color (Terra Cotta) I will use half as much paint, half as much pressure, and half as much coverage as the burnt umber.
The next color (Cocoa) I will use half as much paint, half as much pressure, and half as much coverage as the Terra Cotta.
|
|
|
|
Post by curufin on Mar 14, 2015 14:20:32 GMT
The V-gouge is wood carving chisel that creates a "V" shaped cut(groove) in the wood. It comes standard in any wood carving chisel set. It looks like this:  I just run the V-gouge up and down the craft stick, holding it at varying angles and at different pressures to make grooves of varying sizes and depths. It is extremely fast and easy to do. Each craft takes about 10-20 seconds to cut grooves in. A note about wood carving chisels: this is one of those times that quality absolutely matters! The chisels I use came in a set of 5 and cost about $45USD. They are from Lee Valley, and they are of fantastic quality. They come out of the box ready to use and stay sharp. Before I bought them, I had purchased several sets of chisels from different companies and NOT one set could be used right out of the box. I spent hours grinding, filing, and honing to get them to a point I could use them....and even then they didn't hold an edge for vary long. Dollar store, Harbor Freight, and other 'cheap' chisels are made from junk steel and I find that you will spend all of your time sharpening and swearing and being in a permanent state of frustration that it just isn't worth it. I originally bought the chisels to do relief carvings on sword and knife handles, but quickly realized that they make great looking wood grain texture for miniatures. I have never had to sharpen the V-gouge and I have cut tons and tons of wood grain texture. The small list: Wood doors: 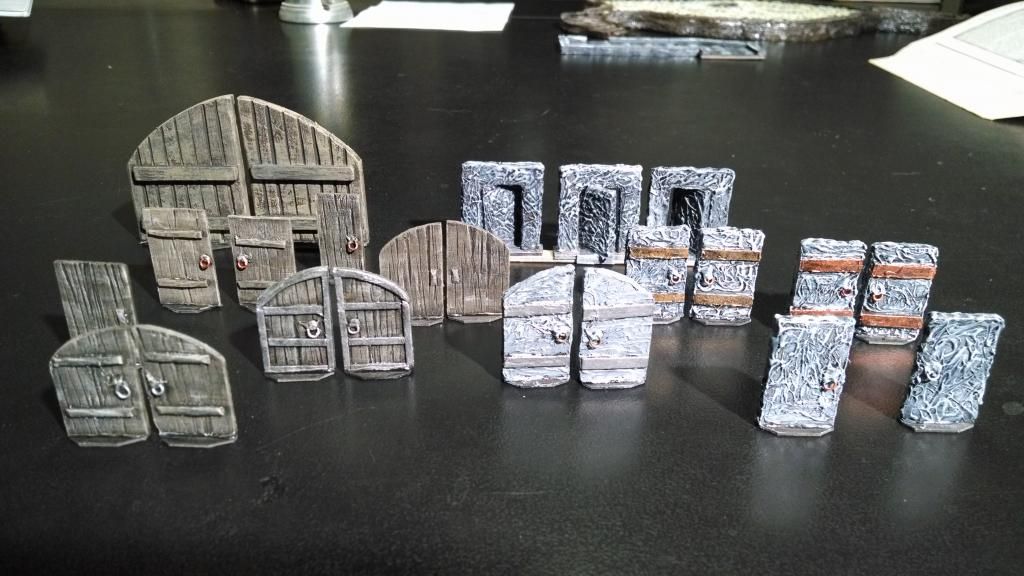 The Carpenter's house:  The Swinging Maiden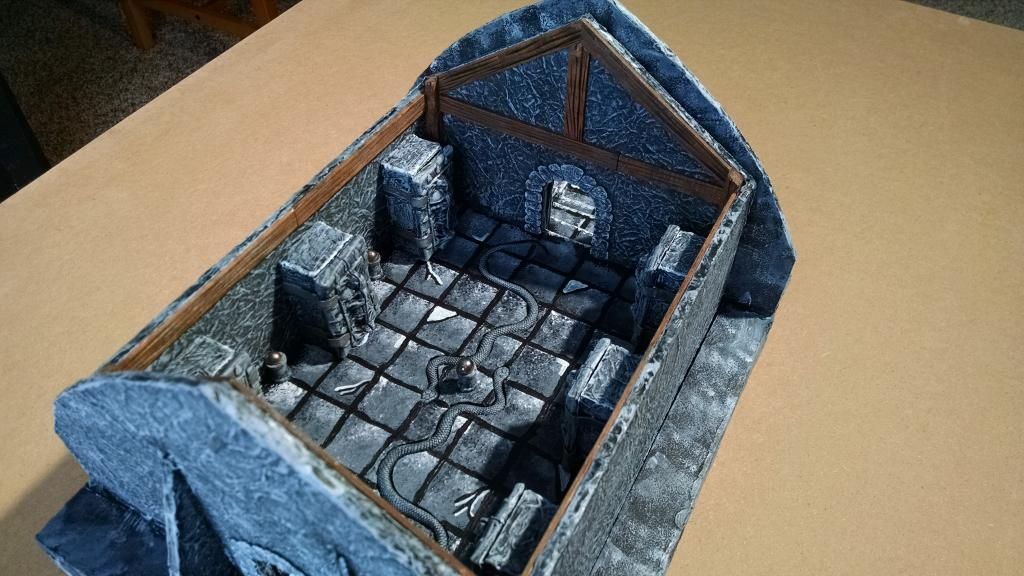 The Rat Trap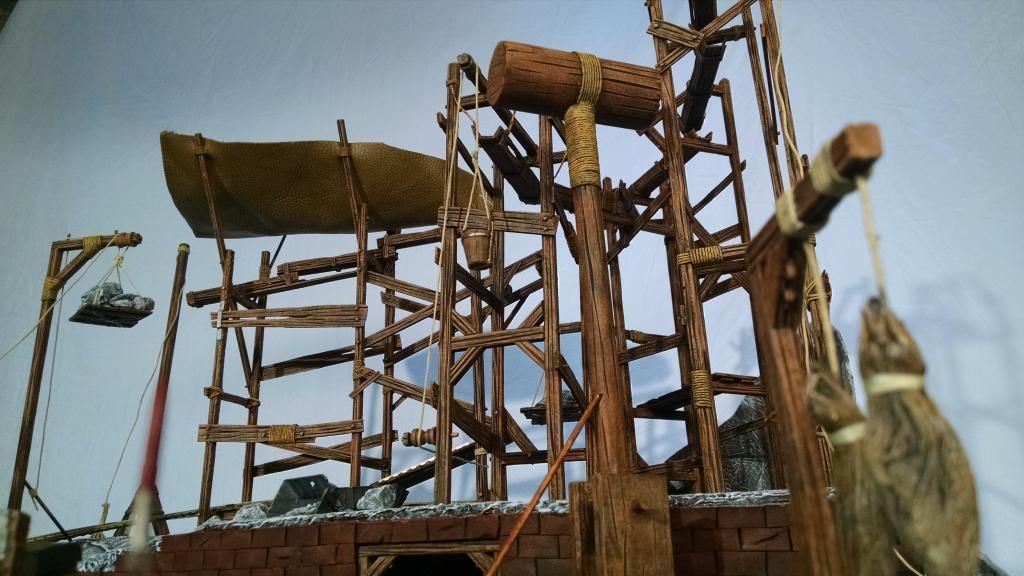 As far as painting goes: I only dry-brush. I have never done a 'wash' in my life. I dry brush all of my wood pieces the same way. 1. Base coat with black spray paint. 2. Dry brush a dark brown. I use Burnt Umber. 3. Dry brush a lighter brown. I use Terra Cotta. (It is actually a sort of orangey brown) 4. Dry brush an even lighter brown. I use Cocoa. The paints are just the cheap acrylic paints that come in the small 2oz bottles from Michaels, or another craft store. I hope this helps. Let me know if there is anything else I need to add or clarify. |
|
|
|
Privy
Mar 13, 2015 20:03:46 GMT
Post by curufin on Mar 13, 2015 20:03:46 GMT
I will get an explanation out tonight after work.
|
|
|
|
Post by curufin on Mar 12, 2015 14:37:24 GMT
Thanks everyone! Super easy built. It only took an evening from start to finish. The design could easily be altered to make sheds and chicken coops etc. Also, am I the only one adding privies to a dungeon setting?  That seems hard to believe. There must be a lot of uncomfortable people in your fantasy setting.  |
|
|
|
Post by curufin on Mar 12, 2015 13:50:53 GMT
And also Kudos and Karma for curufin who also starts this incredible idea! And to all of you Ladies and Gentlemen! I am so happy that i found this great forum here  I may have made the first post, but this was all the brainchild of tauster. he really deserves all the credit. And I will second your statement of how great this forum is! Now get crafting! (and post pictures!) Hey folks, we are running out of people interested in receiving craft stuff. How is this possible? Don't miss out! |
|
|
|
Post by curufin on Mar 12, 2015 13:27:29 GMT
I am filled with jealousy. Absolutely filled to the brim. That is the most coolest-est gaming table ever. I love the choice to make it into two tables. Was the design inspired by a casino table, or did it evolve straight out of your wish list? Thank you! That means a lot to me. It has been so long that I don't really remember how we came up with it. Likely, we were at the bar sketching drawings on cocktail napkins. We had maybe four or five design ideas that slowly evolved into the finished table. We had to built the table in two sections because we were limited by readily available lumber (4x8 sheets) and the turn radius of the basement stairs where the table would ultimately live. |
|
|
|
Post by curufin on Mar 12, 2015 13:17:07 GMT
Thanks everyone! It really is the workhorse of my D&D collection. For being little more than plywood and paint, it have given our group over 12 years of comfortable and efficient gaming. It has survived spilled drinks, metal dice, two floods, a host of excited players, disassembling and reassembling no less than 40 times, and moving across the country...twice.
|
|


 Cheers!