|
|
Post by Erasmas on Sept 10, 2015 16:33:24 GMT
I've started running Monster Slayers for my son and my cousin's children. It is a fun and super simple version of D&D aimed at introducing kids to the game. You can get the free PDFs (everything you need) from WoTC's site or from the author, Susan J. Morris's site. I'm already "off-book" and making up my own stuff, trying to keep it fresh and interject my own spin on it. The two oldest asked for custom characters, so those have been added... my wife has laminated their character sheets... I have come up with some magic items and I will soon start doling out... So yeah. The first campaign was for them to investigate some desert ruins not far from their home village. They fought some kobolds amongst the collapsed ruins (an Egyptian-styled purchased battle map I had). They then delved underground into the tomb, where they had to fight some mummies lining a corridor. Behind each of the mummies (which came to life, of course), in their sarcophagi, was a stone that could be pressed in. Once each of them was pressed, the door into the next room could be opened. Inside was a large chamber with four columns and scattered treasure. However, looming over the treasure was a hydra! Here is the piece I made for the last session we played (the mummies and the hydra). 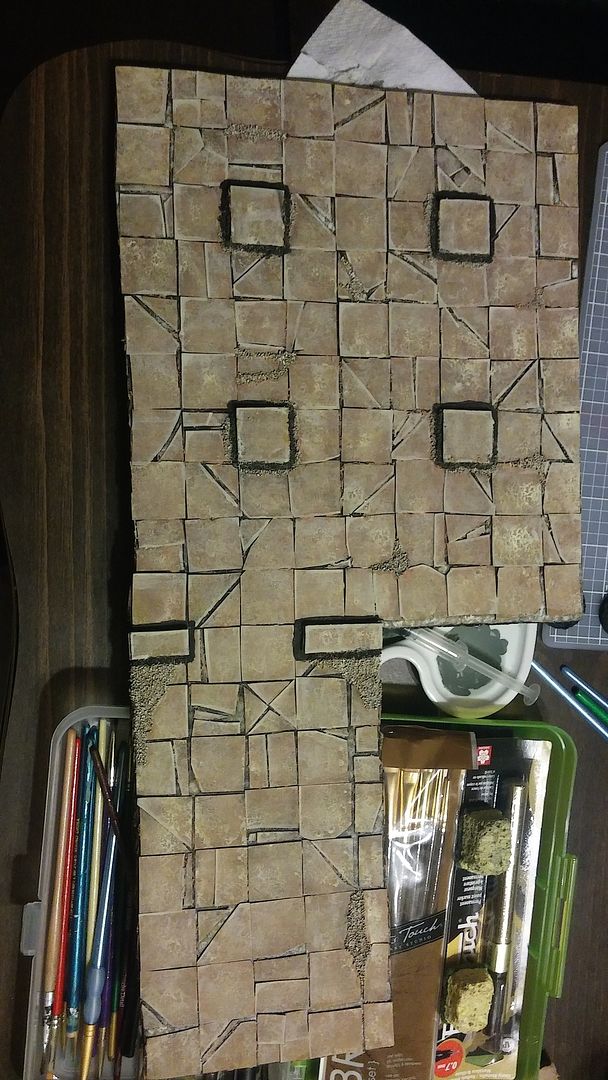 Next session, they asked for "something in a swamp". So they will be traipsing through a nasty bog and will have to fight some will-o-wisps. I will lay a green/brown cloth down on the table and lay out some cardboard "dry spots" of raised ground where they will be able to get out of the muck. I don't have any of those made yet, but they should be simple enough to do. But the session after that, they will be entering into an old overgrown temple that has partially sunken into the swamp and is now infested with lizardfolk. And that, I am nearly done with. It will be a two part thing, much like the last one, as their attention spans don't hold out much past that point. As the second room is the more plain of the two, I will show that here first. Once again, double-layered cardboard with cardstock tiles. Cut out the square area in the center down to the first layer of cardboard and painted it up to look like a pool. I will add some hot glue ripples and then coat the whole area in Hard-as-Nails to give it a shine. Hot glue vines here and there. You can also see the throne I made - just pieces of foamboard with the paper peeled off and glued together. 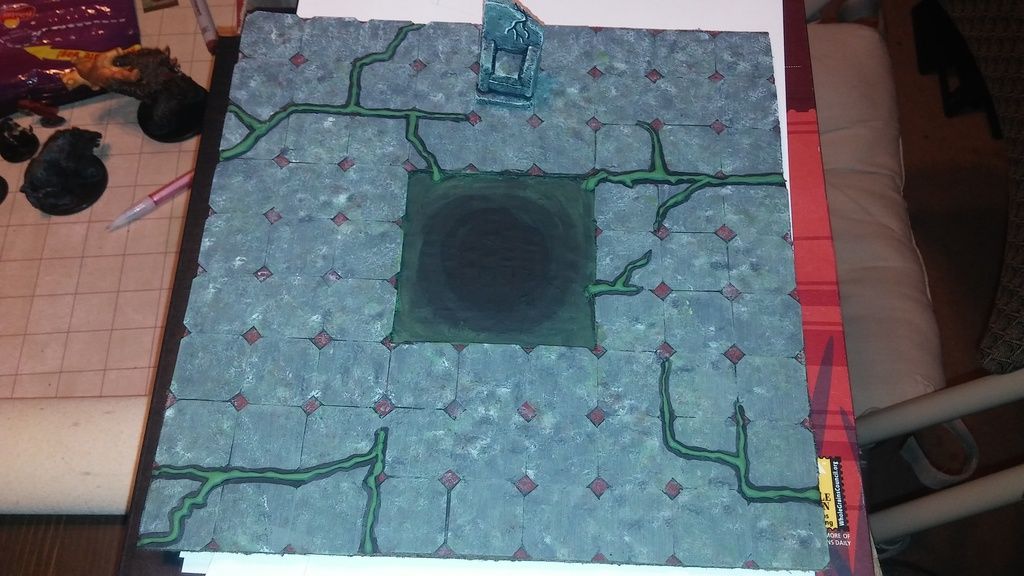 With the first room that they will go through, I loved the idea of having two trees that had dominating the space as part of the walls. I haven't put walls on any of this stuff because there really hasn't been much of a need thus far with it only being two rooms. However, this gave me the chance to finally try out DMScotty's tree-making methods. I have to say that I am very proud of how they have come out. The "muck" portion of this tile still needs to be painted... as I'm not 100% sure what color(s) I want to use yet. 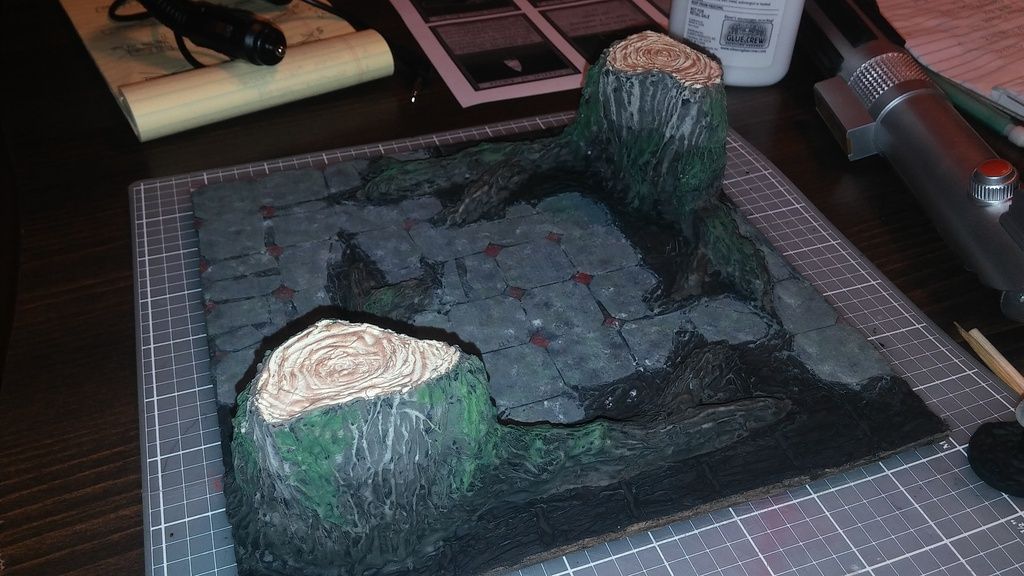 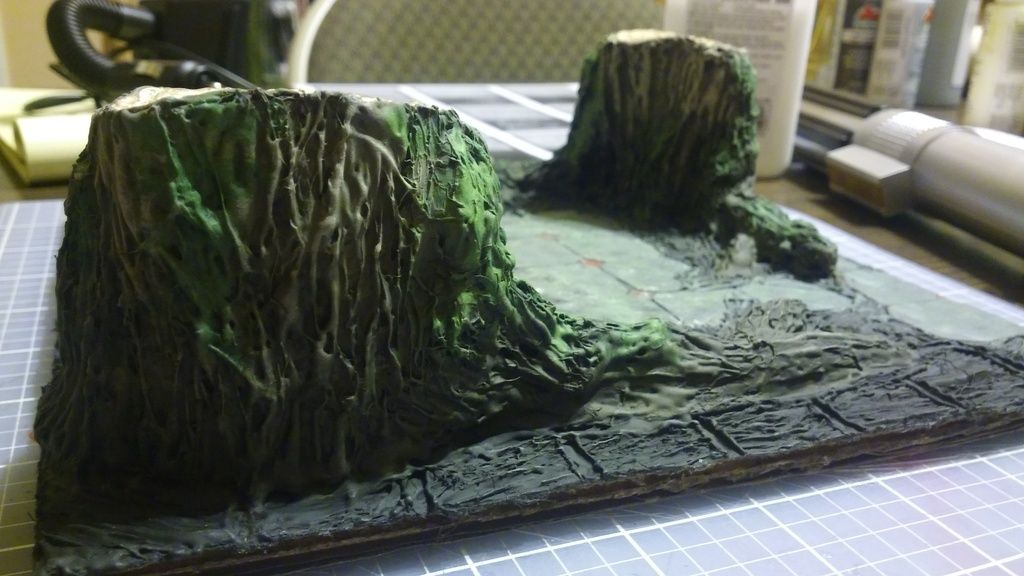 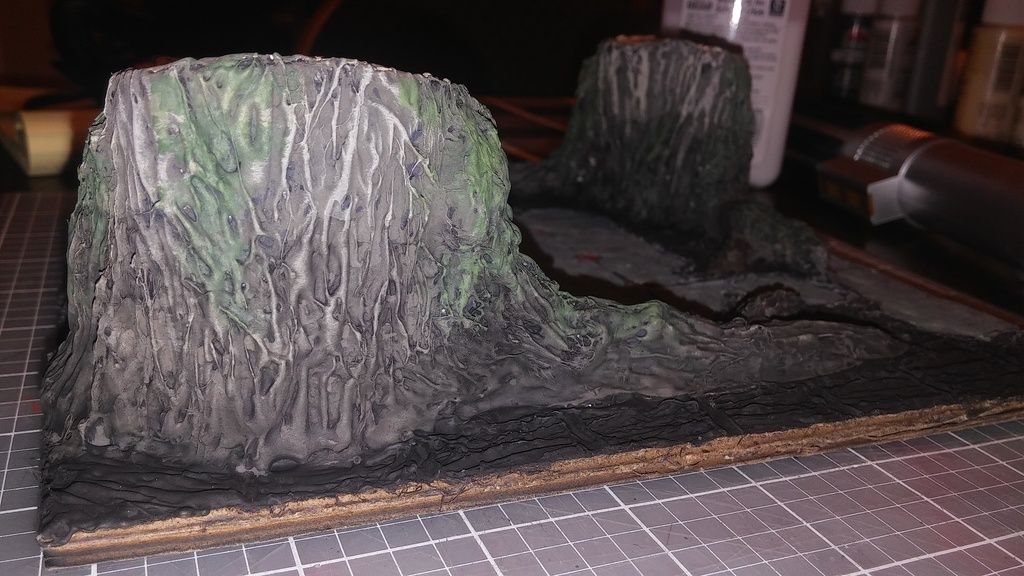 |
|
|
|
Post by Erasmas on Sept 11, 2015 15:52:50 GMT
Got a picture of the Will-O-Wisps I will be using. I took three clear beads from my wife's "Junk Bead Jar" and put a dab of hot glue on the tops just to keep the stem from going all the way through. I was going to use some head pins with flat tops to them, but she didn't have any of those. So, I cut some lengths of large paperclip (slightly bigger gauge than the smaller ones) and pin vised some holes into the center of the bases. Superglued everything together, shaped the blob of hot glue on the tops a bit, and covered the bases in more hot glue "muck". I 'primed' the stems and bases with black acrylic since I wanted to avoid covering up the beads themselves. Whatever colors I end up doing the muck in the Tree Room, I will match the bases of these with. The stems will stay black. Not sure yet, but I might end up doing some kind of metallic or glitter wash on the actual Wisps.  |
|
|
|
Post by bluecloud2k2 on Sept 12, 2015 10:38:59 GMT
The Dungeon Tile with the trees is very Ocarina of Time-esque!
Very cool stuff!
|
|
Jayzhee
Paint Manipulator
 What should I work on today?...
Posts: 106 
|
Post by Jayzhee on Sept 12, 2015 12:53:59 GMT
The trees are very well done!
I like the wisps, too! I could run an encounter with a ton of them on the cheap!
|
|
|
|
Post by Erasmas on Sept 28, 2015 19:16:02 GMT
So, I finished up most of the terrain pieces for the kids' game I've been running lately. I still need to finish the ripples and water effects on the Pool Room, but it's all ready to rock-and-roll aside from that. The two rooms of the Jungle Temple (since named the Temple of Lazgren) won't be needed until our next session, so I'm off the hook on that for a bit. But here is what I got done for our session yesterday! I had cut out a series of irregular shapes of double-layered cardboard a while back, and glued a few shapes of single-layered on top of the larger ones. These were going to be spots of "dry land" among the swamp where they would be trudging. I covered the lower levels with swirls of hot glue, flocked certain sections of it (including the raised portions), and then painted them up. The wet look was achieved with Hard-as-Nails painted over it once it was dry. 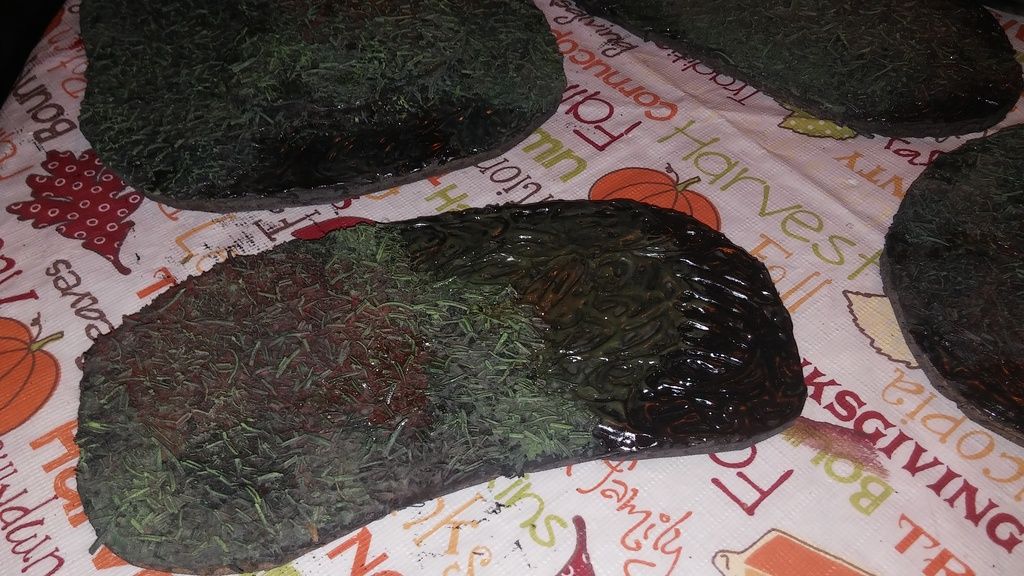 And here are the Wisps all finished. 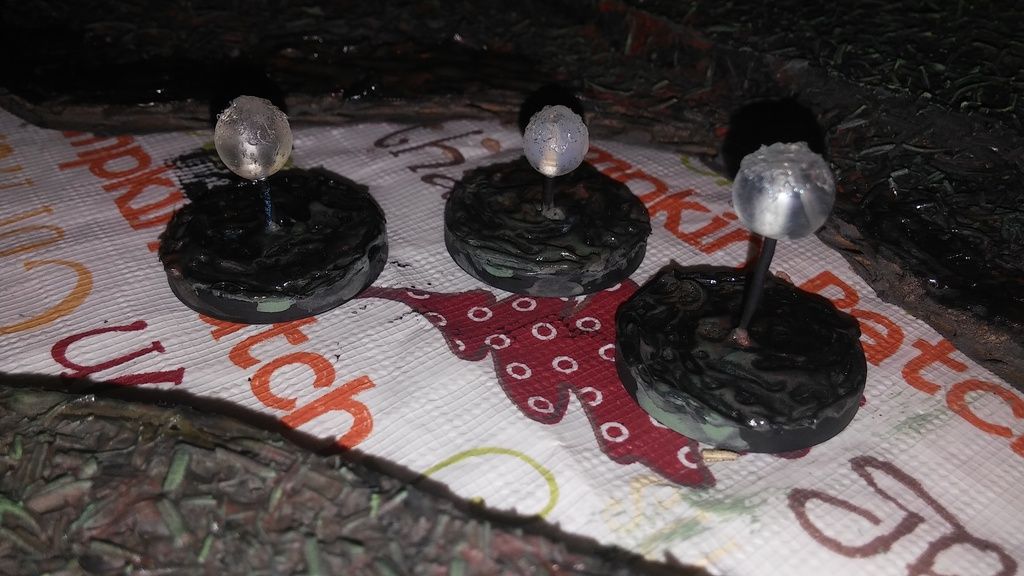 And, the piece that I am most proud of, the Tree Room. Finished it in the same painting scheme as the others that had the muck on them, though I think the black wash on this was a bit heavier than the others. 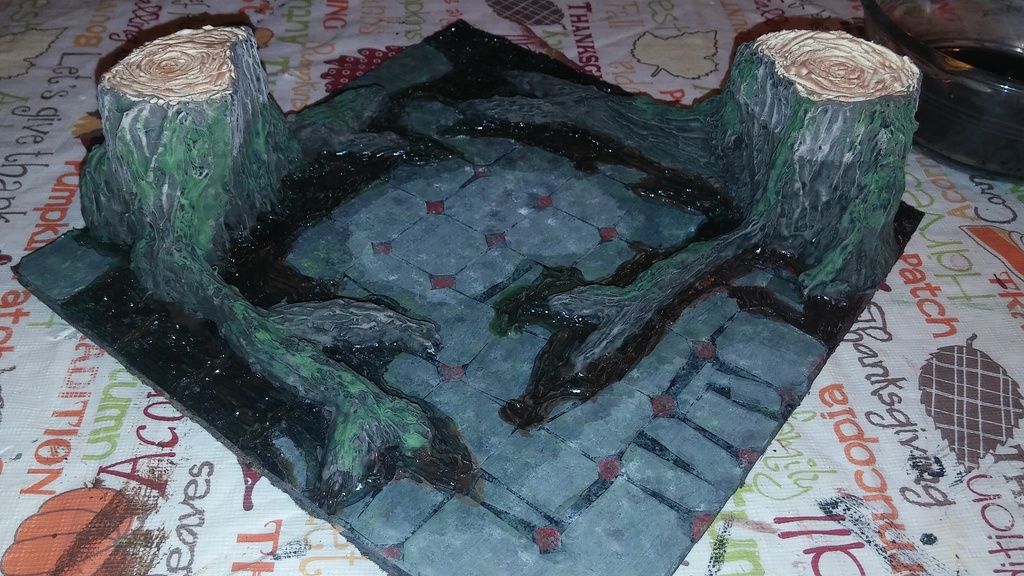 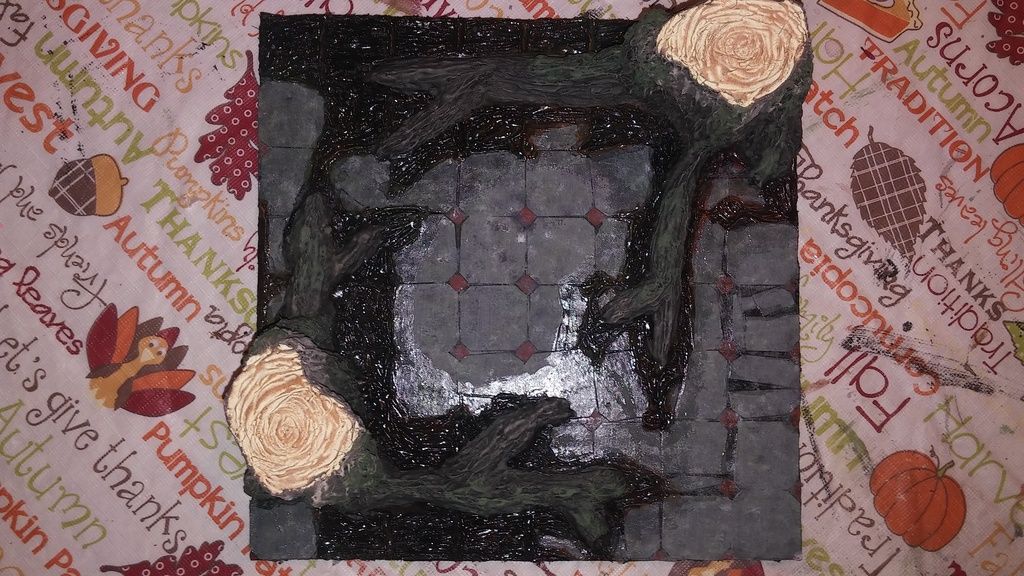 And here are a couple of pictures of us playing! The greenish cloth is swamp water, which they had to swim through. Since there was no grid for this part, I made two measuring strings.   |
|
|
|
Post by bluecloud2k2 on Sept 29, 2015 19:49:25 GMT
Very kickass!
|
|
milojaggerson
Paint Manipulator
Laying tile on the floors...
Posts: 161
|
Post by milojaggerson on Sept 30, 2015 15:23:18 GMT
I'll bet the kids really had a blast. Kudos and exaltations for you, and karma, too!
|
|
|
|
Post by Erasmas on Sept 30, 2015 15:31:18 GMT
They did have a blast. The oldest one (he's 10, I believe) is definitely "smitten" with the idea of the game and with crafting! It is so awesome to see them saving cardboard boxes and broken toys and asking me what we can do with them.
|
|
|
|
Post by skunkape on Oct 20, 2015 15:16:25 GMT
You've added more good looking terrain pieces since I last looked at the thread!
|
|
|
|
Post by Erasmas on Nov 12, 2015 21:54:38 GMT
Not really a crafting update, but this was just too funny not to share with you guys. My son came to me and thrust this in my face and said, "Daddy, look... now I have a glue gun!" He was so proud of himself and, I must say, it looks pretty spot on!  |
|
|
|
Post by Erasmas on Dec 22, 2015 17:53:07 GMT
I haven't done any work on this guy recently, but in re-reading my way through this thread, I noticed that I had mentioned him but never posted any of the pictures. One day while strolling through Toys'R'Us, I noticed this bin of brown African elephants. Scale-wise... it immediately made me think of the oliphants from LotR... and so, I absolutely had to get one. I do not have any pictures of what he looked like before, nor can I find any of this particular one online. The first thing to do was to repaint him. Brush base-coated him in black and dry-brushed up to gray. I re-watched the movie scenes with them in it and (pausing it multiple times) I copied the tribal markings on them. For the sides/angles that were not covered in the film... I just made it up as best I could. It was left intentionally rough, as it is supposed to be warpaint after all.  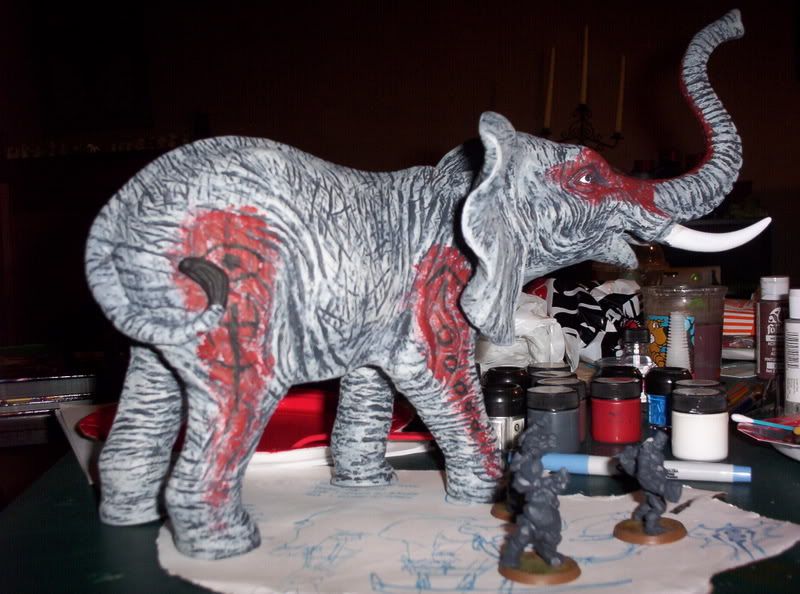  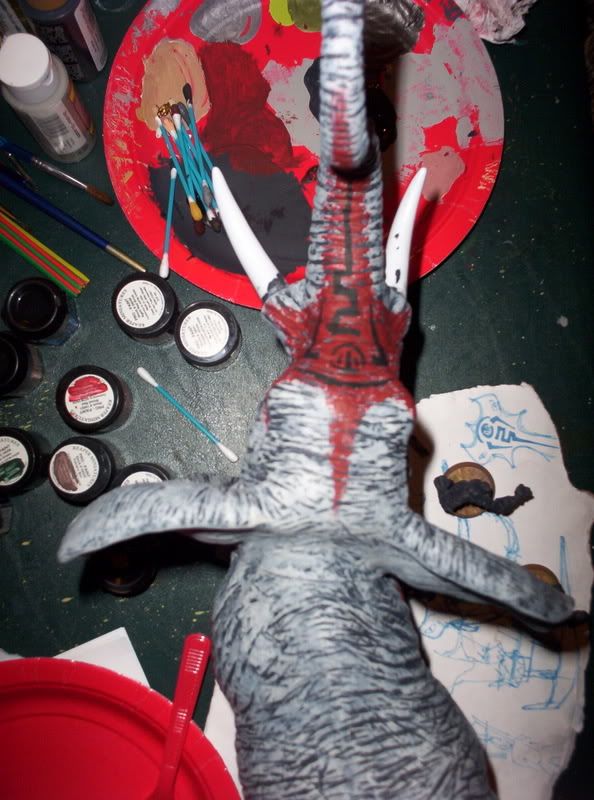 I nicknamed him "Masood", as he was originally being made for playing with HeroScape and that was the name I had arrived on. At some point after these pictures, I removed his tusks, since oliphants should have the massive, curling, spiked tusks... but set them aside as the secondary tusks that they have. He then sat on my shelf for years, sadly. The tusk issue I still have not yet resolved. But, he is a back-burner project for the time being... so it isn't pressing enough to hammer out a solution for just yet. Anywho, years later, I finally put some more work into poor neglected Masood. I pierced his ears and put some jewelry rings in them. I braided and attached some hemp cording (for making surfer necklaces and the like) to these rings to serve as reigns. For the platform, I used bamboo skewers and craft sticks for its construction. I broke them in most of the places where cuts needed to be made, in order to keep it a bit more "barbaric"-looking. I carved woodgrain into the planks and actually lashed things into place with more hemp cording before gluing them together. I am an Eagle Scout, so it was nice to get the chance to practice these once again! I then stained all of the wood, trying to leave it as natural looking as possible. I cut some leather straps and hand-sewed them on, with some more jewelry rings as the buckles... this formed the harness to hold the platform in place. It is still removable this way! I took a deer from an animal tube type thing and reposed it with the boiling water/cold water technique; then repainted it. Some more hemp cording made a coil of rope. My wife made a couple of bedrolls out of fabric with a deep "nap" to it (good texture) and a few items out of Sculpey (a waterskin and a ham (which still needs to be painted and strung up). Not pictured is a small lamp that came out of some Reaper pack or another, hung from the middle of the second story platform. I hung all of these various things from the upper structure to look like supplies for these travelers that ride atop of good ol' Masood's back. 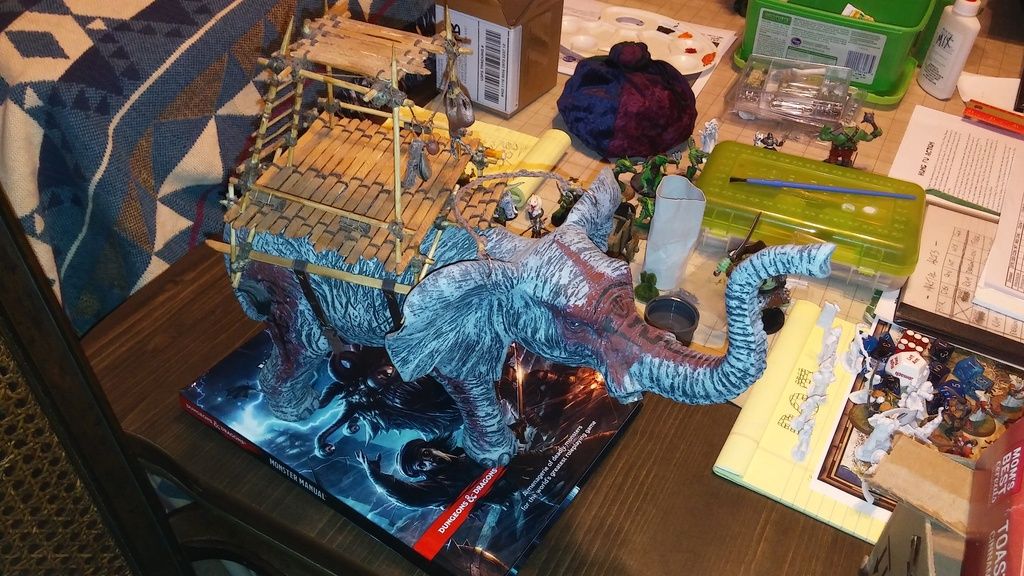 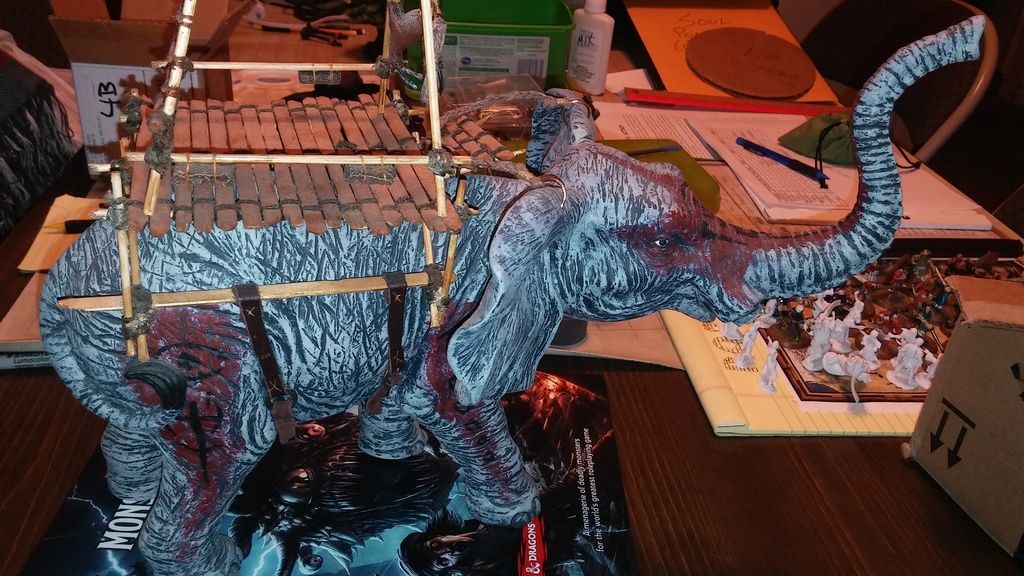 He is still needing to be completed. Like I said, I still have to work something out for his tusks - which will have a spiked rope strung between them when it's all said and done. I also want to make some "tent flaps" for the sides of the upper area, to make it look like they can close it off when they want to. But yeah... there is Masood, in all of his unfinished glory! |
|
|
|
Post by DnDPaladin on Dec 22, 2015 19:58:10 GMT
they should definitely have a nitro generating lab up there. XD
this is the kind of ride my barbarian character would definitely play drums on !
|
|
|
|
Post by SpielMeisterKev! on Dec 23, 2015 4:31:19 GMT
Howdy,
DUDE! You... are... KILLIN' it!
Seriously,
Kev!
|
|
|
|
Post by kgstanley81 on Dec 24, 2015 5:02:34 GMT
I missed this intire thread, just looked through it, wicked awesome stuff man, makes me think I should look at tracker supply and see how big the elephants are there
|
|
|
|
Post by Erasmas on Dec 28, 2015 16:35:04 GMT
I asked my son where he thought the Kids' Campaign should go after they finished up with the swamp and the Temple of Lazgren. His answer was... a volcano. So, I set about making a lava field piece where they would have to jump across, leaping from safe spot to safe spot (what kid doesn't love that game?). I glued down layers of double-corrugated cardboard after cutting them out into odd shapes. I then formed the flow of the lava with hot glue, dragging the tip through it and trying to keep some semblance of fluid dynamics in mind. I then textured the non-lava areas with craft sand. 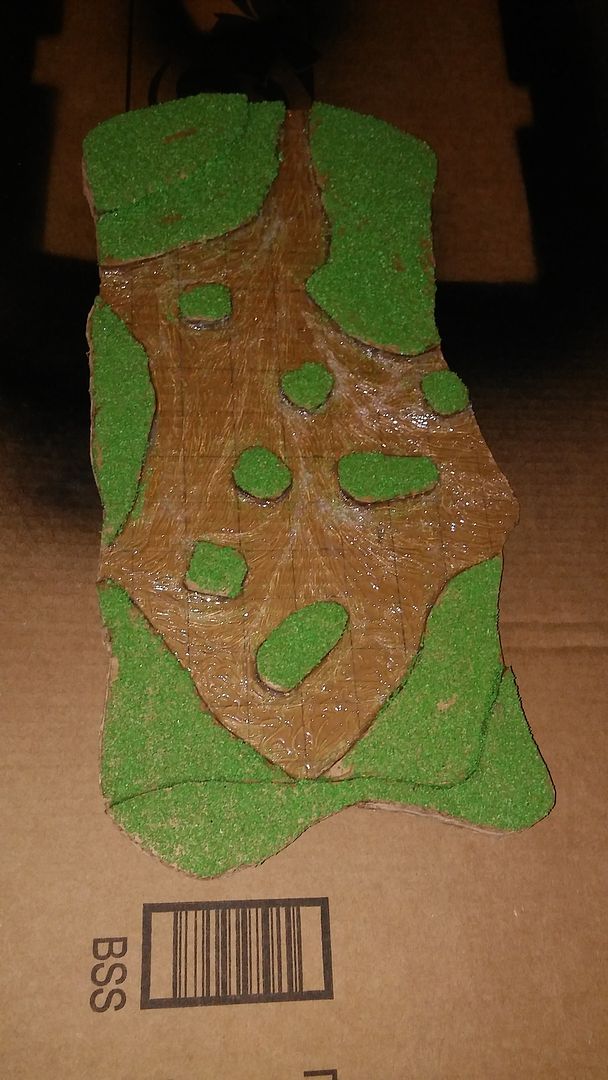 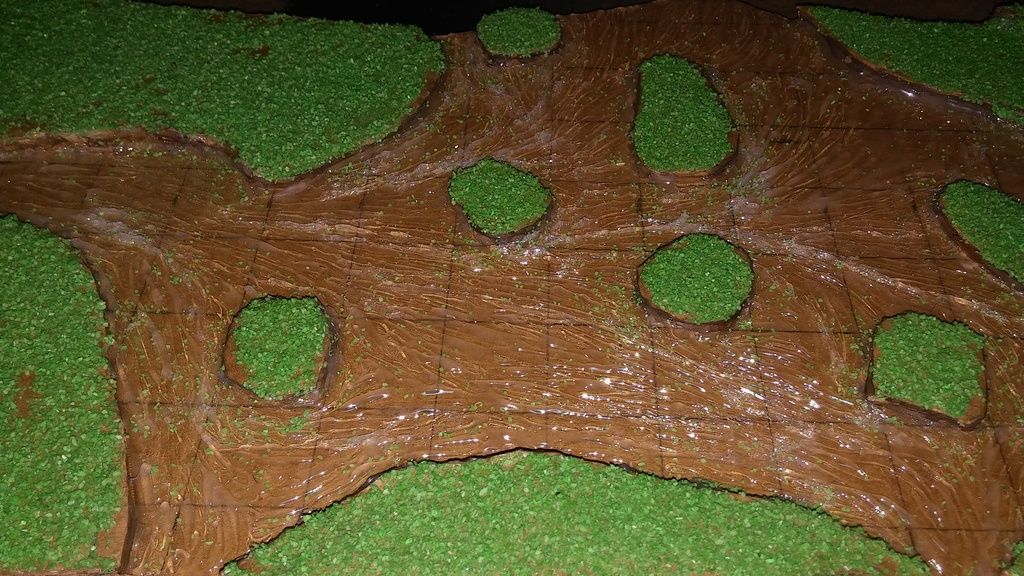 The airbrush seemed like the best candidate for getting the lava painted up. So, that's what I did! Again, as I worked, I tried to keep in mind how lava would actually flow - with the hotter parts being the fastest-flowing, causing the lighter/brighter color to be in these parts. And I am very happy with the results that I managed to get. 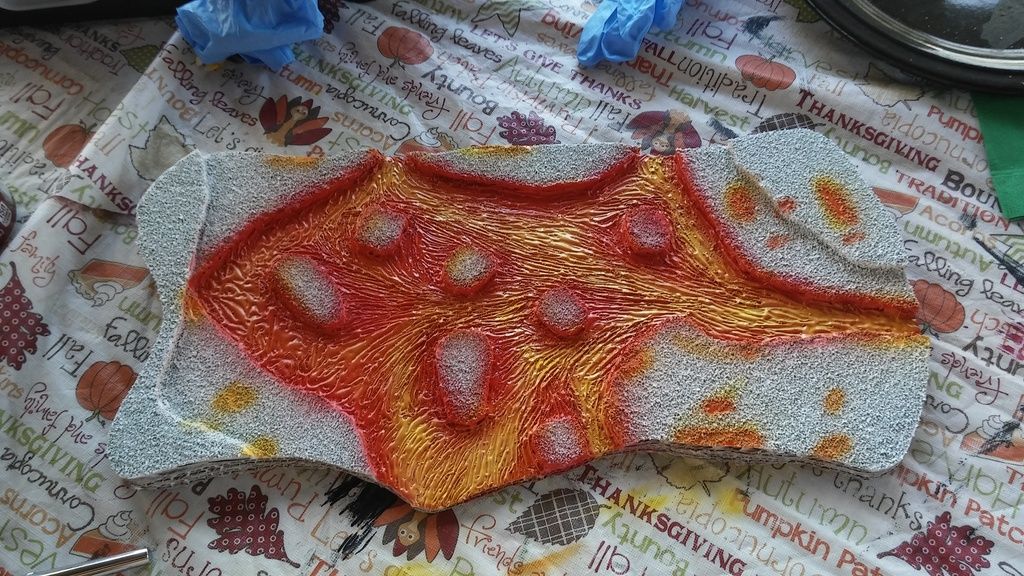   I then painted the non-lava areas with black and built up the highlights with grays. I kept the more extreme highlights along the edges and places where the lava was "peeking" through the ground. 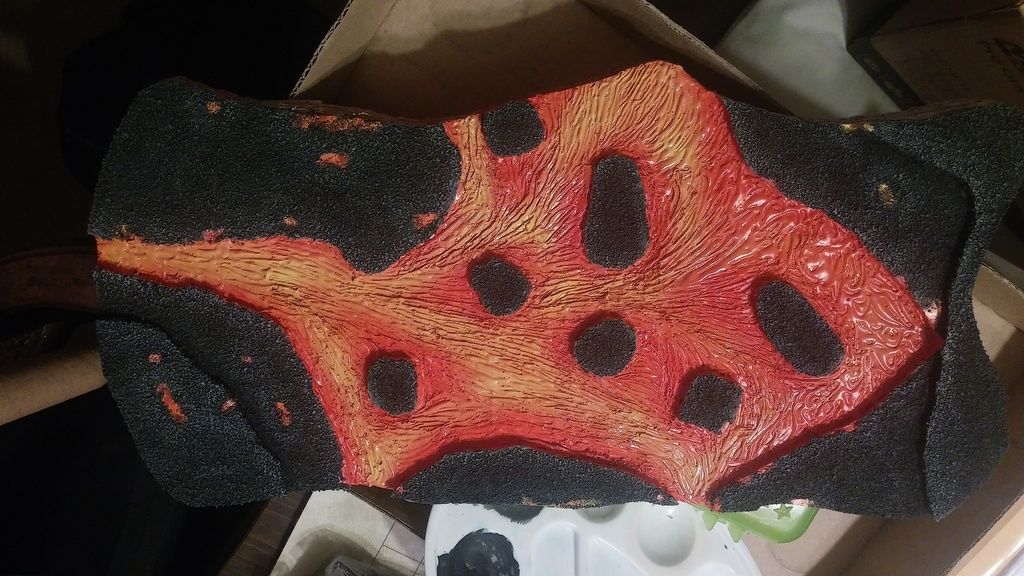 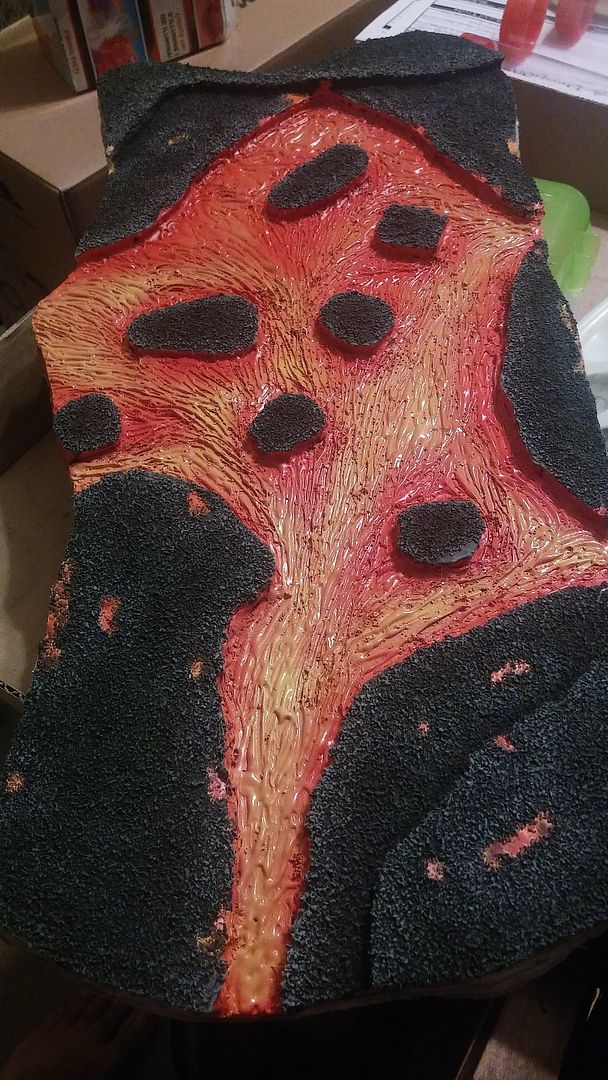  At some point, my son mentioned the lava spurting out and sending magma flying about. Of course, I thought this was a brilliant idea and had to make some. I took three washers (two smaller, one larger) and glued in sections of bent paperclips. I then built up blobs of hot glue along their lengths and textured the bases in a similar fashion to the lava itself. 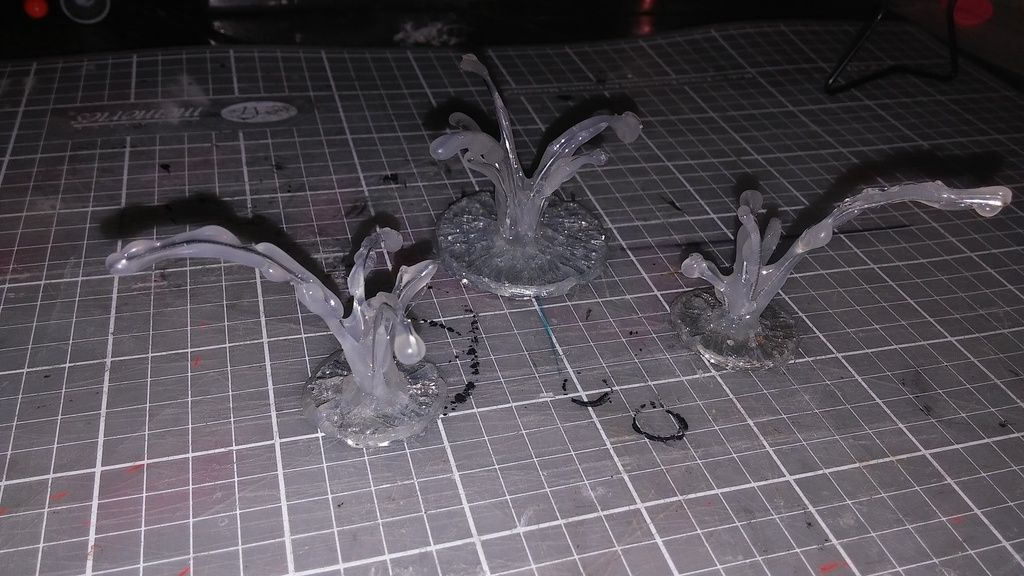  I have not painted these as of yet, but they are primed and ready to go! After they were primed, I noticed a few spots that could've been built a little better (holes, strings, etc.), but such is working in a clear medium I suppose. I think that the painting will hide most of my sins fairly well.   |
|
|
|
Post by sgtslag on Dec 28, 2015 17:26:19 GMT
The lava plumes are brilliant! They make a great additional hazard for PC's to dodge while they dance across the hardened lava rocks... Consider these stolen for every liquid lava board to come. Cheers!
|
|
|
|
Post by tauster on Dec 28, 2015 18:26:55 GMT
Awesome stuff! Love the lava spurts. You could glue little pebbles (those with rough edges, or the round ones...) on the ends of the spurts and paint them black-ish, so you would have rocks exploding all over the place. Adds some bludgeon/blunt damage to the fire damage of the flying lava. See here for a tutorial (though I don't think you need a tut...) |
|
|
|
Post by skunkape on Dec 31, 2015 15:02:45 GMT
I agree, the plumes do look great!
|
|
|
|
Post by Erasmas on Jan 1, 2016 2:08:37 GMT
Thank you guys very much!
Now I just have to decide where the colors need to vary on them. Would the coolest (aka reddest) part be the end of end tendril, since they are the furthest from the source? Or would they be the hottest since they have, arguably, the greatest potential energy?
|
|
|
|
Post by sgtslag on Jan 1, 2016 2:19:41 GMT
They would be the coolest, most distant bit. The cooler, the darker, for lava. The hottest would be bright yellow, the coolest would be dark red. Cheers!
|
|


 Cheers!
 Cheers!