|
|
Post by Erasmas on Nov 5, 2014 20:40:19 GMT
Thank you!
Man, I really hope so. I just tested out the rules system that I am basing everything on for this game last night with a buddy of mine. It was a LOT of fun... so hopefully that will carry over across the conversion.
|
|
|
|
Post by DnDPaladin on Nov 6, 2014 5:53:22 GMT
man i'd love to play in a tron game session !
i imgine the players throwing disk and bouncing them off to fight people.
them getting away by jumping and getting on lightcycles !
man, nice job for sure ! these looks sick !
|
|
|
|
Post by Erasmas on Nov 6, 2014 6:24:36 GMT
Thank you very much.
Hopefully it ends up being as fun as it seems in my head! And yes, all the things you were talking about are intended on being a part of the game.
|
|
|
|
Post by Erasmas on Nov 7, 2014 20:20:39 GMT
I got some Games Workshop Skaven minis from noctuary, which is totally awesome of him! They aren't finished yet, but here is their progress. I nabbed two of the multitude of square slotted bases that I have and prepped them. The one pictured here has a square of receipt paper (from mini purchases) glued down to hide the slot, since I won't be using them on these guys.  Both of these are going to be sewer-dwelling nasties. One of them I wanted to have on a slightly raised walkway beside the muck. So, I cut out a piece of cardboard and cut the inner edge to resemble uneven stones. I then cut pieces of single layer cardboard (cereal box) into individual 'stones' and glued those down in place (purposefully misaligned). I then got the hotglue gun and filled in the muck river beside it, as well as filled in the corrugation on the sides. Note: you can see the thin strip of receipt paper underneath the glue here, likewise covering up the slot.  Now, one of the beautiful things about these guys is that they come in pieces... so you can essentially pose them in a variety of different ways (something that I am not used to, as I mainly use Reaper). One of the arms was a wicked-looking spear, but I liked the look of it straight up as opposed to being held 'lance style'. Now, with it this way, the bottom of the spear came nowhere near his feet. But, I decided to put this guy directly in the sewer sludge; so I cut off his feet at the ankles and pinned him to the base. I then made ripples with the hotglue gun coming out from around him, as well as a dollup at the base of his spear - both to secure it and to serves as ripples as well. Since these are wererats and I wanted their equipment to be gross and well-worn, I filed down several parts of his spear and slapped a beat-up-looking shield on him. After the ripples, I coated the entire base in PVA glue to seal it all a bit more as well as to make the contrast between crest and valley a little less severe.  Here's the other guy, now pinned down. He had a nasty-looking curved knife, which I further notched and dinged up. Likewise, the shield I choose for him was a little too "pristine", so I drilled some holes and divots into it... and then added a short section of wire that will later be painted to look like a partial arrow shaft.  Here they are primed black and beside one another...  And the same angle with them at the stage of painting that they are presently.  And the spear-user thus far...  And the one that doesn't want to get his feet wet...  |
|
|
|
Post by tauster on Nov 7, 2014 20:56:25 GMT
Plase keep going with these step by step tutorial! This is exactly what I'm looking for: each step of painting a mini.
Thumbs up: The bases are great, and I love the way you made one shorter and put it in the water!
|
|
|
|
Post by Deleted on Nov 7, 2014 20:59:07 GMT
These are awesome! Good stuff man. Glad you could put these guys to use.
|
|
|
|
Post by Erasmas on Nov 7, 2014 21:50:18 GMT
Thank you guys! I work on several projects at the same time, usually. So, I will go ahead and showcase something else that I am working on. I will be running an Oriental Adventure-esque game in the near-ish future and got ahold of several asian-themed figures a while back. As I was basing the others, I really wanted to try something else with this particular mini - I had done a couple on grass, given one of them a rettan-style floor, and done a few on zen garden gravel. So, I decided to just go for it and placed this archer in a grove of bamboo stalks, to seem as if he had been hiding and was about to take his fatal shot. In this picture you can see the naked miniature, the sections of rounded toothpicks and skewers that I cut for this, as well as some dried rosemary (which will become the leaves).  I then hotglued all of the uprights into place, including a broken one that I had lean against the stalk next to it. I also glued down a layer of loose rosemary to simulate fallen bamboo leaves covering the ground of the forest floor. Now, I can hear you saying "But Erasmas, isn't that going to be extremely hard to paint, now that you put all of that stuff in the way?!" And the answer is... yes, yes it will be. Why did I do this to myself? Sometimes you just have to go with an idea... the consequences are Future Erasmas' problems.  And here are the leaves glued in place. I used superglue for this, as it ended up being the best thing to work with for this particular task. However, applying each of these with tweezers and contending with the superglue AND static was... a beast, to put it nicely. Lots of cussing on this project. But, I used the leaves to brace the uprights against one another - also attaching them where they crossed with more superglue and using the same to coat the entirety of each leaf as well. From what I can tell thus far, it is all surprisingly stable and secure. And I am really, really happy with the results. We'll see how the rest of the process goes.  |
|
|
|
Post by tauster on Nov 7, 2014 22:28:28 GMT
Now, I can hear you saying "But Erasmas, isn't that going to be extremely hard to paint, now that you put all of that stuff in the way?!" And the answer is... yes, yes it will be. Why did I do this to myself? Sometimes you just have to go with an idea... the consequences are Future Erasmas' problems. Oh how much I know that...  I've been there several times before. Most often I come out of this trap with some new, useful stuff learned. But sometimes I don't, end the trap project ends up in some corner to gather dust. So far, no such project has been smashed in rage, so I consider myself a emotionally balanced crafter.  |
|
|
|
Post by beetlewing on Nov 7, 2014 22:40:21 GMT
Looks awesome so far!
...and I guess I'm a wimp - I would have painted everything and then assembled, though I do understand that feeling of "must throw reason to the wind and craft it NOW" haha
|
|
|
|
Post by DnDPaladin on Nov 14, 2014 3:08:21 GMT
unfortunately i haven't found any of those wood chips or those bases, somehow none of the market stores sells them.
so i'll have to find washers i guess.
|
|
|
|
Post by Erasmas on Nov 14, 2014 3:58:39 GMT
Not sure what wood chips you mean... the only wood I used are the toothpicks and the skewers. I'm not 100% certain, but I think the plastic square bases are GamesWorkshop. There are actually some that I really, really like that I usually reserve for my PCs or major villains. They are the 10mm rounds from Malifaux and are actually very reasonably priced. Just as a suggestion, if you're in the market.
|
|
sadric
Paint Manipulator
 crafting not enough, not enough time. :-(
Posts: 199 
|
Post by sadric on Nov 14, 2014 8:05:11 GMT
Thank you guys! I work on several projects at the same time, usually. So, I will go ahead and showcase something else that I am working on. I will be running an Oriental Adventure-esque game in the near-ish future and got ahold of several asian-themed figures a while back. As I was basing the others, I really wanted to try something else with this particular mini - I had done a couple on grass, given one of them a rettan-style floor, and done a few on zen garden gravel. So, I decided to just go for it and placed this archer in a grove of bamboo stalks, to seem as if he had been hiding and was about to take his fatal shot. In this picture you can see the naked miniature, the sections of rounded toothpicks and skewers that I cut for this, as well as some dried rosemary (which will become the leaves). This are sooo cool. Have to try this technic myself (possibly for terrain tiles). But take mental note to paint the miniature first. I fear that with my chaotic way of storing miniatures/terrain tiles the halflife period wile be fairly short. |
|
|
|
Post by DnDPaladin on Nov 14, 2014 22:12:28 GMT
Not sure what wood chips you mean... the only wood I used are the toothpicks and the skewers. I'm not 100% certain, but I think the plastic square bases are GamesWorkshop. There are actually some that I really, really like that I usually reserve for my PCs or major villains. They are the 10mm rounds from Malifaux and are actually very reasonably priced. Just as a suggestion, if you're in the market. some of the guys here have been using wood chips that can serve as bases for creatures. they are like round 1 inch wood pieces. dont know if they are doing it themselves. but some have said that they had found them in stores. and bought them for very cheap. but somehow i never found anything of the sort, not even in RONA or other places like that. |
|
|
|
Post by beetlewing on Nov 14, 2014 22:51:37 GMT
Ahh... He means the 1" Woodsies discs.
|
|
|
|
Post by Erasmas on Nov 26, 2014 16:59:50 GMT
I've still just been putting away with things that I need for future games (mostly). But it has been a while since I've contributed anything instead of just sprinkling karma all over the place, so I decided to post a few pictures. First up, I have always... always... wanted to make a gelatinous cube miniature. I had done all kinds of research into making them out of resin and acrylic and whatnot, but I kept hearing about how messy/expensive/difficult that similar projects were, so I wrote it off. The D&D Miniatures line came out with one that had a hinged side to it so that you could put minis inside of it, but I didn't care all that much for the appearance of it and tracking down an individual mini of theirs can be tough and expensive as well. And so, when I saw DMScotty's tutorial video on how to make one cheaply and easily... and saw how awesome it looked when it was finished... I knew that I had to make one for myself. It seriously took me one entire big glue stick and about half-an-hour tops (with cooling time included)! Behold the magnificence.   |
|
|
|
Post by Deleted on Nov 26, 2014 17:11:16 GMT
Nice work man! This was the first monster I created using dmscottys method as well. I used the scraps from an I pad screen cover.  |
|
|
|
Post by Erasmas on Nov 26, 2014 19:53:06 GMT
And here is one of the TRON guys with the UV-reactive paint put on him (the picture is taken with the blacklight, as well as with the normal lights so as to actually be able to see anything). The glow is barely perceptible, but it is there. And it looks really, really badass in the dark! At the top of the picture, you can also see a few of the "bytes" that I am working on for the game to go with these guys; they are orange and are on their 0 sides.  And on a totally unrelated project, I am still amassing Asian-themed miniatures as well. These two are from Spartan Scenics and are for some kind of steampunk-y WWI-inspired game, but they work well enough. I decided that I wanted to put one of them on a ratan floor and the other amid a rice paddy. I cut the latter off at the top of his boots, put some rosemary standing up (same as with the leaves on Bamboo Guy, listed above) and there we have it. The former's ratan flooring is just round toothpicks, snipped to length.  |
|
|
|
Post by Deleted on Nov 26, 2014 20:12:52 GMT
Get out of my brain. I was just about to ask you when you were going to have more tron stuff up. I love it the paint job is great! I want to see more of this bamboo work your doing too. Stuff is stellar brother. Also how is the bit system playing out?
|
|
|
|
Post by Erasmas on Nov 26, 2014 20:58:13 GMT
Thanks, Noc! I went ahead and updated the other thread I already had going. |
|
|
|
Post by Erasmas on Apr 2, 2015 17:33:03 GMT
While I was ordering minis for my Asian-themed game, I came across this awesome one and just had to get him. He is an Arabian bodyguard-looking guy, a Harem Eunuch or something similar. 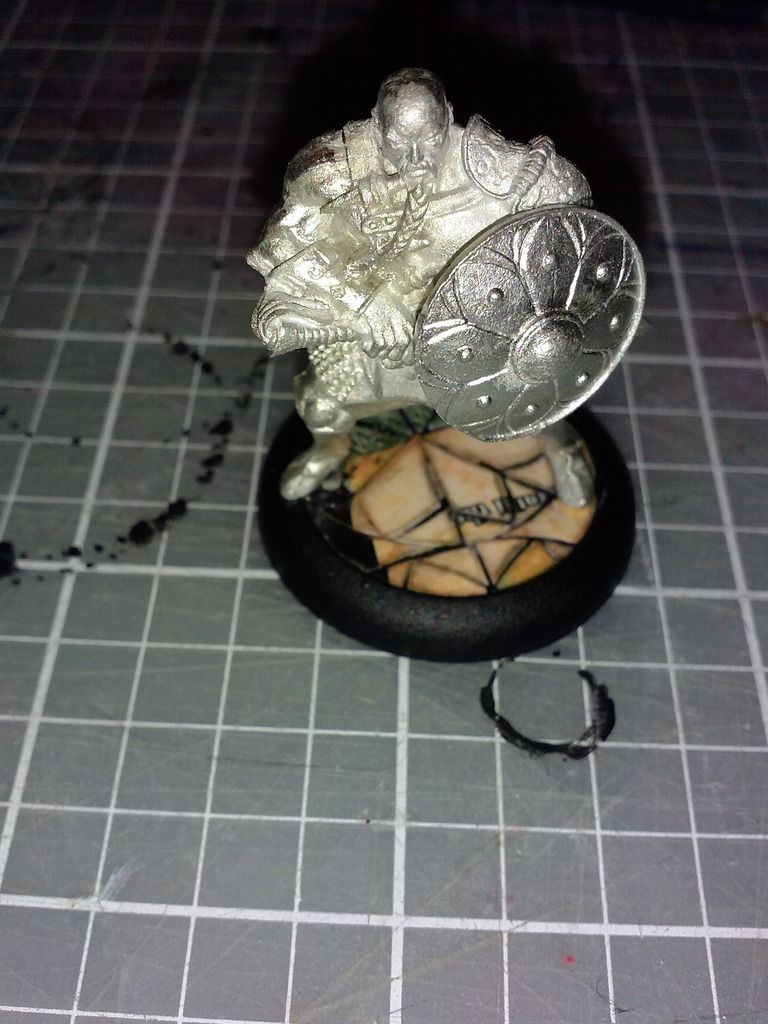 For his base, I cut up the card that he came with (cardstock) and drew out a pattern on it that mimicking the one on his shield - a sort of radially symmetric lotus blossom thing. I then cut out the sections one at a time and glued them down into their proper place. Painstaking to be sure... but I like how it turned out!  |
|


 Cheers!
 Cheers!