|
|
Post by wilmanric on Dec 5, 2013 14:26:58 GMT
...its Aurora actually. I'm waiting for my Neice to outgrow some of her toys for this very reason... Aurora? Sleeping Beauty? I guess I should have kept the box.  Thanks for the help guys! |
|
|
|
Post by wilmanric on Dec 5, 2013 14:26:04 GMT
I started doing something similar with modified Batman's. My dungeon has three statues so I got three poses for three looks. I cut off his pointy armor and used some modeling paste to smooth him out and ditch the bat-logo. They are currently base painted, I still need to dry brush. I love Dollar Tree! I like this. I was thinking of repeating my process with Thor, but Batman might be a good choice too. Thanks! |
|
|
|
Post by wilmanric on Dec 5, 2013 14:24:31 GMT
I was looking at those Dixney Princess dolls at the Dollar Tree this weekend and decided I couldn't use them as miniatures, but a statue is an awesome idea. I am totally stealing this! That's Cinderella though, I think, not Belle. Thanks. Cinderella makes more sense. |
|
|
|
Post by wilmanric on Dec 4, 2013 19:13:42 GMT
Saw this girl (Belle?) at the dollar store. I epoxied her to a bottle cap, filled in gaps with flexible modeling paste, sprayed her black and then drybrushed with grey. Turned out pretty well. I think she's suitably regal without being too much. The base she's on is a stand alone piece made from a 4x4" plaque and some flexible modeling paste. Painted, drybrushed. Made lines to go with the Dwarven Forge, but I ignore the lines all the time.  |
|
|
|
Post by wilmanric on Dec 4, 2013 19:08:35 GMT
Are you planning to make templates to draw around? It would be faster. Love the planning: measure twice, cut once, or... Measure once, cut 3-6 times! Ack! [Been there, done that -- refused the T-shirt...] Cheers! I made a "tool" to help me make sure that the openings are the same size -- 2" and 1" with appropriate borders for the 2.5D walls. I'll put up a pic when I get home. I'm planning to "freehand" the shapes of the rooms/corridors to make them more random looking. For some of the larger pieces, I may just leave them at 4x4" and just glue the walls on. We'll see. |
|
|
|
Post by wilmanric on Dec 4, 2013 14:26:12 GMT
So, I'm bringing it to scale. Missed a couple of rows, but that's OK for a start... Now to draw the curvy lines...  |
|
|
|
Post by wilmanric on Dec 4, 2013 14:19:09 GMT
Some real wisdom there. Thanks for sharing that. |
|
|
|
Post by wilmanric on Dec 4, 2013 14:16:21 GMT
They arent dead...only resting Yeah. Something's got to stop them as they try to escape!! |
|
|
|
Post by wilmanric on Dec 4, 2013 1:48:59 GMT
I'm planning to make a set of "cavern geomorphs" to go with my Dwarven Forge Tiles. Nothing wrong with 2.5 method, but I learned about it *after* I had already made this purchase. Maybe, if my cavern set grows on me, I'll decide to sell my DFGT set. We'll see. Anyway, I'm a bit of a planner, so I went to Incompetech and made some special graph paper. 4 squares to the inch; heavy lines at the 1" mark. I plan for the cavern geomorphs to be roughly twice the size/4x the area of a single game tile. I want them to interface with the game tiles, so I made the openings 2" wide. There are 1" tunnels too, but those are designed (primarily) to work inside the cavern geomorph system. Here's my planning document. I'll need 2.5'x3.5' of cardboard to lay this out.  More to come! |
|
|
|
Cart
Dec 4, 2013 1:37:10 GMT
Post by wilmanric on Dec 4, 2013 1:37:10 GMT
(Moved from old forum) Inspired by DM Scottys short tip video #29 on cart props I made a cart using coffee stirring sticks made of wood, white glue and cardstock strips. Hint: Paint wooden sticks before assembly, white glue seems to disolve when using too much water when painting. Found out the hard way... Cart wheels are made from cardboard and cardstock strips. I made two cuts on each wheel to make them look like they were made from planks.  Really exceptional work. The cart, the road, etc. Nicely done. |
|
|
|
Post by wilmanric on Dec 3, 2013 13:39:58 GMT
Really nice work on the furniture and braziers! Elegant idea! Thanks for sharing!
|
|
|
|
Post by wilmanric on Dec 3, 2013 2:33:47 GMT
In my opinion it far out weighs the paper craft chair keep up the good work! I agree. The wooden one looks great. |
|
|
|
Post by wilmanric on Dec 3, 2013 2:31:13 GMT
Really great adventure. Looks like a lot of fun. Hope its not too deadly. PS: where did you get the cool "dragon statue" at the end of the adventure? I really like the look of it... |
|
|
|
Post by wilmanric on Dec 2, 2013 2:45:03 GMT
Awesome! I just purchased that same Spiderman mini this week. I was intending to do something very similar. I have a couple Thor miniatures too that I'll be modifying. I look forward to seeing the results! |
|
|
|
Post by wilmanric on Nov 30, 2013 17:01:14 GMT
Hmm. I didn't try any others. I had such a surplus of the water ones, and they were white/clear, that I just used those. Is there a particular type you are hoping to use? I've noticed different water bottles have different sized caps, just slightly. Those look like Nestlé bottle caps. Not super tall, which would be great for doing tokens like that. I would bet that vitamin water bottle caps could work well for large monsters too. I don't know about Nestle, but the lids I use came off the Costco brand 20 oz (tall) water bottles. You'd need a larger punch for the larger bottles. I'm pretty sure the scrapbooking stores have larger circle punches. I have a 1-1/4" one and a 1" one. |
|
|
|
Post by wilmanric on Nov 30, 2013 16:58:20 GMT
This idea began a few weeks ago, when I discovered the Spiderman "Lizard" toys at the dollar store. Others have posted about the Lizard, so I won't do so again. At that time, I commented on my blog that maybe you could use Spiderman to make a giant bodak or something. Well, turns out, I did just that. Here's a picture of the Spiderman toy.  He's got kind of an action pose, maybe a little stiff, but intimidating, like the bodak --  Here's the bodak mini --  Originally, I was just going to paint it a metallic blue and call it a day. Then, I got a sample of epoxy putty in the mail. I decided to do a little modding. Here's the result --  I built up the head, face and jaw with putty. I also decided he needed "toes" on his feet to make him look a little more alien and to cut down on the "boot" look. I hit the front and back of him with my dremel to take the boot lines and the spiderman logos off. Here's a couple closeups --   They are a little blurry. Sorry. I'm not an expert sculptor and I don't really have any tools.  I'm thinking that he'll look better painted. Lastly, here he is with the standard size bodak mini. I think my "giant bodak" is going to be a lot more intimidating.  |
|
|
|
Post by wilmanric on Nov 30, 2013 3:29:14 GMT
Right now, the test tiles are somewhat BENDING due to the amount of water (as expected), but let's see, if some heavy stuff could help over night ... . Maybe, just maybe, if you glue TWO sheets of cardboard together with the "grain" on the two sheets cross-wise against each other, you might see less bending. I've been successful in strengthening cardboard that way. YMMV. Looking forward to seeing your finished work! |
|
|
|
Post by wilmanric on Nov 30, 2013 0:27:39 GMT
Did you have success with multiple types of bottle caps? Hmm. I didn't try any others. I had such a surplus of the water ones, and they were white/clear, that I just used those. Is there a particular type you are hoping to use? |
|
|
|
Post by wilmanric on Nov 26, 2013 14:08:47 GMT
Tonight our intrepid adventurers arrived at Sez'zia Outpost. They decided to divide into pairs to explore, and keep an eye on one another, while searching for the traitorous priestess Iyellle Faen Tlabbar...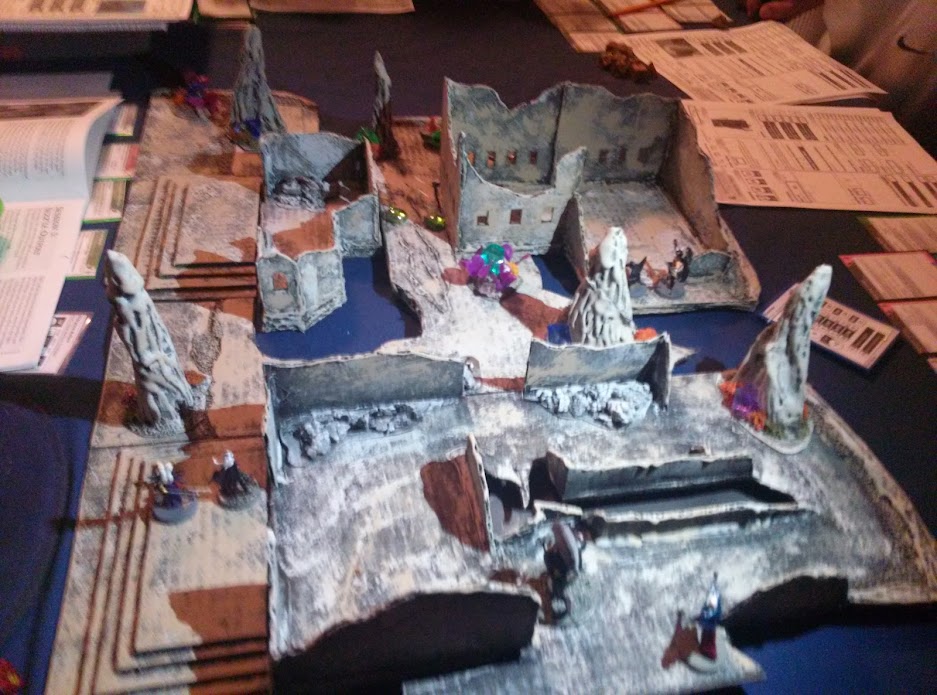 The two mercenaries from Bregan D'aerthe, Khaele the Alu-fiend and Nal'tyrr, went to the right while Zedrina, a necromancer from House Xorlarrin, accompanied Zildrynna, the inquisitor/hexblade from House Melarn, explored to the left of the ruined plaza. That left the draegloth Urathear and the nethermancer Nadryn to explore the middle.... The two mercenaries from Bregan D'aerthe, Khaele the Alu-fiend and Nal'tyrr, went to the right while Zedrina, a necromancer from House Xorlarrin, accompanied Zildrynna, the inquisitor/hexblade from House Melarn, explored to the left of the ruined plaza. That left the draegloth Urathear and the nethermancer Nadryn to explore the middle....  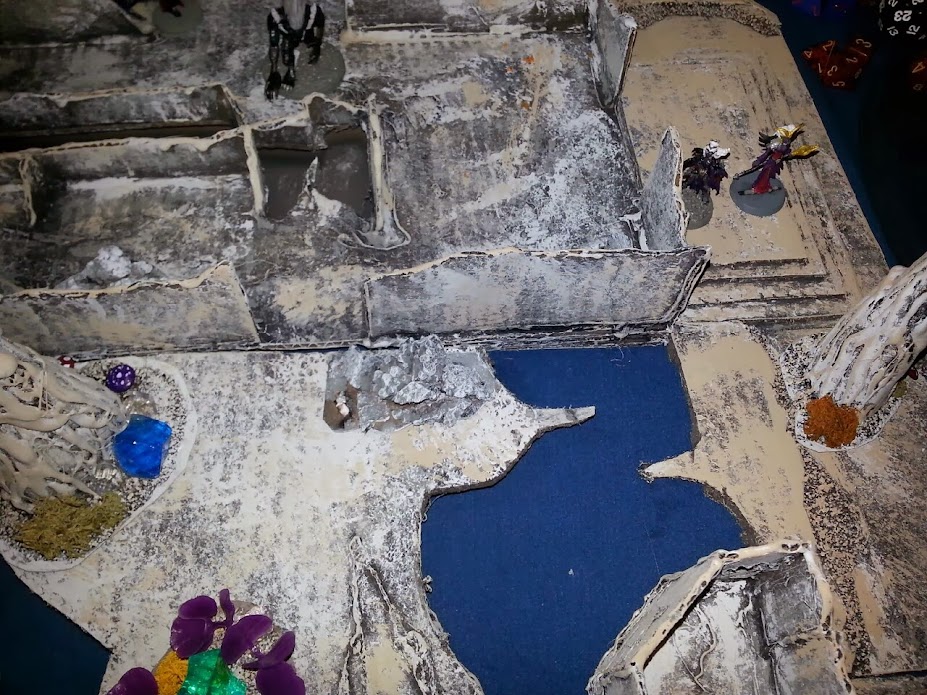  They noticed that there seemed to be light coming from some sort of flame coming from the far side of the plaza and noticed several shadows flickering upon the walls... They noticed that there seemed to be light coming from some sort of flame coming from the far side of the plaza and noticed several shadows flickering upon the walls... Unfortunately the draegloth wasn't as quiet as he hoped to be and the hobgoblin guards heard him and investigated... Seeing the towering draegloth in the distance the hoblin fled back and warned its' compatriots..... Unfortunately the draegloth wasn't as quiet as he hoped to be and the hobgoblin guards heard him and investigated... Seeing the towering draegloth in the distance the hoblin fled back and warned its' compatriots..... The traitor priestess, from Faen Tlabbar, came forward with her hobgoblin guards and quickly ordered her men to attack the draegloth... The traitor priestess, from Faen Tlabbar, came forward with her hobgoblin guards and quickly ordered her men to attack the draegloth... A grand fight ensued with the alu-fiend first polymorphing into the likeness of the traitor priestess and confusing the hobgoblins, and them charming the real priestess and having her attack the hobgoblins. The draegloth waded into the melee with his claws slashing and slicing through his opponents while the magic users stood back and peppered their foes with ranged attacks... A grand fight ensued with the alu-fiend first polymorphing into the likeness of the traitor priestess and confusing the hobgoblins, and them charming the real priestess and having her attack the hobgoblins. The draegloth waded into the melee with his claws slashing and slicing through his opponents while the magic users stood back and peppered their foes with ranged attacks... The adventurers managed to kill all of the hobgoblins and capture the traitor priestess. They then fpund their way through the obsidian wall and into the final resting place of an ancient primordial where they performed a ritual of Lolth and added the ancient power from this site to Lolth's Demon Weave..... The adventurers managed to kill all of the hobgoblins and capture the traitor priestess. They then fpund their way through the obsidian wall and into the final resting place of an ancient primordial where they performed a ritual of Lolth and added the ancient power from this site to Lolth's Demon Weave..... Having completed the ritual the party returned to Menzobrranzan to report their success and get some much needed rest... Having completed the ritual the party returned to Menzobrranzan to report their success and get some much needed rest...(Again all sorry for the blurred pics, camera phone drives me bonkers,,,Hope all have enjoyed this series so far. I hope to post more in the near future. Thanks!) This is very impressive! Well done! I think the 3D "town" makes a great compliment to the 2.5D tiles. Wonderful set piece! |
|
|
|
Post by wilmanric on Nov 26, 2013 14:00:37 GMT
I made a house complete with to-scale furniture for a Gizmo doll I had. You know, from the movie "Gremlins"? G aming related, I made a sandstone rock formation for some Warhammer 40K terrain. I made it entirely from Foamcore board. Then I spray painted it. That was a disastrous decision...
I was able to save the tile, but it is a bit of a disappointment for me, despite being a really functional piece regardless of my mistake. If you spraypaint styrofpam very carefully (i.e. only a little), the solvents eat only a bit into the foam and give it a wonderful 'weathered rock' texture. After the whole mess has dried, you can paint it regularly with acrylic colors. Have a look at the rock pillars at the very back (nearest to the arm rest of the couch; sorry for the blurry picture...). They were cut & carved with a hotwire tool and then treated as described above. Of course some of the holes in the rock look hexagonal, but it's not as bad as the picture suggests. I bought a cheapie latex spray gun from Harbor Freight to facilitate the painting of large styro pieces quickly. Also, buying gallons of mis-mixed latex at the hardware store can be super cheap. $5 a gallon! I have black and tan and grey and... Well, you get the idea. As an aside, tauster, where did you get those seed pod things?? |
|


 Thanks for the help guys!


 I'm thinking that he'll look better painted.


 Cheers!
 Cheers!