|
|
Post by wilmanric on Dec 4, 2013 1:48:59 GMT
I'm planning to make a set of "cavern geomorphs" to go with my Dwarven Forge Tiles. Nothing wrong with 2.5 method, but I learned about it *after* I had already made this purchase.  Maybe, if my cavern set grows on me, I'll decide to sell my DFGT set. We'll see. Anyway, I'm a bit of a planner, so I went to Incompetech and made some special graph paper. 4 squares to the inch; heavy lines at the 1" mark. I plan for the cavern geomorphs to be roughly twice the size/4x the area of a single game tile. I want them to interface with the game tiles, so I made the openings 2" wide. There are 1" tunnels too, but those are designed (primarily) to work inside the cavern geomorph system. Here's my planning document. I'll need 2.5'x3.5' of cardboard to lay this out.  More to come! |
|
|
|
Post by DMScotty on Dec 4, 2013 2:02:58 GMT
Great idea!
|
|
|
|
Post by onethatwas on Dec 4, 2013 4:10:55 GMT
I was working on this too, except for ruins. It got a bit intimidating, so i put it on hold. I'm looking into how to do it so its more easily done/not as intimidating.
|
|
Kyral
Paint Manipulator
 Building Worlds.
Posts: 157 
|
Post by Kyral on Dec 4, 2013 5:26:21 GMT
that's a good idea..
|
|
|
|
Post by wilmanric on Dec 4, 2013 14:26:12 GMT
So, I'm bringing it to scale. Missed a couple of rows, but that's OK for a start... Now to draw the curvy lines...  |
|
|
|
Post by ashrothedm on Dec 4, 2013 14:53:49 GMT
You just saved me a whole lot of time planning a cavern system... my next tile set.
Looking forward to watching this project progress!
|
|
|
|
Post by sgtslag on Dec 4, 2013 16:11:58 GMT
Are you planning to make templates to draw around? It would be faster. Love the planning: measure twice, cut once, or... Measure once, cut 3-6 times! Ack! [Been there, done that -- refused the T-shirt...] Cheers!
|
|
|
|
Post by wilmanric on Dec 4, 2013 19:08:35 GMT
Are you planning to make templates to draw around? It would be faster. Love the planning: measure twice, cut once, or... Measure once, cut 3-6 times! Ack! [Been there, done that -- refused the T-shirt...] Cheers! I made a "tool" to help me make sure that the openings are the same size -- 2" and 1" with appropriate borders for the 2.5D walls. I'll put up a pic when I get home. I'm planning to "freehand" the shapes of the rooms/corridors to make them more random looking. For some of the larger pieces, I may just leave them at 4x4" and just glue the walls on. We'll see. |
|
dmbrad
Paint Manipulator
Posts: 166
|
Post by dmbrad on Dec 4, 2013 23:16:22 GMT
cant wait to see these finished
|
|
|
|
Post by onethatwas on Dec 5, 2013 5:22:40 GMT
This is me making things more complicated for myself, but for a cavern complex, wouldn't hexagonal tile add a more natural feel?
Naturally making a hexagon tile is harder. I'm mostly putting the idea out there because I'm considering making some tiles, and hexagons seem a potentially good option
|
|
|
|
Post by onethatwas on Dec 5, 2013 17:13:07 GMT
Sorry for double post. My phone browser doesn't let me update posts as far as I know.
In anycase, I've decided to try making a cavern system with hexagon tiles. So far I have enough tiles to make a full cluster (7 tiles lined up together) and a generalized plan to piece them together, as well as plans to make more. A full set (accounting for most tile arrays...I think I may be missing a small few exit combos, but I can live with that.)
In the end I should have 37 tiles and the ability to make one bad ass cavern complex.
|
|
|
|
Post by wilmanric on Dec 5, 2013 23:12:21 GMT
Sorry for double post. My phone browser doesn't let me update posts as far as I know. In anycase, I've decided to try making a cavern system with hexagon tiles. So far I have enough tiles to make a full cluster (7 tiles lined up together) and a generalized plan to piece them together, as well as plans to make more. A full set (accounting for most tile arrays...I think I may be missing a small few exit combos, but I can live with that.) In the end I should have 37 tiles and the ability to make one bad ass cavern complex. I really like this idea. |
|
|
|
Post by onethatwas on Dec 6, 2013 2:18:31 GMT
I wasn't sure how they'd turn out, but since I got the first four crafted (waiting for a dry day to paint them), i have to say they are turning out great!
|
|
|
|
Post by wilmanric on Dec 6, 2013 3:50:37 GMT
OK, the project is progressing-- Here's a "tool" that I made so I can quickly measure the gaps for the hallways. I made a 2" and 1" space. You can place the gap across the gridlines and draw little tick marks. Then you can freehand the walls on the tile. I also made a 4" rule with a 1/4" tick mark for quick use.  Here are a few tiles drawn in -- I want to try a proof of concept before I finish the whole thing. No sense in wasting time.  I used strips of black foam for the walls. They are flexible and irregularly shaped. It's kind of an eggcarton foam that I get from work (electronics packaging.)  Now I've covered the foam and tiles with TP using a glue/water mix. About 50/50.  Gonna let it dry. Then I will cut out the tiles and spray paint them black. We'll see how it goes! |
|
|
|
Post by Deleted on Dec 6, 2013 7:23:34 GMT
I'm excited for this project!
|
|
|
|
Post by sgtslag on Dec 6, 2013 14:07:46 GMT
Wilmanric: you have just solved the problem with using foam packaging for making dungeon terrain -- how to get rid of the open-cell texture! Brilliant! Covering it with TP+Water/Glue Mixture, will remove that awful surface texture! Thank you!!! Cheers!
|
|
|
|
Post by skunkape on Dec 6, 2013 14:27:06 GMT
Great looking results so far. Only thing I'd worry about is how much water to use, you don't want your cardboard warping! With the TP, you shouldn't have to worry about spray paint melting the foam as well!
|
|
|
|
Post by wilmanric on Dec 6, 2013 18:10:29 GMT
Great looking results so far. Only thing I'd worry about is how much water to use, you don't want your cardboard warping! With the TP, you shouldn't have to worry about spray paint melting the foam as well! Yeah. I've got some warping this morning. Not happy. May be changing gears a bit... |
|
|
|
Post by onethatwas on Dec 6, 2013 19:44:38 GMT
Those are awesome tiles that you have shown so far. I'm really interested in seeing how the square tiles turn out when you're finished. One advantage I can see to the Square Tiles is the ability to use them in a Modular fashion with other tiles (Ruins, for instance, ala thedmg''s modular set). The route I'm taking makes using them alongside other tiles harder to accomplish, and I've had to design a specific piece just to do so. I also haven't decided to make use of alternative crafting materials, which leaves my pieces looking less natural (But still pretty cool imo). SO, here's an example of what I have so far: 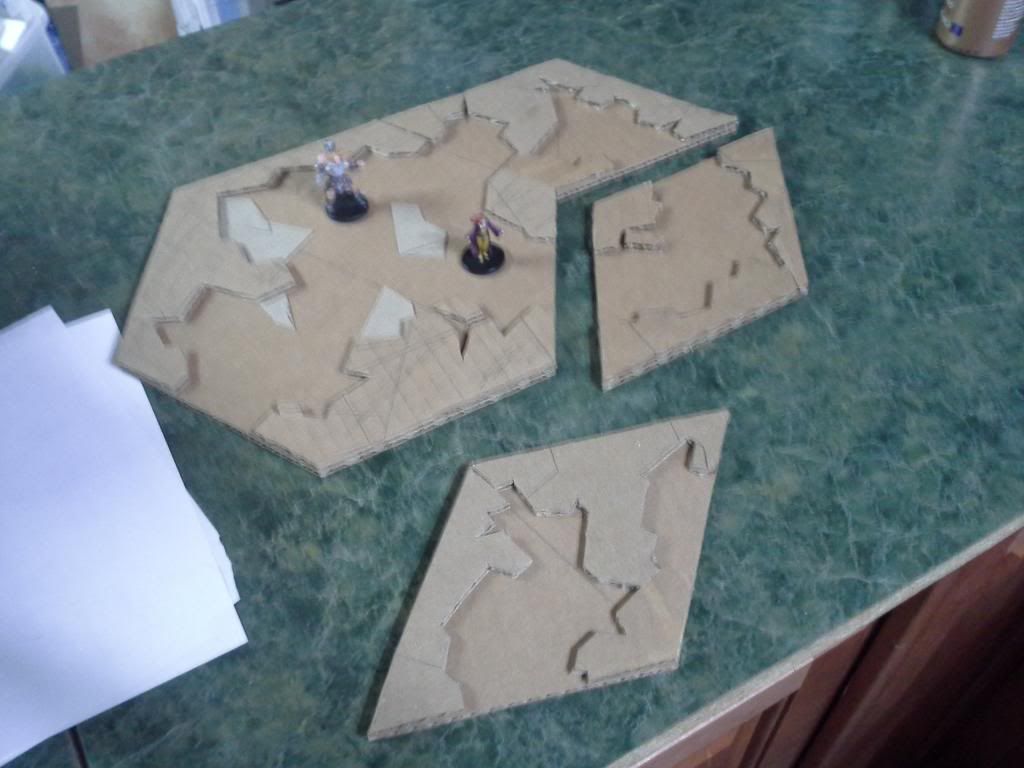 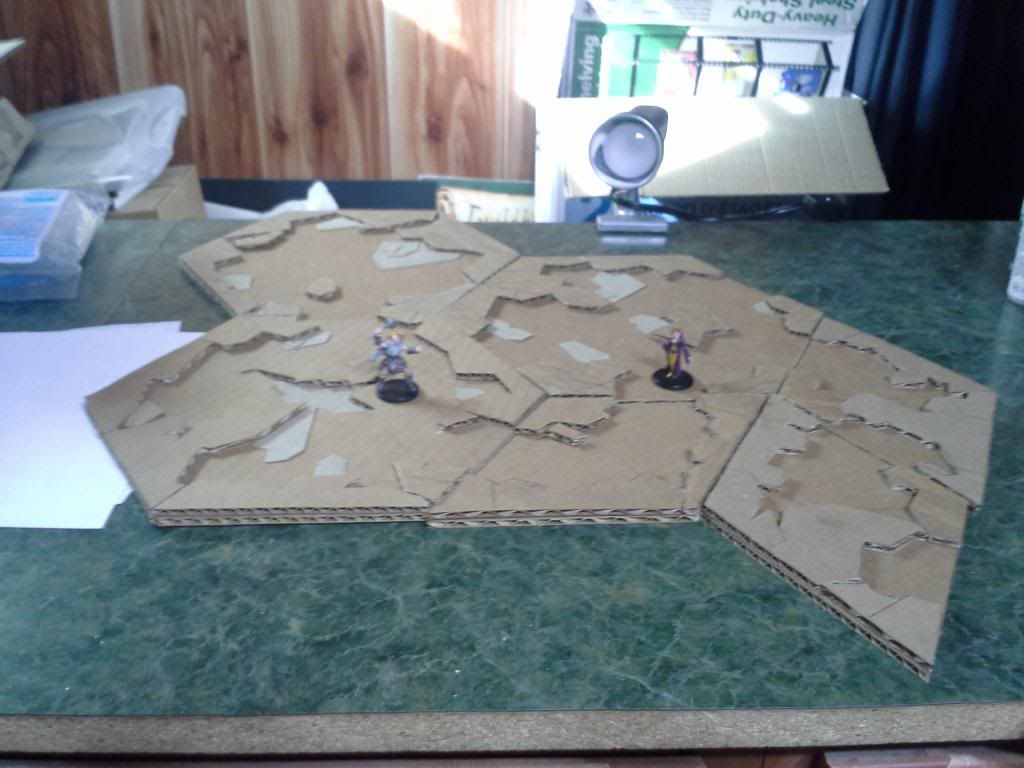 A bit of a (and probably not very effective...I'm not good at tutorials) Tutorial on what I did: I basically did some mock measurements to get an idea of the size of tile I want. While I prefer a much larger tile size, I decided to go with a more cluttered approach (Going to Carlsbad Caverns here in NM, while there are certainly large, open galleries in caves, alot of the areas that I could see adventurers traveling appeared small and cramped, and the "Open" feeling in the galleries was mostly due to overhead space, not actual walkable space. Overhead "space" can't be represented by 2.5D unfortunately...or 3D gaming boards even, now that I think about it. Anyway, I digress...), so I decided each hex tile side should be 5 inches long, with a 2 inch corridor for entrances/exits. There was lots of geometry involved, and rather than explaining the process of getting equal sided hex tiles, it's probably best to look for a visual tutorial for figuring it out, if, like me, you're bad at math/geometry. In the end I made a Trapezoid tracing piece which I used to create each hex grid (Easier to manipulate for purposes of some of the other planning/cutting I had to do). Basically I just reversed the trapezoid to make the second half of the grid. I also made a tracing piece to measure the distance between the corners of the hexes to the entry/exit zones, that way I had a precise zone that allowed the geomorphic tiles to line up. Basically from each corner I wanted exactly 1.5 inches of "Cavern wall" on any side that required an opening. Using the corner tracing piece, I basically started using scrap cardboard (Saved from designing the hex grids) and any necessary long pieces of scrap cardboard, and cut out random designs. So long as the outer edge was clean, and the openings were clear, it worked out fine. I did have to do some planning to determine how many openings I wanted to have available on each tile. I stuck with essentially a max of 4 openings (Any more and I may as well have had a flat tile with no walls, enclosed by other tile pieces), and made a set of 7 tiles (Enough to make a larger hex, although not required. I am certainly making more "sets" in the future, to make a much larger, extended cavern system). I plotted out the openings I wanted (Basically an x on the sides I wanted with an entrance/exit), and started cutting random bits of cardboard whose outer edge conformed to the hex shape required. I tossed in some cardstock on some of the tiles to create some variations on texture (Using the same scheme of basically creating randomized polygonal shapes as I did with the walls). For the smaller pieces you see (Useful connectors in places where I may need a dead end or open channel), I basically plotted out the center line from corner to corner of a hex piece I had crafted solely to make those pieces, and cut so that two of the "Triangles" that make up the hex piece were connected, creating a diamond shape. Then I plotted out the exit points the same way I did with the hex pieces (A little trickier, as the shape was obviously different. I had to make a new trace tool to make my cavern walls). Now I just have to glue on some flocking sand (I crafted cracks in the walls so I can have "Viens of ore" on some of the tiles, basically just fill in the cracks with the sand, and paint them metallic), and paint. Then it will be complete! So, hope that helps and Inspires  Oh, and a note for those who may be interested in this method: Doing a bit of loose conceptualization, if you wanted a "Complete" set of these, with a tile representing each combination of entry/exit points, I'm guesstimating it at about 42 tiles, give or take a few. That's full grid tiles, not counting the smaller "Connectors." If you count those in, you may end up with like another 6 or so. BUT, if you want my opinion, you really only need two sets of 7 tiles, with a grand total of 6 connectors. This should give you a pretty decently sized natural cavern (You may need to craft a trapezoid piece to make a flat edge connecting to any special made tiles you want, like a grand gallery for boss fights or whatever). |
|
robagd
Paint Manipulator
Posts: 137
|
Post by robagd on Dec 7, 2013 1:36:37 GMT
Some interesting idea for cavern walls.
To avoid the warping what about just brushing on craft sealer? The moog stuff.... ( Sorry having a brain fart on brand name )
A little bit more on cost but maybe more work able and not having to worry about warping.
My next batch of tiles will be rough caverns as well.
-R
|
|


 Cheers!
 Cheers!