|
|
Post by monkeywithtacos on Jan 9, 2014 3:03:38 GMT
Hey all, Don't normally do these because to be blunt, I suck at them. But anyway here goes... I'm going to put this up in several parts (construction, painting and adding the flocking and moss). First you're going to need your materials; some aluminum foil, hot glue and glue gun, wire/paperclips, wooden base, pair of plyers...  Take your foil.....  Fold and roll your foil into a tube....  Then put hot glue on one end of the foil tube and glue it to the base, and then bend it to form a knee joint... 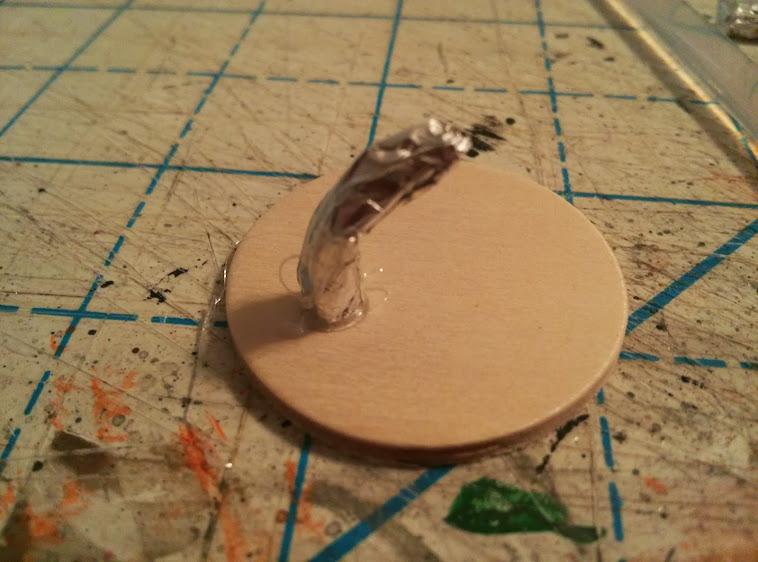 Take the glue gun and draw several lines radiating outward to form the roots/toes ( you may need to use a knife to clean them up a bit)  Repeat the process to form the second leg, then glue the top of the legs together, as well as to the wood base...  Next, take the foil and roll/fold up another section for the body of the tree...  Hot glue it onto the legs...  Take 3 strands of wire and, using plyers, twist the wires around to form the arms. Then seperate one end into the 3 fingers...  Roll foil into a ball like shape to form the head...  For a "face" into the foil...  Insert the arms into the foil body, then coat them with hot glue to form a "bark" layer, then glue the head into place on the body...  Cover the entire model in layers of hot glue, to bulk it up and form it's "bark"...  Form and add additional wire branches to the shoulder and head areas and then cover them with hot glue (these will support the "leafy" hair)   End of Part I... |
|
|
|
Post by monkeywithtacos on Jan 9, 2014 3:03:57 GMT
Tutorial Part II: Painting To start with, as I am wanting them to have a darker tone when finished and because it provides shadow in some of the deepest recesses, I base coat the entire treant with a black acrylic paint. ( I brushed this on but you could use spray paint if you prefer)  I personally like to use three successively lighter colors when I dry brush larger mini's and objects. As I wanted the bark on my trees to be a rich brown color, I started with a dark brown. With this color I was much heavier handed than I would be with the next two colors ...  Next I dry brushed on a medium brown.....  Thirdly, I lightly dry brushed on the lightest of my brown paints...  Lastly, I painted the bases and painted on the eyes and mouth on one of the two....  Coming soon, Part III: Foliage and Basing.... |
|
|
|
Post by monkeywithtacos on Jan 9, 2014 3:04:17 GMT
Part III: Basing and Foliage There are many ways, and many items that can be used, to create the foliage. I initially utilized some "Reindeer Moss" hat I had on hand, but I ended up changing that to something I found at a hobby store: Foliage Fiber Clusters. I also at the same time picked up some "Coarse Turff" flocking to have on hand... (Here's a pic of both) 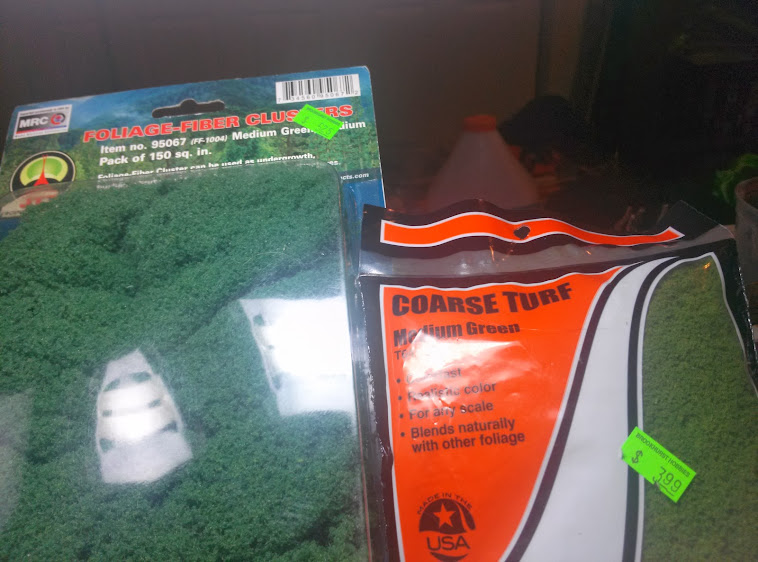 Getting back to the models, after I finished painting them I went ahead and brushed them with a matte sealer and added some rocks and sand to the base. I painted over that and sealed it as well...  I then took and cut off some small pieces of the "foliage" and glued them onto the "eyebrows" of the treants...  I then took the foliage and placed it into a bowl in order to make for easier cleanup as small flecks of the flocking WILL rub off and make a mess   I then selected and cut a large cut of the foliage (which comes in a "sheet") and balled it up into a rough tree "canopy" shape....  I then placed glue on the "branch" prongs and fitted the canopy onto the tops of the treant...  Reapeated for the second treant....  I then took some hairspray and sprayed the canopy, both top and bottom, as this will help hold the "canopy" shape and help hold it into place (spray glue would work as well)...  (Thanks to my daughter for taking the pics while I did this part )   And the final results, foliage and basing complete.... a pair of Animated Trees / Treants.....  PS: For those that saw my original Treant, I did do some revamping on him as the moss I used was old and starting to mold (something I didn't know it could do- which is why they recommend sealing it with a spray glue....)  Coming in Part IV: Shots of them in play! (Might be a couple weeks though) |
|
|
|
Post by monkeywithtacos on Jan 9, 2014 3:04:53 GMT
(Saved for possible Part IV)
|
|
|
|
Post by bloodchoke on Jan 9, 2014 3:12:10 GMT
Awesome, thanks for showing us the magic! Can't wait to try this out.
|
|
dmj
Paint Manipulator

Posts: 245 
|
Post by dmj on Jan 9, 2014 12:34:54 GMT
Looks great ill definitely try this for my elven army, mantic hasn't produced a model for the forest shambler monster yet and this would work well.
|
|
|
|
Post by sgtslag on Jan 9, 2014 14:49:26 GMT
I am making two Treants, currently, using twisted wire for an armature only... Your approach is much easier to control the ending dimensions, size, pose, etc. One of my Ents is standing, the other is walking -- with your armature method, making animated poses should be much easier! My next several Treants will be made using your crumpled aluminum foil armatures, with wire for the hands. My first two are really thin/skinny, but they will make great Treants for a thinner style/breed -- variety is a good thing in Treant models
Do you find the crumpled foil is strong enough, after applying Hot Glue? I may use a wire, covered in foil, for added strength. (My Ents are a hybrid of all of the techniques shown here, thus far -- they get better with each Ent 'how-to' posting...) Thank you for sharing! Cheers!
|
|
|
|
Post by monkeywithtacos on Jan 9, 2014 16:43:23 GMT
I am making two Treants, currently, using twisted wire for an armature only... Your approach is much easier to control the ending dimensions, size, pose, etc. One of my Ents is standing, the other is walking -- with your armature method, making animated poses should be much easier! My next several Treants will be made using your crumpled aluminum foil armatures, with wire for the hands. My first two are really thin/skinny, but they will make great Treants for a thinner style/breed -- variety is a good thing in Treant models Do you find the crumpled foil is strong enough, after applying Hot Glue? I may use a wire, covered in foil, for added strength. (My Ents are a hybrid of all of the techniques shown here, thus far -- they get better with each Ent 'how-to' posting...) Thank you for sharing! Cheers! I have found it to be very solid after painting. I do like that the wire parts can still be bent and posed (after the glue has been put on an has dried, but prior to painting) so you can gt them into just the right place. So far I have completed one of the Treants, and the other two are going to be "animated trees", brought to an awakened state by the treant to help him defend the forest. They are a definitely different shape and look than the Treant, and are slightly smaller as well and certainly darker and more feral looking (kind of like the in Lord of the Rings when Treebeard awakened the trees of the dark forest) I'm glad I could be of help. I was hoping to get the painting pics taken and posted tonight, but we found a ping pong sized lump on my pomeranian's abdomen and are taking her to get checked at her veterinarian today, Not sure if I will have time to get them done...But I should have them up by the weekend.... |
|
|
|
Post by Tabletop Gaming with Juce on Jan 9, 2014 21:55:51 GMT
This is another great thread. Loving this! May need to try this soon.
|
|
|
|
Post by Sleepy Hollow Mike on Jan 10, 2014 4:51:44 GMT
I am making two Treants, currently, using twisted wire for an armature only... Your approach is much easier to control the ending dimensions, size, pose, etc. One of my Ents is standing, the other is walking -- with your armature method, making animated poses should be much easier! My next several Treants will be made using your crumpled aluminum foil armatures, with wire for the hands. My first two are really thin/skinny, but they will make great Treants for a thinner style/breed -- variety is a good thing in Treant models Do you find the crumpled foil is strong enough, after applying Hot Glue? I may use a wire, covered in foil, for added strength. (My Ents are a hybrid of all of the techniques shown here, thus far -- they get better with each Ent 'how-to' posting...) Thank you for sharing! Cheers! I have found it to be very solid after painting. I do like that the wire parts can still be bent and posed (after the glue has been put on an has dried, but prior to painting) so you can gt them into just the right place. So far I have completed one of the Treants, and the other two are going to be "animated trees", brought to an awakened state by the treant to help him defend the forest. They are a definitely different shape and look than the Treant, and are slightly smaller as well and certainly darker and more feral looking (kind of like the in Lord of the Rings when Treebeard awakened the trees of the dark forest) I'm glad I could be of help. I was hoping to get the painting pics taken and posted tonight, but we found a ping pong sized lump on my pomeranian's abdomen and are taking her to get checked at her veterinarian today, Not sure if I will have time to get them done...But I should have them up by the weekend.... I hope that your pet is ok! Keep up the great work! |
|
|
|
Post by monkeywithtacos on Jan 10, 2014 7:04:23 GMT
Thanks, took her to see the vet and she thinks it is most likely a hernia, but that it could possibly be a tumor on her mammary. They are going to repair or remove it in a couple of weeks when she is spayed.
As to the tutorial.... just finished updating Part II.... Enjoy!
|
|
|
|
Post by Sleepy Hollow Mike on Jan 10, 2014 12:33:59 GMT
I started messing around with MWT's ideas. As usual I stand on the backs of giants to accomplish something! LOL! Any ways here is my version of a Treant of course he is still missing his canopy and is still drying but here is what I have so far.
|
|
|
|
Post by grym247 on Jan 10, 2014 14:55:15 GMT
OOzing Awesomeness, thanks for the Tutorial Dude
|
|
|
|
Post by monkeywithtacos on Jan 10, 2014 19:34:27 GMT
I started messing around with MWT's ideas. As usual I stand on the backs of giants to accomplish something! LOL! Any ways here is my version of a Treant of course he is still missing his canopy and is still drying but here is what I have so far. Looks great.... almost exactly like the first one that I made prior to me putting on the "foliage"! Awesome Job!!! |
|
|
|
Post by Sleepy Hollow Mike on Jan 10, 2014 23:49:52 GMT
I put on the canopy and added some other greenery like vines growing up his legs and stuff. I owe it all to you becuz I never would have tried it. I didnt think I could ever do "Faces" yet here I was banging one out! Yesterday I was a steampunk vehicle guy and so so terrain maker. Today I AM a sculpter! LOLOL Thanx for the inspiration!( I have to work on his eyes tho He looks a little like he is trippin on Meth!)
\
|
|
neil
Paint Manipulator
Posts: 134
|
Post by neil on Jan 11, 2014 1:55:33 GMT
Great tutorial thanks for posting it
|
|
|
|
Post by bloodchoke on Jan 11, 2014 5:12:40 GMT
MWT, as much as I loved your first Ent in the other thread, I think these are going to turn out even better. I really like the feeling of movement these guys have. They're looking great man, can't wait to see them finished. And thanks again for the tutorial!
|
|
|
|
Post by monkeywithtacos on Jan 11, 2014 8:11:46 GMT
I put on the canopy and added some other greenery like vines growing up his legs and stuff. I owe it all to you becuz I never would have tried it. I didnt think I could ever do "Faces" yet here I was banging one out! Yesterday I was a steampunk vehicle guy and so so terrain maker. Today I AM a sculpter! LOLOL Thanx for the inspiration!( I have to work on his eyes tho He looks a little like he is trippin on Meth!) \ Holy guacomole, dude! That turned out absolutely epic! Blows mine outta the water!!! Seriously! Glad I could inspire you to give it a go.... Now the bar has been raised and I'm gonna need to match it lol.... |
|
|
|
Post by grym247 on Jan 12, 2014 0:30:13 GMT
Both of you have done great jobs indeed
|
|
|
|
Post by brutis140 on Jan 12, 2014 6:25:04 GMT
awesome tutorial, very imformative. i love the way all of these are turning out
|
|


 Cheers!
 Cheers!