valas
Room Planner
 I'm being twisted, on the sideway down.
Posts: 459
|
Post by valas on Aug 25, 2014 21:52:55 GMT
Wow, good luck with all that card board cutting! Nightmare indeed. Its a PIA to do the cutting for the tiles. I don't envy you AJ. I am sure it will look fantastic in the end though!
|
|
valas
Room Planner
I'm being twisted, on the sideway down.
Posts: 459
|
Post by valas on Aug 29, 2014 1:55:29 GMT
Some more progress tonight. I starting making some of the 3D elements - stalagmites. I also got in some of the miniatures I ordered! Gibbering mouthers, grells, and a mimic. Lots of work to do! The stalagmites are just made from card board hot glued together and covered with hot glue. A pic of them and a pic of them on the tile.   |
|
dmzane
Paint Manipulator
Posts: 150 
|
Post by dmzane on Aug 31, 2014 1:41:53 GMT
I really love the look of those!!! I made a few for my modular cavern set using dm scotty's method. I do like the idea of a few large ones...I also dig making them out of cardboard and hot glue. Guess I just enjoy working with my glue gun and it's faster to dry, which means I can get to painting.
Also...do they fall over easy or did you add some weight to them?
|
|
valas
Room Planner
I'm being twisted, on the sideway down.
Posts: 459
|
Post by valas on Aug 31, 2014 3:17:06 GMT
I really love the look of those!!! I made a few for my modular cavern set using dm scotty's method. I do like the idea of a few large ones...I also dig making them out of cardboard and hot glue. Guess I just enjoy working with my glue gun and it's faster to dry, which means I can get to painting. Also...do they fall over easy or did you add some weight to them? Thanks! I haven't had any problems with them falling over, but it wouldn't hurt to add a washer to the base. |
|
|
|
Post by GMPeter on Sept 1, 2014 9:00:03 GMT
I have just finished my sewer set modular tiles, so I can start doing some cavern tile experiments using stacked layers of cardboard to give a more topographical aspect. Its breaking some of the 2.5D 'rules' but it still allows play unhampered by walls, per se. So picture built up layers like this 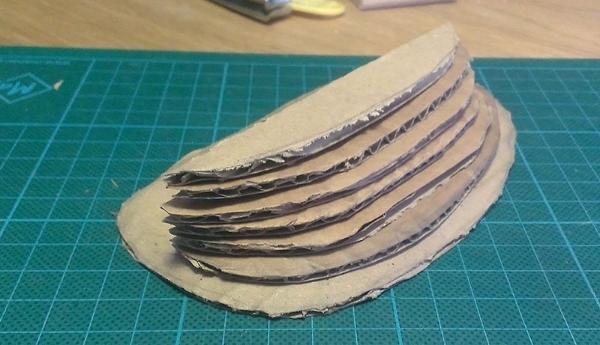 To build complex cavern tiles looking something like this (except with a rock texture, fungus, rope bridges, chasms, ponds, rubble, stalagmites, etc)...  And its going to be a slight nightmare to cut all that with a craft knife, but the overall effect will be awesome.. clearly though, a lot of work and planning is going to go into this.. I am inspired by what this guy did on his blog, using layered cardboard.. check it out if you like.Damn AJ! Could you a tutorial on that, but in Nature/mountain? Like with a road in the middle and stuff like that? I need to make a Forest for my campaign  |
|
|
|
Post by GMPeter on Sept 1, 2014 9:08:26 GMT
Can I ask how you did the stone pattern and painting? It looks Amazing!
|
|
valas
Room Planner
I'm being twisted, on the sideway down.
Posts: 459
|
Post by valas on Sept 1, 2014 12:28:20 GMT
Can I ask how you did the stone pattern and painting? It looks Amazing! Sure, I used the AJ method. I printed out a tile pattern I had and use the mighty glue stick to atach the papper to the card board tile. I only had a laser printer so all my tiles have no color. I use various washes to add color to the tiles. |
|
|
|
Post by Deleted on Sept 2, 2014 1:05:10 GMT
Ironically, I am breaking from my usual aversion to painting terrain to do my cavern set up.
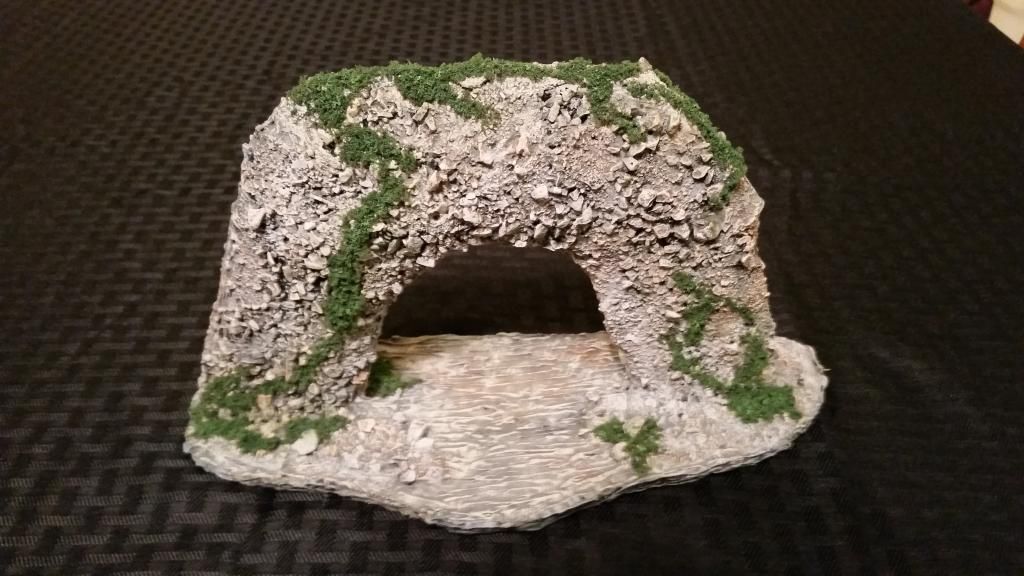
I have cut rock formations from chunks of broken off polystyrene, attached them to layers of cardboard I have simply cut with scissors (much easier than using a craft blade, as there is not a straight line to be found anywhere), and these are not fixed to a base of cardboard, I just paint it all with a black and grey rock pattern and place the formation pieces in different positions to form whatever sort of cave configuration I need.
I can see that I need some integral specialised pieces.. a cave opening, an overhanging pathway/ledge, a chasm and a rope bridge, a ramped ascent piece for moving from one level to another, and both curved and straight cliff/wall pieces, as well as some formations with pools or lengths of stream.
Essentially, I am making a modular cavern set for myself.
|
|
valas
Room Planner
I'm being twisted, on the sideway down.
Posts: 459
|
Post by valas on Oct 12, 2014 23:38:31 GMT
|
|
|
|
Post by DnDPaladin on Oct 13, 2014 0:52:50 GMT
hmmm, nails for mushrooms... not a bad idea.
gives me an idea for a trap as well.
that project is huge. but whats fun is that those tiles can actually be reused when that whole cavenr has been explored.
makes thing not useless considering it.
|
|
|
|
Post by voduchyld on Oct 14, 2014 20:55:53 GMT
gotta love those 'shrooms!
|
|
valas
Room Planner
I'm being twisted, on the sideway down.
Posts: 459
|
Post by valas on Nov 16, 2014 14:30:46 GMT
Work continues on this project. I have all the cavern tiles complete. I am now working on some of the creatures and features of this module. Next creature feature, the Living Wall. Living walls appear to be normal walls of stone or brick, although they radiate both evil and magic if detected. Infravision will not detect any peculiar patterns. However, a character who casts a true seeing spell or who peers through a gem of seeing will see past the illusion: the wall actually consists of greying and sinewy flesh -- of faces, hands, broken bones, feet, and toes jutting from the surface. Characters within 5 yards of the wall can hear low moans of horror, pain, and sorrow issuing from it. Even if a silence spell is cast, the moans still rise. Inspiration picture from the module.  Materials needed: 1 heroclix figure Card board Hot glue Masking tape Old Bitz magnetic sheet paper I made the cardboard 2x2.5 inches I made two because the wall was big, but wanted a smaller size in case I had to seal a regular doorway in a future module. Dig out a part of the card board where you want to figure to rest. Seal the edges of the card board with masking tape to hide the corrugation and apply liberal amounts of hot glue to simulate flesh, intestines , etc. Apply various bitz as needed or desired. Then prime and paint. Using a little bit of pva glue, apply the magnetic sheet to the back of your wall and use the magnetic wall system as demonstrated in DM Scotty video here.    Finished Product:  System broken down into components:  I did add a topper wall to hide the magnetic strip and will add side pieces to use when I do a single wall. Hope you enjoyed my craft. |
|
|
|
Post by tauster on Nov 16, 2014 16:20:49 GMT
Absolutely stunning effect!
I have lots of bits and will definitely make something similar. I'll even go so far and make up some spells for the PC necromancer, so that we can use these pieces as spellmarkers in the future.
How exactly did you paint it up?
- first a dark red basing and then the bone-colored drybrushing, or
- first a bone-colored basepaint and then a red wahsing?
I suspect the former because I don't see traces of red on the bone-colored surfaces, but I'm not sure just from looking at the pic.
|
|
valas
Room Planner
I'm being twisted, on the sideway down.
Posts: 459
|
Post by valas on Nov 16, 2014 17:37:13 GMT
Absolutely stunning effect! I have lots of bits and will definitely make something similar. I'll even go so far and make up some spells for the PC necromancer, so that we can use these pieces as spellmarkers in the future. How exactly did you paint it up? - first a dark red basing and then the bone-colored drybrushing, or - first a bone-colored basepaint and then a red wahsing? I suspect the former because I don't see traces of red on the bone-colored surfaces, but I'm not sure just from looking at the pic. Well, painting was a challenge. Originally I was going more grey with a dark purple. I did not like the effect, so I repainted it. I started by laying a flesh tone down, then washing with orgyn flesh wash - it is a red tinged flesh wash. I then used 2:1 mixture of flesh tone:ivory and added the first highlight. I then did a 1:1 mix of flesh:ivory and followed with a 1:2 flesh ivory. The red wasn't dark enough so I applied a watered down dark purple to the red and followed one more time with wash just the red/purple areas. The bone parts (skulls, etc) used a similar pattern using bone and ivory combination with a couple sepia washes. The few metal parts:black followed by gunmetal, then rust effects and a light black wash. finally I sealed everything in a gloss coat and then dusted with a matte finish. The camera I use (my phone) and the lighting really doesn't show the subtle differences in shade. |
|
|
|
Post by DnDPaladin on Nov 16, 2014 23:50:36 GMT
elektra, elektra, ELEKTRAAAAAAAAAAA !!!!
seriously sick pal, thats a nice wall. i remember those walls, they were frightening every single players during my time in second advanced games. my players would never get close to a wall ever.
|
|
valas
Room Planner
I'm being twisted, on the sideway down.
Posts: 459
|
Post by valas on Nov 17, 2014 0:10:19 GMT
|
|
|
|
Post by voodoo on Nov 17, 2014 0:13:55 GMT
Dude sick walls!! And the shrooms....both are simple and re-useable. Awesome! Great paint on the walls!
|
|
valas
Room Planner
I'm being twisted, on the sideway down.
Posts: 459
|
Post by valas on Nov 17, 2014 0:15:12 GMT
|
|
|
|
Post by skunkape on Nov 24, 2014 15:40:48 GMT
Great looking wall pieces!
|
|
valas
Room Planner
I'm being twisted, on the sideway down.
Posts: 459
|
Post by valas on Nov 26, 2014 1:37:49 GMT
|
|


 Cheers!
 Cheers!