|
|
Post by Jason on Jul 28, 2014 5:36:52 GMT
Since I just finished a large project, I am trying to figure out what to do next. I promised I would paint something and sculpt something everyday. I painted this today for an Elven Wizard NPC that will help to fill out a party in the game I am running. I was pleased by the richness of the red in the robe. I was also happy with the color selection. It also gave me some practice mixing up an oil wash for red, brown and the grey. I think it turned out ok.  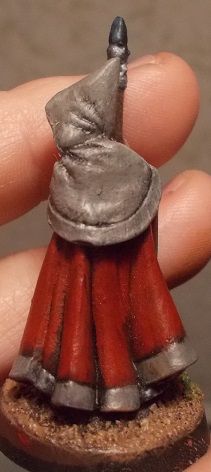 |
|
|
|
Post by dragon722 on Jul 28, 2014 14:45:27 GMT
Since I just finished a large project, I am trying to figure out what to do next. I promised I would paint something and sculpt something everyday. I painted this today for an Elven Wizard NPC that will help to fill out a party in the game I am running. I was pleased by the richness of the red in the robe. I was also happy with the color selection. It also gave me some practice mixing up an oil wash for red, brown and the grey. I think it turned out ok. For those of us who do not know...What is an oil wash? Love the mini though  |
|
|
|
Post by Jason on Jul 28, 2014 15:52:13 GMT
Here is a video showing the basics. Hope this explains it...
|
|
|
|
Post by Jason on Jul 28, 2014 15:56:20 GMT
There are other videos available as well on oil washes specifically. I paint on the Pledge with future shine. Then I mix some oil paint thinner and some oil paint together and wash the mini. After it dries, go over the mini with a cotton swab with some thinner to clean up where you don't want the wash.
|
|
|
|
Post by sgtslag on Jul 28, 2014 18:05:08 GMT
Dragon722, Search The Dip technique on the Internet for oil-based wash techniques. It is phenominal, fast, and it just works...  The Dip The Dip is where Army Painter Quick Shade products came from -- they are very similar, but much higher priced. For The Dip, visit your local hardware store, and ask for Minwax Polyshades Tudor (Black), or Royal Walnut (dark brown -- yields a muddy/dirty look). After applying a simple, block painting technique to a figure (works on 6mm - 60mm figures!), thoroughly (and I mean very thoroughly) mix a can of the Minwax urethane-stain, mechanically, with a stir stick, to get the pigment off of the bottom of the can, suspended within the urethane. Then, using a disposable brush (I use the school paint brushes -- 30 for $1, at Wal-Mart) to liberally apply the urethane-stain mix to the figure. It will pool in the recesses of the figure, creating shadows. It will also pool excessively, so I use a paper towel's edge, to absorb excess urethane-stain mix from areas where it gets too thick, especially on the base. Go back, after five minutes of applying it. to check, and remove any excess pooling on each figure. I use The Dip/Magic Wash on all of my figures. Here is my blog page article on painting up plastic Viking figures, as Frost Giants, which clearly demonstrates how effective this technique is. I also used Magic Wash on some 54mm, white plastic wolves, which I use as Winter Wolves, for my Frost Giants' pets and guards. Both The Dip, and Magic Wash techniques can be used on terrain pieces, with equally good results. With The Dip, you are limited to the colors available (mostly shades of browns, and black, only); with Magic Wash, you create your own shade, whatever it may be, by adding acrylic paint to Pledge Floor Shine (around $7 for a large bottle, available at any supermarket, in the floor cleaning aisle). Cheers!
|
|
|
|
Post by Jason on Jul 28, 2014 20:16:55 GMT
Dragon722, Search The Dip technique on the Internet for oil-based wash techniques. It is phenominal, fast, and it just works... The Dip is where Army Painter Quick Shade products came from -- they are very similar, but much higher priced. For The Dip, visit your local hardware store, and ask for Minwax Polyshades Tudor (Black), or Royal Walnut (dark brown -- yields a muddy/dirty look). After applying a simple, block painting technique to a figure (works on 6mm - 60mm figures!), thoroughly (and I mean very thoroughly) mix a can of the Minwax urethane-stain, mechanically, with a stir stick, to get the pigment off of the bottom of the can, suspended within the urethane. Then, using a disposable brush (I use the school paint brushes -- 30 for $1, at Wal-Mart) to liberally apply the urethane-stain mix to the figure. It will pool in the recesses of the figure, creating shadows. It will also pool excessively, so I use a paper towel's edge, to absorb excess urethane-stain mix from areas where it gets too thick, especially on the base. Go back, after five minutes of applying it. to check, and remove any excess pooling on each figure. I use The Dip/Magic Wash on all of my figures. Here is my blog page article on painting up plastic Viking figures, as Frost Giants, which clearly demonstrates how effective this technique is. I also used Magic Wash on some 54mm, white plastic wolves, which I use as Winter Wolves, for my Frost Giants' pets and guards. Both The Dip, and Magic Wash techniques can be used on terrain pieces, with equally good results. With The Dip, you are limited to the colors available (mostly shades of browns, and black, only); with Magic Wash, you create your own shade, whatever it may be, by adding acrylic paint to Pledge Floor Shine (around $7 for a large bottle, available at any supermarket, in the floor cleaning aisle). Cheers! Dragon, sgtslag is dead on with that advice as well. I only mix oils, because I am experimenting with other shades. However for blacks and browns dip is the way to go. It is essentially the same effect. sgtslag do you apply pledge to your minis before dip, or is it even necessary. |
|
|
|
Post by sgtslag on Jul 28, 2014 21:10:22 GMT
Excellent question, and point: acrylic craft paints (my personal choice) often have a microscopically rough, course finish, when dry. This becomes more prominent when applying The Dip, as it concentrates even within the very small texture of the rough paint! When I use Magic Wash'es, that is all I use, aside from a matte clear coat to dull it down. I never used Future/Pledge Floor Shine to seal the paint, prior to applying The Dip, until recently. I would just apply The Dip, followed by a matte clear coat. I have recently started to seal the paint, first, by brushing on a pure, full-strength coating of Pledge Floor Shine: it seals the paint, and it smooths its surface, just enough, to allow The Dip to only highlight the folds, and recesses, avoiding a stippled look on otherwise smooth surfaces. It also adds another layer of protection over the paint, itself. The Dip flows much better, over the flat surfaces, leaving them less darkened than they were when I applied it directly to the acrylic paints.
It is possible to over-do it, so I keep the number of coats to a bare minimum. Some folks claim that if you dull-coat a mini, and it begins to appear shiny (revealing the underlying coat of Pledge Floor Shine/Minwax Polyshades), your matte clear-coat has worn off, and it is time to hit it again. I have never seen this happen, but it is logically possible. Cheers!
|
|
|
|
Post by Jason on Jul 28, 2014 21:17:32 GMT
Excellent question, and point: acrylic craft paints (my personal choice) often have a microscopically rough, course finish, when dry. This becomes more prominent when applying The Dip, as it concentrates even within the very small texture of the rough paint! When I use Magic Wash'es, that is all I use, aside from a matte clear coat to dull it down. I never used Future/Pledge Floor Shine to seal the paint, prior to applying The Dip, until recently. I would just apply The Dip, followed by a matte clear coat. I have recently started to seal the paint, first, by brushing on a pure, full-strength coating of Pledge Floor Shine: it seals the paint, and it smooths its surface, just enough, to allow The Dip to only highlight the folds, and recesses, avoiding a stippled look on otherwise smooth surfaces. It also adds another layer of protection over the paint, itself. The Dip flows much better, over the flat surfaces, leaving them less darkened than they were when I applied it directly to the acrylic paints. It is possible to over-do it, so I keep the number of coats to a bare minimum. Some folks claim that if you dull-coat a mini, and it begins to appear shiny (revealing the underlying coat of Pledge Floor Shine), your matte clear-coat has worn off, and it is time to hit it again. I have never seen this happen, but it is logically possible. Cheers! Thanks! I will keep all of this in mind, if I ever decide to switch. Which is a distinct possibility, considering how many acrylic colors I have available versus the oil. Also, oil paint is really a pain to clean up. |
|
|
|
Post by sgtslag on Jul 29, 2014 17:26:35 GMT
Two things about applying The Dip:
1). Wear disposable gloves;
2). Apply it using 'school' paint brushes (30 for $1 at Wal-Mart), then pitch the brush with the gloves, when done.
"Three, Sir! Three!..."
"Right. Three things about The Dip..."
3). Do figures/terrain in large batches to get the most out of your disposables.
Cheers!
|
|
|
|
Post by Jason on Jul 29, 2014 19:37:22 GMT
Two things about applying The Dip: 1). Wear disposable gloves; 2). Apply it using 'school' paint brushes (30 for $1 at Wal-Mart), then pitch the brush with the gloves, when done. "Three, Sir! Three!..." "Right. Three things about The Dip..." 3). Do figures/terrain in large batches to get the most out of your disposables. Cheers! Haha! Thanks for the tips. |
|
|
|
Post by dungeonmistress on Jul 31, 2014 15:41:20 GMT
So, you think your Elven Wizard turned out OK? Really? Well, I have news for you, Jason, ol' Buddy, your Elven Wizard is...Freakin' Fabulous! <muttering to myself> OK? OK?! Just who does he think he is? Saying his stuff is OK? I mean the nerve of some people! <muttering becomes indecipherable as I walk away, shaking my head.> |
|
|
|
Post by grym247 on Aug 7, 2014 21:52:19 GMT
The Elven Wizard is fantastic dude
|
|
|
|
Post by Jason on Aug 8, 2014 7:14:10 GMT
Thanks! I am happy with how it turned out as well.
|
|
|
|
Post by beetlewing on Aug 11, 2014 18:52:45 GMT
Everything looks amazing!
I actually just bought that elven wizard on Friday, and this is my first time seeing that post, so thanks for that lol. I had a very similar color scheme in mind as one option, and gray & teal as another. Still can't make up my mind.
|
|
|
|
Post by Jason on Aug 11, 2014 20:18:16 GMT
Everything looks amazing! I actually just bought that elven wizard on Friday, and this is my first time seeing that post, so thanks for that lol. I had a very similar color scheme in mind as one option, and gray & teal as another. Still can't make up my mind. I couldn't help using red, because the mini looks so much like Raistlin from the Dragonlance series. Grey and teal would be a nice color scheme. |
|


 Cheers!
 Cheers!