|
|
Post by Wyloch on Dec 19, 2014 17:20:47 GMT
Never did any painting of any sort until a couple months ago when I discovered scotty's channel. Here are some things that I have learned through frustration and experimentation. This is for newbs like myself. It applies to tiles and decor. Anything you would craft. 1) Using water mix.
I only work with the Michael's brand acrylics. Americana, Folk Art. So this will not always be true but I have not found any need to mix my paints with water. At all. 2) Standard three color bring-upBase coat: 100% coverage. Second coat: paint brush at an extreme angle (almost parallel to the piece) and only moderate pressure in order to not "shove" paint into deep crevices. Final coat: dry brush. Important - after the second coat, the piece will probably look odd, or even "bad." It's amazing how much difference the final dry brush makes, tying it all together. 3) Don't always base in black.
Many early tutorials tell you to black bomb. That is often appropriate. But if you are trying to achieve a sandstone kind of look, you'll never get there. Don't be afraid to base in gray, brown or some other color. But it should be a more neutral/pastel/muted shade. 4) Don't always dry brush in white.It sure does make things pop, and the piece you're working on will look great. But when everything on the table is frosted with white, nothing is special and nothing stands out. This error is notable in my project here, where the walls and floors are hard to differentiate: dmscraft.proboards.com/thread/2281/wylochs-modular-tiles-cause-instructions?page=35) Walls and floors should contrast.Again, see failure here: dmscraft.proboards.com/thread/2281/wylochs-modular-tiles-cause-instructions?page=3I guess this isn't a painting tip, more of a design choice tip. Anyways. THE FUTURE (for me)After doing more reading and watching more videos, I have seen a backwards approach to the three-coat-bring-up. Basically, you "base coat" with your middle (second) color. Then, mix black with water...very diluted black paint...and wash the piece. Dab off excess, and you've created shadows. Finish with dry brush color as usual. Haven't tried this yet. |
|
|
|
Post by Deleted on Dec 19, 2014 17:38:05 GMT
I always use the black wash for shadows now on minis. Once you get the hang of it it adds great effect. Its super easy to practice with since it is really watered down anyways. Wish I could have read this when I first started. This is what got me started on amping up my mini painting. Plus a helpful pic for others. how to paint minis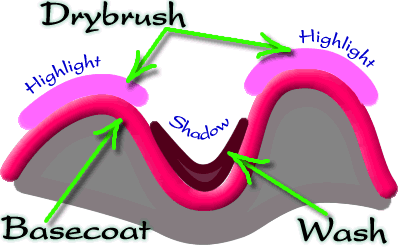 |
|
|
|
Post by rane on Dec 19, 2014 18:39:15 GMT
To emphasize a couple of your great tips
I also have the Michaels Acrylics and I find im only ever applying water if I want to achieve an opaque effect with the color.
The only thing I ever drybrush in white are tile walls, to really make them pop off the board and show players the boundaries of the tile. I find things like a Tan/Beige are phenomenal for wood effects - it really brings out the texture but keeps the color in theme of the effect.
|
|
|
|
Post by adamantinedragon on Dec 19, 2014 23:15:38 GMT
I typically use a mix of white paint and a dollop of the color I am highlighting for my first layer of drybrushing. If I REALLY want something to pop, I'll do a second, much lighter, dry brush of pure white on top of that.
Thinning your paint is sometimes useful, especially if you are doing very fine detail with tiny brushes. Even Michaels' acrylics.
|
|
|
|
Post by lordmorbius on Dec 20, 2014 2:13:19 GMT
As for walls and floors contrasting, I'd say that floors, where the dust, dirt and scuff marks of boots tend to settle, should be darker than the walls.
Walls on the other hand, do not collect dirt and dust, but do find the occasional cob web. Walls are also the mounting points for torch sconces (and hero held torches tend to be around head height), which means that they will probably be more illuminated than the floor, which is further away.
|
|
|
|
Post by DnDPaladin on Dec 20, 2014 10:26:22 GMT
White drybrushing as DMG said often, is for aging effects. if you dont intend to age your stuff up with white... you should definitely dry brush with a lighter color of the same color you used on second coat. exemple of DMscotty using 3 types of brown on his wood textures. a dark brown, a lighter brown and then a very light brown. that way you dont get aged woods. you get lighted effect. as for bse coat colors, thanks to my projector i now understand the difference between white to black. a screen projector will need to be grey, thats the 50/50 brightness setting. going all the way white, would be very lighted colors. and going all the way black, would be much darker colors. basically, if you paint grey, true grey i mean, the 50/50... your colors will not lose or add anything. they would stay the color you painted. if you go white, they'd end up becoming lighter. and if you go black, they'd end up drying darker, like in DMG and Scottys vids. beware, mixing the colors directly to white or black doesn't really make this true. i tryed often to mix my black directly to my brown to make it darker, and it works but no the same as if i had painted black, let it dry and then added brown above the coat. so i really dont suggest you mix with white or black to try and light or darken the colors. if anything just paint, wait to dry, then paint again. that said, im not really into that paint wheel to know which color do what color. something liek this i think...  i know there is an acrylic wheel that is being sell, that if you spin you actually get to know which colors gets you what. but i haven't tryed it at all. if anything dont ever use the computer color RGB codes, theya re totally different and totally do not work the same way. this is only true if you let the base coat dry up entirely first. of course colors do not stack. so once the door as been brushed brown, dont expect the black or white to ever show itself again. colors are only affected by the last color painted. at least thats what i understood since i started. |
|
|
|
Post by DMScotty on Dec 20, 2014 14:35:20 GMT
Nice to see how you learned from some trial and error wyloch. Thanks for the share.
|
|
|
|
Post by thedmg on Dec 20, 2014 21:07:38 GMT
I use a simple colour pallette because it simplifies the painting tutorial and reduces the cost to new comers. A lot of what I have done in painting has been over simplified on purpose. Almost my entire series so far has used primarilly black, white, yellow and brown, with the occasional blue and red.
I only ever edge highlight in white on the walls or floor when they are above the first layer, so the raised areas stand out. Then I also do point highlights randomly on flagstones to breakup the monotonous look of the flagstone floor.
I did not want to get into colour theory (the colour wheel) and explanations of more advanced painting techniques as I feel that is something one can do on their own.
Another aspect is time. You can waste a lot of time painting details no one will see. I also try not to have long periods of drying so that people can quickly produce pieces to use.
Understanding washes is important for models, but I would not overuse it on low detail terrain, purely because most of the time the moisture will warp/damage the piece if made from absorbant materials like cardboard, wood and certain types of foam.
I had thought originally to do detailed ink lined flagstone patterns with washed edges in a deep grey green and pointalist stippling in a midtone grey. This would have taken weeks to finish a sizeable dungeon and would have been too over whelming for beginners - something I feel would have turned them off trying to craft their own stuff.
Painting is a HUGE discipline and most of what we do here is a toe in the water. No matter how skilled you are there is always something to learn.
I started using a "wet" pallette for painting minis a few months ago and a simple change in pallette choice makes a huge difference.
|
|
|
|
Post by ashrothedm on Dec 23, 2014 16:00:47 GMT
There are a few points I'll add too here (and restate a little bit):
If you want a vibrant color, starting from black will make it muddy. It's much easier for a bold color to start from a white or gray primer. Black is a simple starting point for painting miniatures, because by default a black shadow will be in the recess of the miniature.
As for color wheel and mixing colors: when it comes to light and dark, the color you want may or may not involve mixing white or black. It actually almost never does, but it's passable and easy if you do for minor variations in color. For more drastic changes in green for example, tossing yellow in to lighten it will (probably) get you to the color you want.
|
|
|
|
Post by runningwolf on Dec 27, 2014 14:43:58 GMT
By no means to I consider myself an artist.... But after learning a bunch of techniques from DM Scotty and other folks around the forums I no longer end up having stuff looking like it was painted by a 4 year old child. Thanks for the post, will definitely help out a lot of newbies. I had heard about dry brushing and washes and all but had never had the stuff explained. I know that frustrated me to no end when I was a newbe. Always want to point out that that is the reason I like this forum (the videos and the FB page) so much. It's not just advice, it's friendly advice. No one gets flame for asking a newbe question. People of all skill levels will post very basic information for the newbe (and easy to find) in terms that are easy to understand.... just for the love of the craft. Back when I first started gaming the early/mid 1980's.... If someone would have taken the time to explain painting techniques to me back then I would now be super mega awesome instead of just so/so  And to all the folks starting out painting stuff keep up with it. Like riding a bike, or cooking, or anything else in life you need to do it a few times to get a feel for it. You will screw up several times. After screwing it up a few times you'll have a eureka moment when it will all come together and make sense. You'll all of a sudden get the feel for the brush/paint and be able to feel some confidence. Once you have the confidence you will want to experiement.  And newbes, don't be afraid to ask questions or ask for help. All of us have been there. All of us are at different skill levels. All of us have a slightly different way of approaching something (listen, gold mine for ideas that seem to work the best for you)..... And that doesn't just apply to newbes. I've seen people with some mad skills ask for advice, no one is all knowing and perfect. |
|
|
|
Post by tauster on Dec 27, 2014 17:35:19 GMT
runningwolf: glad to have you back!  I often feel a bit silly for posting each and every single step of a project, since I've done that dozens of times already, and after all, once you have posted one drybrush, you know all... Your posting just convinced my to continue without like as before.
|
|
|
|
Post by runningwolf on Dec 28, 2014 22:46:28 GMT
runningwolf: glad to have you back! I often feel a bit silly for posting each and every single step of a project, since I've done that dozens of times already, and after all, once you have posted one drybrush, you know all... Your posting just convinced my to continue without like as before. Good to be back. Usually when you say the devil is in the details it's cause something went sideways. Only takes a min or so to show/explain what dry brushing is. Seems a lot of tutorials on things either assume you know nothing, or have been doing it for years and know your poop. I got in the habit of the KISS (Keep It Simple Stupid) when I was doing some screen shot tutorials for my mom (who barely knows how to turn on her computer). Having a short vid/pic tutorial on simple stuff posted (say wash, dry brush, is your razor blade sharp?) that you can reference is also a plus.... They don't need to be long and drawn out. And that's not to say that stupid people are watching. I can tell you some IT stories about experienced folks making rookie mistakes that drove them crazy because they were checking the complex problems and not the rookie mistakes (like me not seating a card right and going crazy for 2 hours). The hard thing in making a tutorial is trying to balance everything out. It's always better to explain/reinforce the basic concepts.... I'm trying to learn CGI, and 90% of the stuff I run into assumes I know graphic design  . When I do things I try to make it entertaining enough to keep the interest of someone who knows what they are doing but not gloss over the basics that a newbe might be lacking. Trying to make it so I don't frustrate others (like the CGI example I just gave). |
|
|
|
Post by DnDPaladin on Dec 29, 2014 7:06:46 GMT
in communication class, i learned that you should never ever expect someone to knw the same stuff you do. even if its the basic stuff.
for an exemple...
all of you all do the same thing when it comes to dry brushing... you say its a wet removed brush and that you should only lightly brush the figures or the minis. but none of of you even show or talk about the pressure you give to the brush, none of you even show how close tot he mini you are when dry brushing. and as such, my dry brushing never really got to be like in your videos. i had to learn by myself that dry brushing is all about not even touching the minis. its like you have to barely touch it at all for it to work. otherwise it puts too much paint onto the mini.
sometimes the very very very basic stuff is harder to grasp then you think. and it doesn't mean those people are bad in it. its just that ts easy for you and forgot how hard it was when you started. so i agree that every little detail even if they are benign have their importance.
|
|


 . When I do things I try to make it entertaining enough to keep the interest of someone who knows what they are doing but not gloss over the basics that a newbe might be lacking. Trying to make it so I don't frustrate others (like the CGI example I just gave).
 Cheers!