|
|
Post by onethatwas on Dec 18, 2013 7:45:49 GMT
So I had a rather long absence from this board, and during that absence apparently I missed some interesting foamcore crafting techniques. Specifically I'm seeing usage of foamcore to replicate a more textured stonework floor effect.
Now normally I dislike foamcore, because it eats the edge of my box cutters like crazy, and it doesn't play well with spray paint. Not to mention the expense. But I've resolved that I want to use foamcore to make a high quality Tavern project. I want to make sure I have a good handle on the techinques though.
So in interest of that, I am asking for pointers from this awesome community to get a handle on foamcore crafting. Does anybody have any links to videos, or picture tutorials they can share?
|
|
|
|
Post by adamantinedragon on Dec 18, 2013 8:29:58 GMT
One, I've done a bit of crafting with foam core boards. I have been making a fort from foam core and some pringles and nut cans, here's how it looks right now: 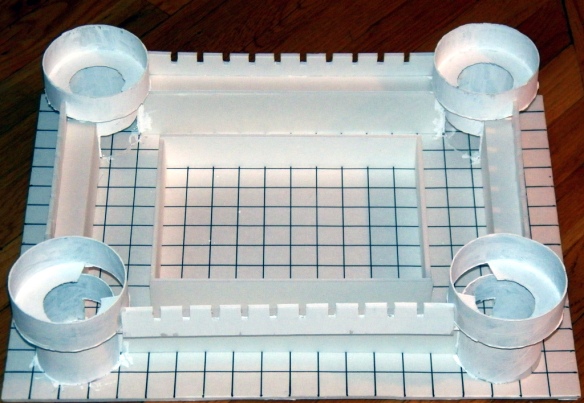 I'm probably going to paint it with the stone texture and call it done. I've also made a palace with it. In general I find that it is pretty easy to work with. But I haven't done much with the texture approach others use. I haven't stripped off a layer of paper and then textured the foam. That just seems like a lot of effort and would greatly reduce the structural integrity of the foam core. I almost feel that if I wanted to do that, I'd just shave off sections of polystyrene from blocks and use that since it's cheaper (usually free) and I can control the thickness. As far as working with the foam itself, yeah working with polystyrene or any similar foam product is going to have problems, especially with spray paint that uses propellant that eats the foam like acid. If you have an airbrush that might not be as much of a problem. I've also found that the foam core I purchase at dollar stores is much more difficult to work with than the stuff I get at Hobby Lobby or other craft stores. The paper in the cheap stuff seems to be thinner and more easily damaged with any liquid or solvent touching it. However, it is cheaper and if you aren't using solvents and keep it dry, the cheap stuff seems to work OK for me. I have used foam core as a base for my Hirst Arts efforts and it seems to work well up to about 8"x8". Bigger than that and it starts to warp. Not sure if this is any help, but I can say that in general I find foam core board to be a very useful crafting tool for my gaming. I use it a lot. |
|
|
|
Post by onethatwas on Dec 18, 2013 8:49:47 GMT
I've used it before, but often only for bigger projects. Foamcore, strangely, seems more durable than cardboard (if only slightly). But my biggest issue is the spray paint one. I had such a disappointment with it (before having the knowledge of how styrofoam reacts to spray paint propellant) that any time I use it I take great pains to protect the foam center.
I understand its potential, even though I gripe about it. My experiences have just been somewhat negative. But I'm hoping that for this project I can make it work for me, to epic effect.
By the way, that castle looks awesome!
...I'm thinking that I'll be using a wide combination of styles to make this work. I don't think i'll be using plaster though. Clay maybe. But as far as warping goes, I plan on using square dowels for yhe 2.5 walls instead of cardboard for extra rigidity and strength.
Thanks for the pointers
|
|
|
|
Post by sgtslag on Dec 18, 2013 16:44:29 GMT
With regards to paint, there are spray versions of latex paints available -- no solvents; check craft stores for this type of paint -- ask a staff member, the paints may be located in the floral supplies section. Otherwise, try latex house paints, in smaller cans, to seal your project (brush on, roll on, or spray with something like a Wagner, or a compressed air painter tool); once sealed, solvent-based paints can be applied. With regards to warpage, try painting the opposite side, to help it warp back to flat, or paint both sides at the same time, and let dry vertically.
House paints can be custom-mixed in any color needed. Check the standard paint chips for a suitable color, though, as custom mixes tend to be more expensive than off-the-shelf colors. House paints can also be less money than craft paints, when purchased in bulk. House paints come in glossy, semi-gloss, and matte finishes. They tend to be thicker viscosity, but it can be thinned with water, or extenders (ask at the paint store). For terrain pieces, house paint can be a great bargain. Cheers!
|
|
|
|
Post by bloodchoke on Dec 19, 2013 7:31:16 GMT
Here's a thread I made on the old forum about foamcore. dmscraft.proboards.com/thread/118/using-cheap-foamboard I specifically use the cheap shit from the dollar tree because the paper peels off easily. I've been away for a bit also, but I've noticed a few other people are using it now, so glad it's catching on. I've also used the regular foamcore to make walls for 3d buildings. As mentioned, paintings a bit of a pain, but when I used it for outside walls, I just put a layer of white glue-corn meal mix and then the paint went on fine. Anyway, hope that was what you were looking for. |
|
|
|
Post by onethatwas on Dec 19, 2013 9:13:44 GMT
Thanks bloodchoke. That was really helpful (and I knew I saw a thread about this somewhere, but couldn't find it).
Would it be worth using glue to give the foam some durability after I've peeled off the first layer though? It seems like a good idea, but I'm not seeing any comments about it.
What I'm planning is basically half foamcore stonework, and half foamcore woodflooring. So I anticipate some challenges...
|
|
|
|
Post by bloodchoke on Dec 19, 2013 9:39:38 GMT
Cool. glad it helped. What I do is peel off one layer and glue that side to cardboard (cut to match), then peel off the top layer and do the texture. They turn out pretty strong, and with the cardboard backing, I haven't found any warping yet.
|
|
|
|
Post by skunkape on Dec 19, 2013 17:35:57 GMT
I specifically use the cheap shit from the dollar tree because the paper peels off easily. I've been away for a bit also, but I've noticed a few other people are using it now, so glad it's catching on. I've also used the regular foamcore to make walls for 3d buildings. As mentioned, paintings a bit of a pain, but when I used it for outside walls, I just put a layer of white glue-corn meal mix and then the paint went on fine. Anyway, hope that was what you were looking for. I can second that thought, I use the Dollar Tree foamcore board as well, because the paper peels off easier than regular foamcore! |
|
|
|
Post by onethatwas on Dec 19, 2013 20:27:33 GMT
I ended up using more expensive (like 50 cents more expensive...) Foamcore, but I did have some issues peeling the paper off. In the end I left a thin layer of the paper stuck to the foam, but that'll probably help with the boards integrity. I also gave it a glue coat, which will help it stay firm in the face of abuse (say one of my players has those craft killing metal dice...seriously, gaming etiquette should say, "thou shalt not fling metal dice towards gaming terrain").
The wooden dowels I used in place of cardboard strip walls are working well, but I'm worried they won't remain attached as effectively. I had similar problems with them when I attached them to cardboard, but foamcore seems to be more finicky...
Anyway, thanks for all the input, and please, keep the tips and advice coming!
|
|
|
|
Post by onethatwas on Dec 20, 2013 19:22:52 GMT
...ok, so I just hit a small snag, which is that I have the sides of my tile exposed (the layer of foam).Cardboard hasnt been an issue, but I'm seeing some issues with foam core in that it tends to flake out, especially in areas where I've cut into it to create the stone floor pattern (came out really awesome btw).
Any tips for sealing the sides of the tile to keep the foamcore board integrity?
|
|
|
|
Post by pedrodevaca on Dec 20, 2013 22:48:02 GMT
I'd try trimming it with card stock or popsicle sticks (trimmed to size) with liquid nails or tacky glue, something strong that won't damage the foam. Or maybe brush on diluted spackle, let it dry, and paint it. I haven't worked with foam core though, just things I would try. good luck.
|
|
|
|
Post by skunkape on Dec 22, 2013 2:57:34 GMT
I use cardstock, 110 lb paper to cover the edge of my tiles, that keeps the foam from flaking away!
|
|
|
|
Post by onethatwas on Dec 22, 2013 8:05:26 GMT
So here's the progress of my foamcore project. As much as I like the way it has come out so far, I am reluctant to do so in the future except in dire need. Alot of effort was required that could have been spent on crafting alot more stuff. But hey, I have a really neat dive tavern now... 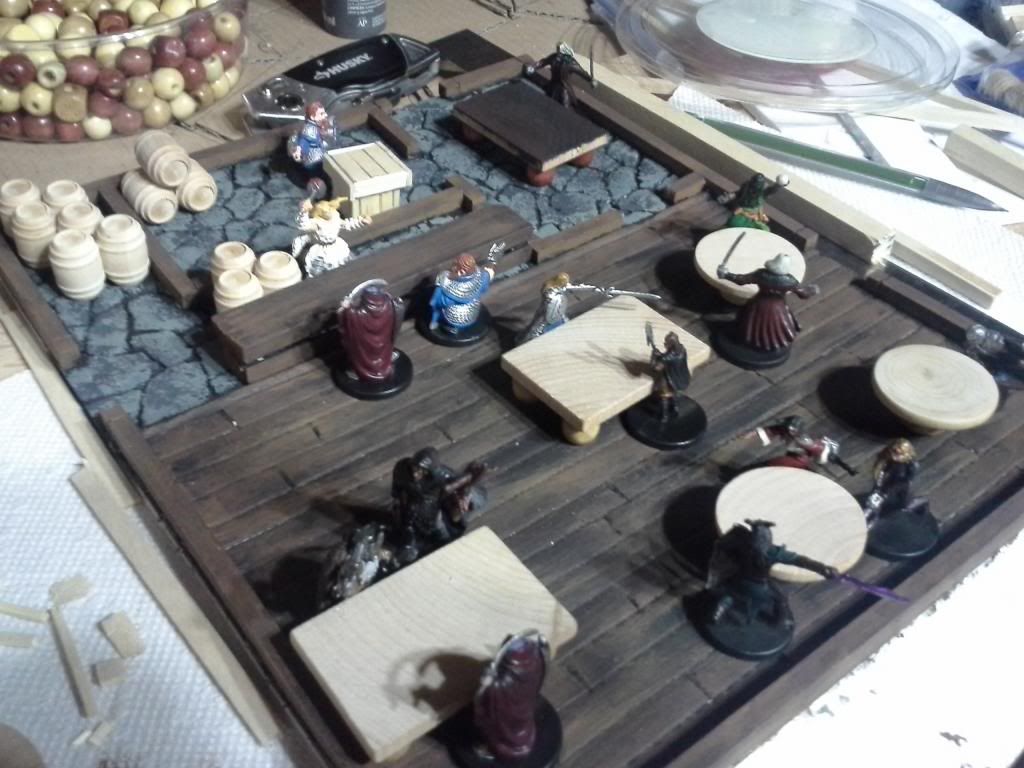 |
|
|
|
Post by Admin on Dec 22, 2013 12:16:02 GMT
I use spray paint on my foamcore and it's fine, doesn't eat at the foamcore at all.  |
|
|
|
Post by DMScotty on Dec 22, 2013 16:06:41 GMT
Genius in constructing the super easy tables.
|
|
|
|
Post by pedrodevaca on Dec 22, 2013 16:28:14 GMT
That tavern looks great! Also your easy furniture construction has relieved my anxiety about crafting furniture. Woot!
I've done a couple furniture pieces using white glue and matchsticks, but my ogre fingers make it a very frustrating process. Basically, I fumble my way through half a dozen or a dozen iterations, destroying the furniture every time I touch it, until dumb luck and probability go my way and the piece accidentally aligns properly and I can stop touching it and let the glue dry. When that happens I throw my arms up in triumph, do a little in-zone jig, then go punch a kitten right in the face.
Your method seems like fewer kittens would be harmed during construction.
|
|
|
|
Post by onethatwas on Dec 22, 2013 17:17:40 GMT
I meant to mention the furniture in my last post. It was a bit of inspiration from DM scotty actually in crafting torch holders. After seeing that video about half a year ago, I basically took some woodsies discs (the 1 inch ones) and glued a bead to the bottom.
When it got flipped over, I noticed how much it looked like a tavern table. So I basically use them for both purposes.
Yesterday I saw some rectangular woodsies, snatched them up, and basically used the same process. I did have to rumage for some smaller beads for the legs though. The larger ones I use on the round tables are larger to lend more balance support. You can see the beads I use in the back.
The bar was more complicated. I used a piece of trim I bought to make a robot hand with (used for the fully articulated fingers), three wooden dowel strips measured to the bottom (which, due to the manufactured beveling, is smaller in width than the top you see), glued those on at equal distances along the length...then I got a coffee stirrer snd cut it to length, and glued it on the front onto each end of the three dowels.
As for the barrel woodsies, I glue those in sets of three for the added weight and convenience in stackability. Not rocket science, but a useful tip for anyone who (like me) suffers occasional blond moments
|
|
|
|
Post by adamantinedragon on Dec 22, 2013 18:30:43 GMT
OK, here's Fort Pringles with a rough paint job and an inside floor made out of coffee stirrer sticks.  It’s amazing what you don’t see until you take a photograph. Clearly I’ve got some touchup work to do. But not a terrible amount. Here are the things I’d still like to do to “finish” this project: 1. Get some lichen and/or moss and glue it around the base of the fort’s outside walls as shrubbery. 2. Line the road into and out of the fort with some bricks or maybe more shrubbery. 3. Do some ivy or vines climbing up the walls. 4. Do at least two more floors for the interior part. Still, it’s at a point now that I’d actually put it into a game. |
|
|
|
Post by onethatwas on Dec 22, 2013 19:11:34 GMT
I like those coffee stirrers for the inside flooring. A clever alternative to either painting on a wood pattern or cutting it out into foamcore like I did.
believe it or not I'm not even close to being done. I mean, yeah, I can use it, but I still want to have a stair crafted in the back nook (which naturally assumesa second floor), and modular walls...that is, removable walls, to divide the main tavern area from the kitchen and storage rooms. Then I want removable corner pillars...basically I'm trying to create the impression of actual 3d walls throughout the tavern without actually making it 3d. And still be able to make it 2.5d on the fly.
And also considering a cellar. That would be the harder part, since I'd have to cut out more stone floor pattern into some foamcore...
|
|
|
|
Post by adamantinedragon on Dec 22, 2013 19:25:31 GMT
I considered cutting the coffee stirrers to random lengths, but it just would have taken forever. Next time I build a floor that way, I'll do random lengths. I think it will look much better.
I might just score the sticks to create the illusion of random lengths though....
And, yeah, I still have a ton of things I could do to the fort, like put in stairs, ladders, railing on the inside of the parapet.... When does this stuff stop?
|
|


 Cheers!
 Cheers!