|
|
Post by kgstanley81 on Dec 26, 2015 2:16:46 GMT
welcome and great start so far, what curufin said about the paper towel/toilet paper or if you wanted to keep the stepped look you could use light weight Spackle to cover the edges. love the song of stuff, i almost wish we (gaming group) didn't move our night to play to wednesday nights, because before we played dnd my dad and i could get a game of SoBH in, so fun i'll have to take a picture of the 3x3 game board i made for us to play on
|
|
|
|
Post by jennifer on Dec 26, 2015 3:40:31 GMT
Here is the link to the Insider Trading. It is just a thread for those that like to give/trade crafting supplies to other members. I think the small hill will work just fine. And it is a very useful way to get rid of junk cardboard. As for the finishing, I would wrap the whole thing in a water/PVA glue soaked paper towel. That will hide all of the corrugation of the cardboard and give the a slightly more slope-like feel to the hill. Once it is dry, you could add more texture with hot gun, or just paint and flock. A couple of large pebbles glued down might also look nice. Anyway, just options... Your stuff looks great! You are off to an amazing start! Spend some time going though other treads, ask questions, leave comments, get inspired, and above all have fun! Such a smart idea with the pva'd paper towel ! I went with leftover miter saw sawdust and pva/water mixture and filled it in that way this time.. but the paper towel is even more brilliant  I'll try the paper towel way next time. |
|
|
|
Post by jennifer on Dec 26, 2015 3:45:28 GMT
welcome and great start so far, what curufin said about the paper towel/toilet paper or if you wanted to keep the stepped look you could use light weight Spackle to cover the edges. love the song of stuff, i almost wish we (gaming group) didn't move our night to play to wednesday nights, because before we played dnd my dad and i could get a game of SoBH in, so fun i'll have to take a picture of the 3x3 game board i made for us to play on I have a bunch of plaster of paris. Would that work the same as Spackle for this purpose? Or would it crack easier? I haven't played a SoBH game yet but it seems like it would be a lot of fun! SUre, I'd love to see the 3x3 board you made |
|
|
|
Post by kgstanley81 on Dec 26, 2015 4:15:06 GMT
i have used plaster in some applications as a trial run, my river sections and swamp, i was worried about the braking and just falling of, so i added some white glue to the mix (along with some grit to give it texture) 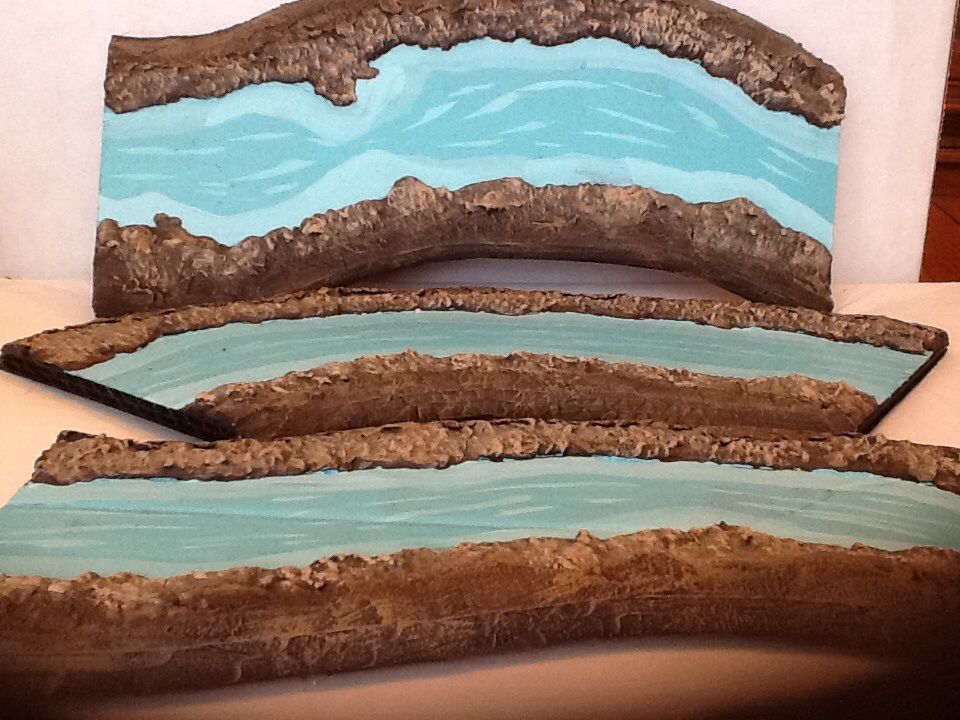 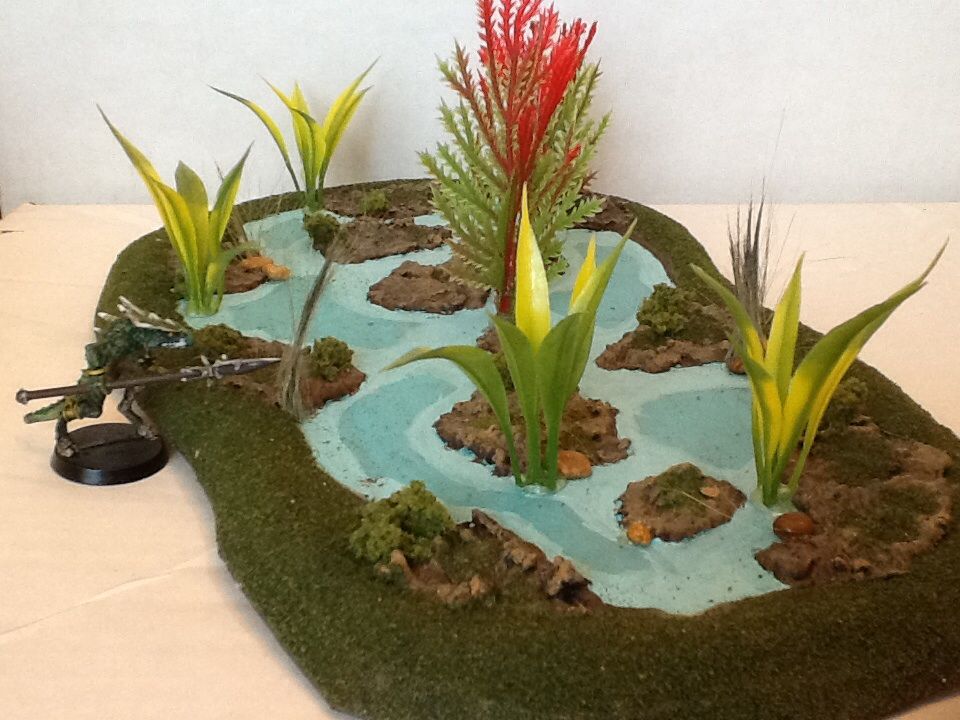 i think that it would work, you could always do a trial run on a piece and see how it looks |
|
|
|
Post by jennifer on Dec 26, 2015 7:41:49 GMT
Just got this idea from reading another thread here -- a bamboo mat was mentioned. I am thinking quick and easy picket fences.. Just need to paint it. I actually easily cut the mat with scissors--yay!  Or a suspended wooden bridge, wooden walkway, dock or hut? |
|
|
|
Post by jennifer on Dec 26, 2015 21:58:57 GMT
So I finished the other 2 ruins and the stepped hill thingy. (All shown in cardboard form in previous posts in this thread.) I am/was trying something new regarding the flock.. I want to be able to use these ruins in desert / dirt or grassy terrain, so I was trying out the soil mix flock and some yellow. I need to blend it a bit better but works for now; I'll be improving the flock on these at a later date.  |
|
|
|
Post by Sleepy Hollow Mike on Dec 26, 2015 22:11:24 GMT
or dare I say ...Snoooow!
|
|
|
|
Post by kgstanley81 on Dec 26, 2015 22:52:19 GMT
What did you end up doing for the filling on the side of the hill
|
|
|
|
Post by jennifer on Dec 27, 2015 10:24:06 GMT
What did you end up doing for the filling on the side of the hill This time I used leftover sawdust from my miter saw mixed with white glue & water. |
|
|
|
Post by jennifer on Dec 27, 2015 15:00:33 GMT
HOVEL & MODULAR ROAD SECTIONS Started on a Hovel, inspired by DM Scotty's Mill exterior. Using chipboard for the shingles (you can see them on the back part of the roof, partially installed --- it's fairly quick and easy). Going to use large bits of construction sand to go undernearth lower beam to give the bottom part of the home a cobblestone look. Also started on my modular road. It lays fairly flat as you can see (you can only see a fine shadow on the left and it blends right in on the right side). It's 4 inches wide right now... going to trim it to 3 inches wide. The modular sections are on heavy canvas. I painted the canvas soil brown, put on some construction sand here and there, then some dyed/painted playsand and soil/yellow flock.  ![]() ![]() |
|
|
|
Post by jennifer on Dec 27, 2015 15:28:45 GMT
Here is a close up of the chip board shingles:  I'll try and texture it with a paper clip or inkless pen perhaps, before painting. |
|
Platemail
Cardboard Collector
 ( ͡° ͜ʖ ͡°)
Posts: 14 
|
Post by Platemail on Dec 27, 2015 21:23:52 GMT
MINIATURES So I am just learning how to paint minis, and just finished my second humanoid -- the knight that follows The knight came from a 36 piece knights set from Amazon.com for $6.95. I only have 35 more to paint--just kidding! I'll paint another FIVE because there are only SIX unique figures in the set.. 36 pieces 6 of each figure.  The dragon I got from the flea market for $2 unpainted (white). It was actually the first (and currently only) creature I have painted. The dwarf in the background in the ruins by the pond, was my first mini I have painted -- I still need to finish him (base and highlights etc). Could you link us to the set you are referring to on Amazon? |
|
|
|
Post by DMScotty on Dec 28, 2015 0:22:25 GMT
Great looking stuff...welcome to the family.
|
|
|
|
Post by jennifer on Dec 28, 2015 2:34:32 GMT
|
|
|
|
Post by Admin on Dec 28, 2015 14:57:37 GMT
These are looking great and welcome to the community! Looking forward to seeing more Jennifer. Thanks Scotty! (I assume Admin account is you?) Yeah, I'll be making lots more posts Nope, it's a completely different Admin. |
|
|
|
Post by jennifer on Dec 29, 2015 9:35:50 GMT
The hovel is almost done. I still need to finish the door and roof. I need to put the elongated hinge thingies on the door along with a door knob. I need to add the midtones and highlights to the shingles to give them a weathered wood look. I might fill in the exposed cardboard sections on the front, with more pebbles like the bottom. I had varnished the bare cardboard hoping it would pass as wood.. a lighter colored golden wood.  Door was painted on using DM Scottie's technique I watched from youtube.. jiust painted it right on the cardboard. The windows were printed out from my color laser printer (they are a very light yellow although the photo appears white). I used construction sand (the larger pieces) for the pebbles. All the trim and roof is chipboard. |
|
|
|
Post by Meph on Dec 29, 2015 11:01:50 GMT
Really nice work.
|
|
|
|
Post by jennifer on Dec 29, 2015 13:42:35 GMT
So I just "textured" / weathered / highlighted the shingled roof all in one shot:  I used equal amounts of the two paints above .. the grey was too blue and I wanted to get some brown in it. I used a very stiff whisker-like brush and loaded the brush as one would do when doing a heavy drybrush. I pushed the brush back in against the adjacent (upper) shingle and whisked it forward making those fine brush lines. I also highlighted at the same time after the brush was a bit dryer by lightly brushing it all over the top of the roof getting the edges of everything. Turned out to be fairly realistic weathered wood (well good enough for me anyways). EDIT: you notice the paint tray has a little of the base (espresso bean) in it .. I used this when I got a bit too heavy with the whisking of the shingles. I just layed the base down over those spots .. let it dry for a minute or two then re-did the whisking. |
|
|
|
Post by sgtslag on Dec 29, 2015 14:28:31 GMT
That house is gorgeous! Fantastic work, worthy of a highly skilled veteran. Scary that you're just beginning... Cheers!
|
|
sotf
Advice Guru

Posts: 1,084
|
Post by sotf on Dec 29, 2015 21:10:18 GMT
While it's not something for that one, when centerlining a roof, it tends to work better to start from the sides and work inward with one at the center. It's how real roofing is done as well
|
|


 I'll try the paper towel way next time.


 Cheers!
 Cheers!