|
|
Post by rane on Aug 4, 2014 6:30:14 GMT
Ive never had this problem with Mod Podge before. I'm trying to make some water pits. I'm doing it slowly in layers to build up a rather thick overall layer of Mod Podge, however on the third layer it dried with these sections of bubbles/discoloration. It's been a couple days now and it hasn't changed. I'm pretty sure it's now cured this way. Is there any way to fix this, or is this how the tiles will be?   |
|
samyjane
Tool Gatherer
 Craftoholic!
Posts: 95 
|
Post by samyjane on Aug 4, 2014 10:44:51 GMT
I would suggest not using Modge Podge for that purpose. It's not really meant to be layered up like that, it's meant to all blend together. I would recommend a water based varnish, like DMScotty and theDMG uses. It can seem expensive for the size of the can you get but you will be using that same can for years if all you are using it for is tiles like that. I've used it to build up layers on a lot of things, like coffee tables, vases and other things that I've decorated. It gives it a nice finish. And the first layer is dry enough to do another after about 10/15 minutes. Then you just leave it overnight to fully cure. The thing about Modge Podge is that it's thick, so it takes longer to dry and if you don't do it very precisely what happened to you can happen easily. The water based varnish is very thin, so it will all dry quickly and in one even layer, rather than a thick layer that will separate itself into smaller layers and bubble. I'm guessing the with the Modge Podge, since you were trying to build up layers you were putting it on pretty thick, which is the biggest part of the problem. If you are set on using Modge Podge then make sure you are doing very thin layers, and that you don't go over a layer until is is 100% dry all the way through. For things like this I would say the varnish is actually cheaper, because you use so much less of it than the modge podge.
|
|
samyjane
Tool Gatherer
Craftoholic!
Posts: 95
|
Post by samyjane on Aug 4, 2014 10:46:13 GMT
Also, sorry I didnt' answer your whole question. You might be able to even it out a bit by using light sand paper. Or you can try to take a craft knife and peel it up off the tile, and then use the sandpaper on what's left, and then start over.
|
|
|
|
Post by ashrothedm on Aug 4, 2014 11:53:37 GMT
I disagree: I would highly recommend modge podge for the water effects. samyjane does describe the proper use of modge podge, but you can also get great water effects from disregarding everything that the packaging says. There are a few people on the forums that have some nice looking modge podge water. Bubbles come from agitating it when it is applied and from the layers below curing. It can take several days or even a week if you liberally apply it to cure, but the color will diminish. I had a cave tile that took almost two weeks to cure, so try to be patient just in case. The bubbles are stuck in there, though. On larger projects, I end up reluctant to add the additional layers because of the bubbles. If it does not cure, you may need to remove it and start over. I agree that varnish is cheaper, but the images on the web do not do the modge podge water justice. The effect is much better than the pictures indicate, and when it is applied heavily over the painted water section, you get a depth that just can't be matched with a thin varnish. It looks like there is a fluid on the tile. In the end, it's cheaper than scenic water epoxy and can offer a comparable look. |
|
|
|
Post by rane on Aug 4, 2014 19:33:28 GMT
aye, I've used mod podge for water before and it turns out great, I've just never had it bubble up like this before.
I'll let it sit for another week or two then try sammyjane's suggestion of sanding it down and reapplying.
Thanks!
|
|
|
|
Post by Jason on Aug 5, 2014 20:58:51 GMT
I have seen Mod Podge used by professional scenery builders (Model Trains and such). So layering like that is no problem. The bubbles were most likely caused by the brush during application, and the discoloration was probably because the previous layer was not completely dry yet. I am speculating. Watch the video that I am posting, it will help with the application of the Mod Podge to reduce those problems.
I will say that I don't think it looks to bad in the pictures. Streams and such do have bubbles, and the discoloration could mean chemicals or other natural biological agents could have tainted the water.
I found this video extremely helpful, and it talks about the brush to use to prevent bubbles in the future.
|
|
|
|
Post by Jason on Aug 5, 2014 21:01:23 GMT
Oh and nice looking tiles.. btw.
|
|
|
|
Post by skunkape on Aug 5, 2014 21:27:00 GMT
Thanks for posting the video Jason!
|
|
|
|
Post by rane on Aug 5, 2014 23:30:58 GMT
I have seen Mod Podge used by professional scenery builders (Model Trains and such). So layering like that is no problem. The bubbles were most likely caused by the brush during application, and the discoloration was probably because the previous layer was not completely dry yet. I am speculating. Watch the video that I am posting, it will help with the application of the Mod Podge to reduce those problems. I will say that I don't think it looks to bad in the pictures. Streams and such do have bubbles, and the discoloration could mean chemicals or other natural biological agents could have tainted the water. I found this video extremely helpful, and it talks about the brush to use to prevent bubbles in the future. Yes I think the brush caused the bubbling. The first layer I did was horizontal waves, the second layer was vertical waves, and the third layer that ended up bubbling and discoloring was dabbing globs of mod podge with a brush like this  to make a more wavy unsettled water look and to blend in the obvious horizontal and vertical lines from the first two layers (it looked like a grid). There was some bubbles that cropped up when i was doing that but i tried to wipe them out and it seemed it removed them but i guess there were more bubbles under the surface  The light glare in the pics doesn't show it as good, but in person it looks like waves of undried mod podge are in the water as well as some bubbles that make that section of the water look carbonated The video is super helpful, im gonna grab a mop brush for future water applications |
|
|
|
Post by rane on Aug 5, 2014 23:45:28 GMT
hrmm and it seems like a mop brush could leave a cool texture for moss/mold dusting on dungeon tiles.
|
|
|
|
Post by Jason on Aug 6, 2014 1:58:35 GMT
Looking at the tiles, it would probably be much less work to trash them and remake them if you still unhappy.
|
|
|
|
Post by rane on Aug 6, 2014 2:09:45 GMT
I'm very impatient so that is likely going to be my course of action  I already have the mop brushes But i will still try to fix the tiles after a couple of weeks - if not maybe paint over it and make it some type of lava or slime pit. |
|
|
|
Post by Jason on Aug 6, 2014 2:23:28 GMT
That isn't a bad idea. Post the finished tiles when you rebuild them. I really would like to see how it turns out.
|
|
|
|
Post by DMNate on Aug 6, 2014 20:04:35 GMT
I've been using mod podge for water a effects for a while now. I've learned a couple of things: 1. You can't go too thick with it. If you want a thick layer of water (more than 1/8"), you'll have to use resin to get the depth and then use a thin layer of mod podge for the water effects on top. I've found that I haven't needed anything more than that to get great effects. It comes down to using clever painting techniques. 2. Bubbles will appear, even after it's cured, if it is not sealed underneath. Both cardboard and foamboard (what I use) will allow little bits of air to cause bubbles to form from underneath after x amount of time (the thinner you make it, the longer it will take for this to happen) To get around this, I put a good layer of PVA glue over the paint and let that dry before I apply the mod podge. This seems to solve the issue if you don't tryand make the layer too thick. 3. It all comes down to your painting techniques. To get a good depth effect, make sure you have at least a small area that is the same color as your bank or beach that is under the water before you start fading into your blue. Similarly, avoid defined lines, as nature is rarely perfectly straight.  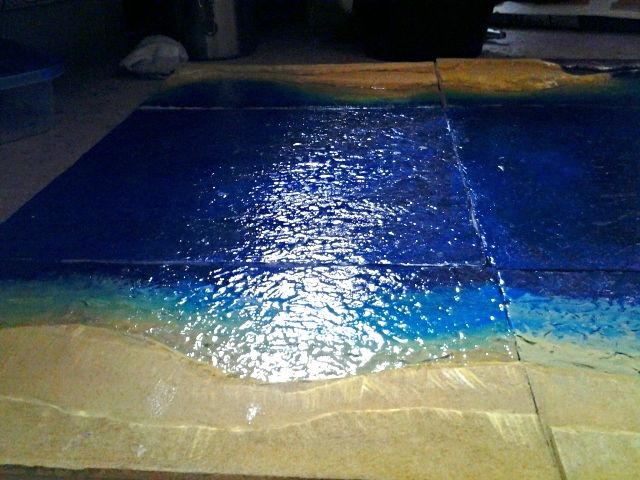 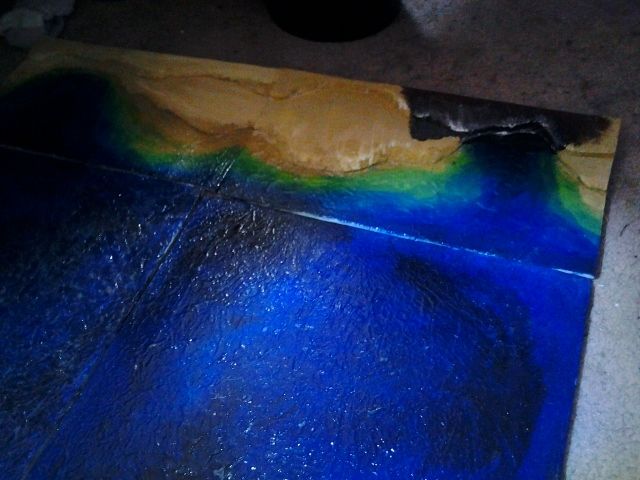 Hope this helped. Post all the pictures! |
|
|
|
Post by curufin on Aug 7, 2014 12:07:47 GMT
I have seen Mod Podge used by professional scenery builders (Model Trains and such). So layering like that is no problem. The bubbles were most likely caused by the brush during application, and the discoloration was probably because the previous layer was not completely dry yet. I am speculating. Watch the video that I am posting, it will help with the application of the Mod Podge to reduce those problems. I will say that I don't think it looks to bad in the pictures. Streams and such do have bubbles, and the discoloration could mean chemicals or other natural biological agents could have tainted the water. I found this video extremely helpful, and it talks about the brush to use to prevent bubbles in the future. Thanks for sharing. This was a helpful video. As a happy coincidence, last weekend my gf stopped by with a bunch of 1/4" and 1/2" gator board, and a self healing cutting mat. I was wondering what to do with the gator board....and now I know. |
|
|
|
Post by curufin on Aug 7, 2014 12:11:12 GMT
I've been using mod podge for water a effects for a while now. I've learned a couple of things: 1. You can't go too thick with it. If you want a thick layer of water (more than 1/8"), you'll have to use resin to get the depth and then use a thin layer of mod podge for the water effects on top. I've found that I haven't needed anything more than that to get great effects. It comes down to using clever painting techniques. 2. Bubbles will appear, even after it's cured, if it is not sealed underneath. Both cardboard and foamboard (what I use) will allow little bits of air to cause bubbles to form from underneath after x amount of time (the thinner you make it, the longer it will take for this to happen) To get around this, I put a good layer of PVA glue over the paint and let that dry before I apply the mod podge. This seems to solve the issue if you don't tryand make the layer too thick. 3. It all comes down to your painting techniques. To get a good depth effect, make sure you have at least a small area that is the same color as your bank or beach that is under the water before you start fading into your blue. Similarly, avoid defined lines, as nature is rarely perfectly straight. Hope this helped. Post all the pictures! Good call about applying pva glue first! Also you did an amazing job on those water tiles. I remember the post you made featuring how you did those and I have shamelessly copied them. |
|
|
|
Post by rane on Aug 13, 2014 4:33:09 GMT
so the imperfections went away a bit more but not enough to make the tile look good. I tried sanding it a bit but it wasn't going anywhere so I just decided to say, forget it, and I painted over the water on all 3 tiles with black again and started over. Repainted them and then put a layer of PVA glue on top  currently dried now i am about to apply the mod podge with the mop brush. Will have an updated first layer pic tomorrow |
|
|
|
Post by ashrothedm on Aug 13, 2014 16:11:37 GMT
It looks good. I would expect that given the colors you've used in the water, a good layer of Mod Podge will really look great on those tiles.
|
|
|
|
Post by Deleted on Aug 13, 2014 16:20:07 GMT
Beautiful water effects folks! I love threads like this  |
|
|
|
Post by okumarts on Aug 13, 2014 16:25:27 GMT
Very inspiring!
|
|


 Cheers!
 Cheers!