|
|
Post by curufin on Jul 14, 2014 2:36:29 GMT
That looks awesome! I really hope your players appreciate the time it has taken to craft a tile like this and give you the "thanks" you deserve.
|
|
|
|
Post by emyerson on Jul 14, 2014 14:20:55 GMT
You were crafting so hard you broke your scissors!
|
|
DM Michael
Paint Manipulator
 Preparing for 'In the spider's web' part of LMOP
Posts: 169 
|
Post by DM Michael on Jul 14, 2014 22:23:20 GMT
That looks awesome! I really hope your players appreciate the time it has taken to craft a tile like this and give you the "thanks" you deserve. They do. I have gotten a lot of positive feedback from them. |
|
DM Michael
Paint Manipulator
Preparing for 'In the spider's web' part of LMOP
Posts: 169
|
Post by DM Michael on Jul 14, 2014 22:27:27 GMT
You were crafting so hard you broke your scissors! Well at least my glue gun didn't blow up. Then again, I don't use the glue gun that much. |
|
DM Michael
Paint Manipulator
Preparing for 'In the spider's web' part of LMOP
Posts: 169
|
Post by DM Michael on Jul 15, 2014 18:40:16 GMT
Ta Da! All done! 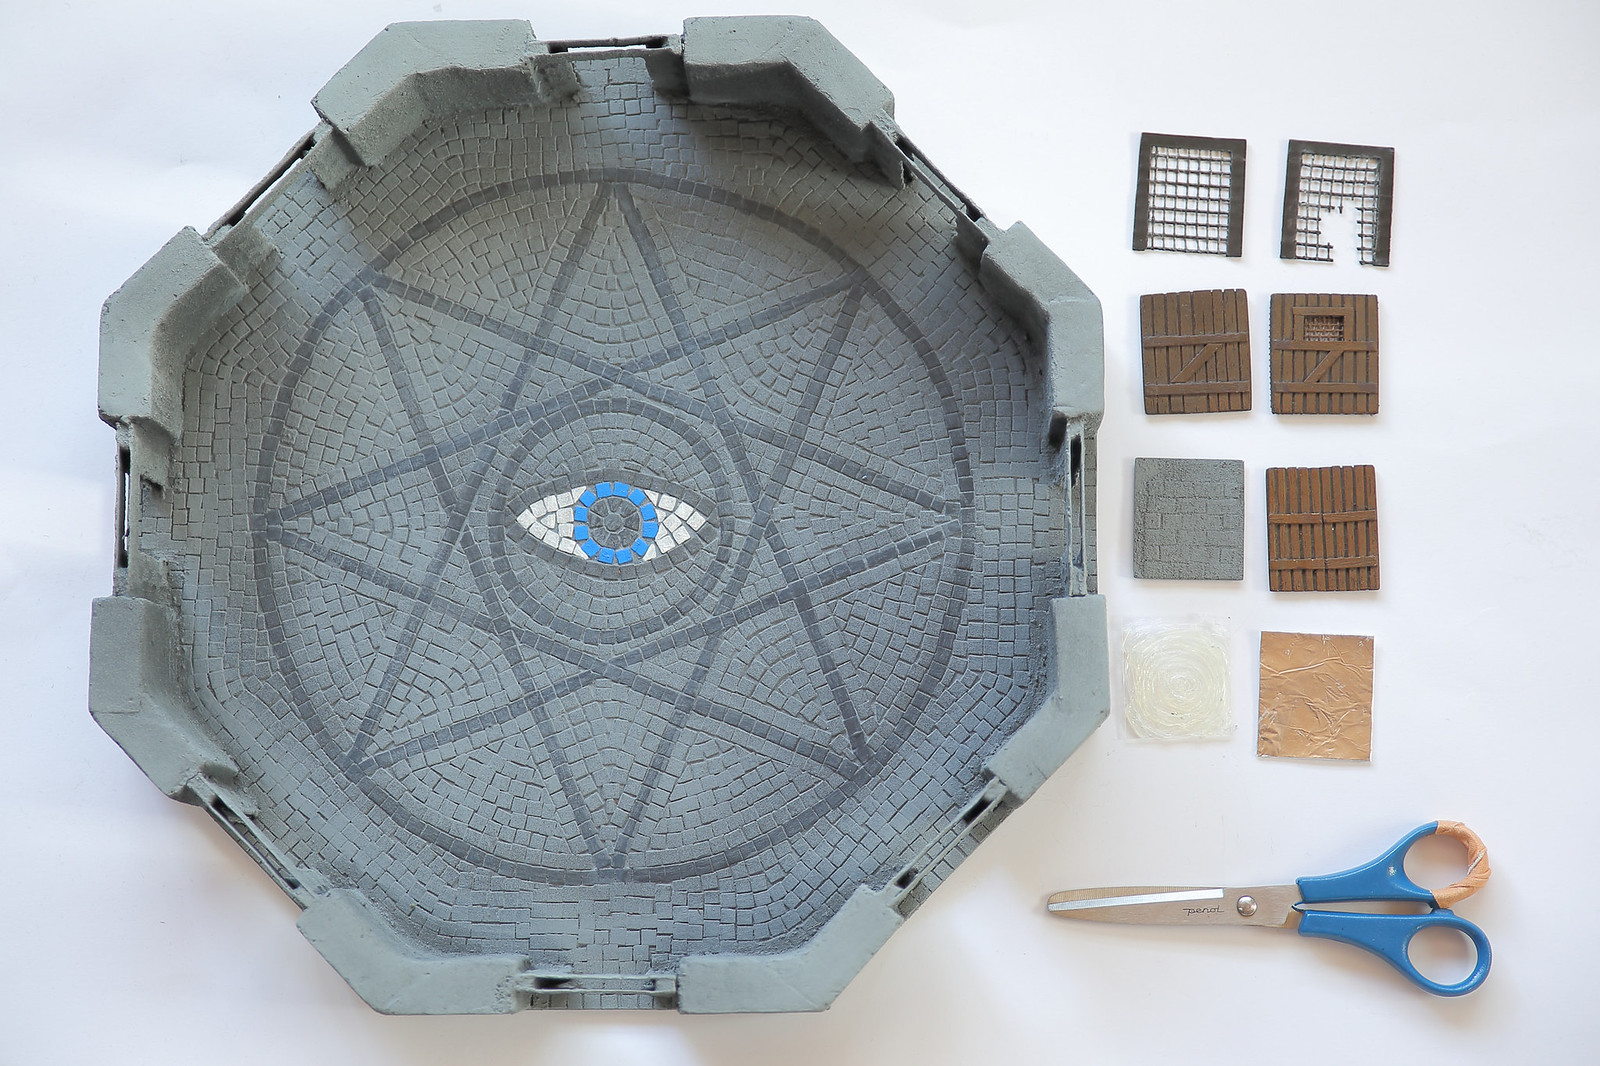 I finished the room. I ran into some troubles painting it. I am kind of impatient when it comes to letting things dry. The way I do these kinds of floors is that when I am done gluing the tiles on, I will paint the floor with a watered down mixture of white glue. 2 parts glue 3 parts water. I do this to seal in the tiles, so that I can really work the paint into the cracks between the tiles, without worrying that some tiles might accidentally come off. As a side-effect this layer of glue also prevents moisture from the paint to enter the MDF base. Well I couldn't wait for the glue to dry. The result was that the base started warping. Three of the door slots broke loose. So to stop the warping I put a weight in the centre and then let it dry overnight. When I removed the weight the paint came off. So I had to do a little extra painting before applying the last layer of black acrylic paint. I have never seen MDF warp before as a result of painting, but then again this is the biggest room I have done to date, and there was a lot of moisture in that paint. The way I paint these dungeon modules is that I "dust" them lightly with a light zinc grey spray paint and then I usually don't do anything more. This saves expensive spray paint and give the tiles some colour variation. The spray paint doesn't get into all the cracks and crevices, so corners are generally darker than the rest which look neat. I have done all my dungeon modules this way. This gives them a nice consistent look. When I started making dungeon modules I knew that I wold be making a lot, so I didn't want to make it too time consuming. (In retrospective I should have chosen another way of making floors. Approximate 60% of the time spent making modules is used to glue on the tiles.) When it comes to water features and other special stuff, I do go all the way though. I chose the eye colour blue, because then it will immediately be clear that this is an eye, and it is probably that of a human or demi human. I painted the pattern without using too much time. It didn't look right, especially the white look out of place. It was to clear and clean. When I painted the tiles I would also get paint in the cracks between the tiles along the lines. So I decided to give it a wash in the same colour as the rest of the floor. So I would apply some watered down grey paint and smear it around using a sponge. Then remove most of it again on top of the tiles. Then the blue paint came off. Not the white or black just the blue. So I painted the blue tiles again. This time I used the expensive blue paint that I use on my minis. Afterwards I would drybrush some areas to give it a more consistent look. You will see that the inner circle have different distances the edges of the octagram. That is because I cheated. The MDF sheet that I used for the base is actually half an inch too narrow to fit this room properly, so I squeezed it a little. I used the doors for aligning the edges, so the octagram is crooked. If I were to do this again I would decide what pattern to use before I glue on the first tile. I might also use the actual printed colour on the tile. This will give it a glass like look. To the right you see 8 of the doors that use for the door slots. The swirly one is based on the technique that DM Scotty used for his gelatinous cubes. In order not to burn myself, I taped the door to my crafting table before adding the glue. When my players discover a secret door along a corridor, I will exchange a straight piece of corridor with a T-intersection and then place a secret door there, to indicate that this was a secret door. Oh, and I repaired my scissors with hot glue and patch. I don’t think it can get much geekier than this. Lastly, I would like to thank Cyan Wisp for suggesting an octagram. Thanks man. |
|
|
|
Post by rane on Jul 15, 2014 19:00:10 GMT
looks amazing, would love to be lucky enough to play on that tile.
|
|
|
|
Post by gnomezrule on Jul 15, 2014 19:10:55 GMT
Wow. That is incredible!
|
|
|
|
Post by Cyan Wisp on Jul 15, 2014 20:10:59 GMT
Thanks for the credit  , but this is your masterpiece. Truly eye-popping conclusion, DM Michael! I was secretly dubious of your 5mm tile thing, but not anymore. Now...I want to "borrow" it - which is high praise around here! |
|
|
|
Post by kokigami on Jul 15, 2014 20:59:32 GMT
oh, man, 8 more little tiles and you would have had 1111
|
|
DM Michael
Paint Manipulator
Preparing for 'In the spider's web' part of LMOP
Posts: 169
|
Post by DM Michael on Jul 16, 2014 14:38:32 GMT
Thanks for the credit , but this is your masterpiece. Truly eye-popping conclusion, DM Michael! I was secretly dubious of your 5mm tile thing, but not anymore. Now...I want to "borrow" it - which is high praise around here! Thank you. I did not keep track of time, but my guess is that it took me about 8 hours to glue on all the tiles. In addition to that I probably spent an additional 2 or 3 hours to cut them out prior to that. But then again, how much time did you spend on painting the floor in the circular room in the Sunless Citadel? You may want to check out my post in the Gallery about a stargate like portal. That is what gave me the idea to begin with. |
|
|
|
Post by darkslayer on Jul 16, 2014 15:10:01 GMT
Here is an update. I have glued most of the tiles to the base. (Today was a rainy day in Denmark). I discovered a few things: 1 White glue is white! Meaning that when you apply the glue you cannot see the drawings on the base that well, which makes it harder to make the lines straight. 2 I already added 4 rows of tiles all the way around the room, so that I could make the texturing on the walls without worrying about spilling texturing on the floor. If the texturing gets on the floor before you glue on the tiles, the tiles become uneven and don't stick that good on the base. I should have waited with the texturing and the outer rows. If I had made outer circle first, it would have been easier to integrate the outer rows. 3 It is not enough to decide what overall pattern to use; you also need to figure out how to fill the "negative space". Concentric circles around the whole room or just between the lines: 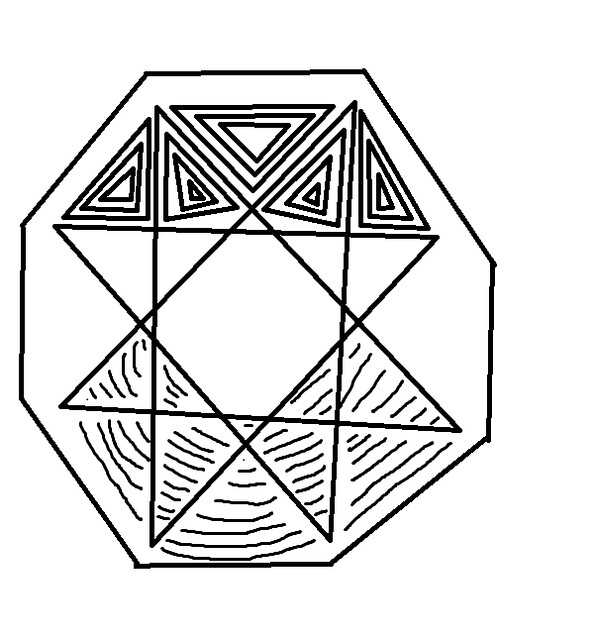 4: You need to be careful when you weave the lines between each other: 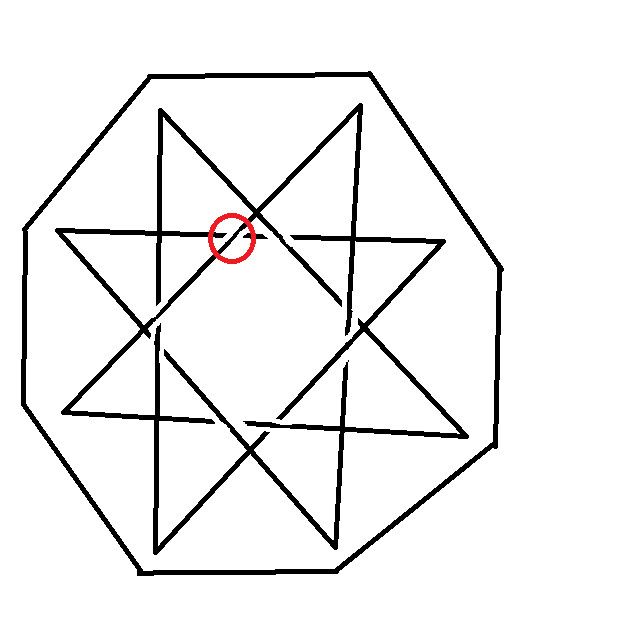 (It is hard to correct your mistakes. The tiles really stick. I discovered that the hard way.) This will be my piece number 94 using this technique for floors. However the previous 93 don't have any patterns on the floor. In retrospective, I should probably have made a smaller room first to try out the pattern making first. - I have thinking about making a small circular room for some time now. That would have been perfect. My scissors broke. My 22 years old trusted Penol pair of crafting scissors fell from the table and broke! And I am al most out of tiles.  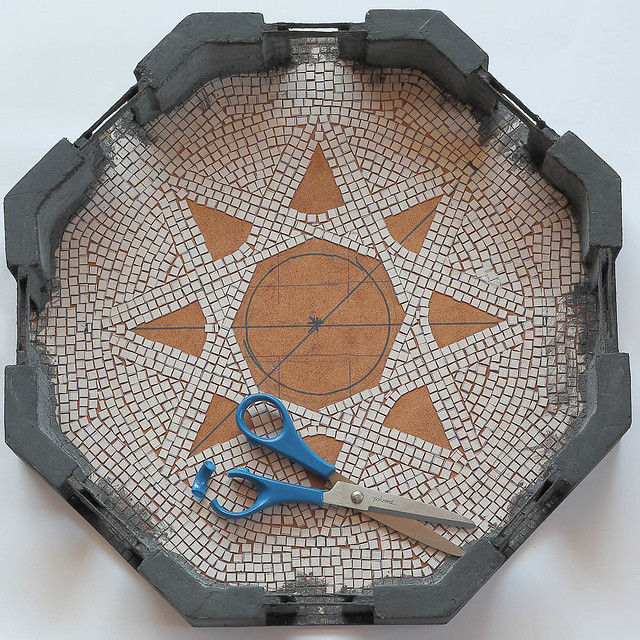 I don't think that I will do the raised tiles after all. I traced my paperboard tubes on the base and they won't be able to fit inside a circle of raised tiles. A lot of things I would place inside the circle would probably be made from these tubes. I don't really need the raised tiles. I have a feeling that my players most of time would deliberately stay away from the centre. So whatever is in the centre won’t disturbed and slide around.  I have also started thinking about what colours to paint the tiles. Red or black? What colour should the eye-colour be of the eye in the circle? Blue, green, brown, red, yellow? I would go for a light color for the tiles, like a brown and beige mixture of tiles to give the appearance of aged white. And for the eye i would go either a dark red for the pupil, or yellow for more of a pop! Sent from my DROID RAZR using proboards |
|
|
|
Post by emyerson on Jul 16, 2014 15:43:11 GMT
So nice, man. Great work.
|
|
|
|
Post by curufin on Jul 17, 2014 13:01:44 GMT
That turned out great! I am blown away! Fantastic work...just fantastic!
|
|
|
|
Post by beetlewing on Jul 21, 2014 22:36:35 GMT
That is some serious dedication! Yeah... You may want to invest in a square hole punch in the future. They come in many sizes, would be uniform, and would save you tons of time, since you use this method on all your tiles.  That said, fantastic job! |
|
|
|
Post by wilmanric on Jul 21, 2014 22:59:28 GMT
That is some serious dedication! Seconded. |
|
DM Michael
Paint Manipulator
Preparing for 'In the spider's web' part of LMOP
Posts: 169
|
Post by DM Michael on Jul 22, 2014 22:07:22 GMT
That is some serious dedication! Yeah... You may want to invest in a square hole punch in the future. They come in many sizes, would be uniform, and would save you tons of time, since you use this method on all your tiles. That said, fantastic job! I have never seen one of those, square hole punch that is. I have been thinking about getting a paper cutter machine. I fear that it will make my tiles slightly more uniform, which means that the random patterns will be less random, if you know what I mean. |
|
|
|
Post by darkslayer on Jul 22, 2014 22:18:00 GMT
Yeah... You may want to invest in a square hole punch in the future. They come in many sizes, would be uniform, and would save you tons of time, since you use this method on all your tiles. That said, fantastic job! I have never seen one of those, square hole punch that is. I have been thinking about getting a paper cutter machine. I fear that it will make my tiles slightly more uniform, which means that the random patterns will be less random, if you know what I mean. yea the slight variation in tile size actually helps the look of "antiqueness" if you will. lol it looks older i mean, which is the point, since back then they didnt have any power tools to cut uniform tiles...although they did have magic..hmmm. |
|
|
|
Post by beetlewing on Jul 22, 2014 22:55:24 GMT
I have never seen one of those, square hole punch that is. I have been thinking about getting a paper cutter machine. I fear that it will make my tiles slightly more uniform, which means that the random patterns will be less random, if you know what I mean. yea the slight variation in tile size actually helps the look of "antiqueness" if you will. lol it looks older i mean, which is the point, since back then they didnt have any power tools to cut uniform tiles...although they did have magic..hmmm. You're right, but they did have molds for ceramics ...but yeah, I didn't think about how perfect they'd be lol |
|
|
|
Post by skunkape on Jul 24, 2014 21:30:50 GMT
Looks really good!
|
|
|
|
Post by SpielMeisterKev! on Aug 8, 2014 20:02:41 GMT
Howdy, Ta Da! All done! I finished the room. Daaaaaaang dude! You MAD bro! Props to your awesome creativity... EXALT BUTTON!!! Karma 4 U, Kev! |
|


 , but this is your masterpiece. Truly eye-popping conclusion, DM Michael! I was secretly dubious of your 5mm tile thing, but not anymore. Now...I want to "borrow" it - which is high praise around here!


 Cheers!