metus
Cardboard Collector

Posts: 1
|
Post by metus on Mar 24, 2016 11:18:50 GMT
|
|
|
|
Post by sgtslag on Mar 24, 2016 13:11:05 GMT
Really neat alternative! Totally customizable... Thanks! Cheers!
|
|
pepebe
Paint Manipulator

Posts: 187 
|
Post by pepebe on Mar 24, 2016 13:27:05 GMT
Brilliant idea! A 2" plastic ball (hard plastic), a small glue gun and about 5 minutes of work and I had this: 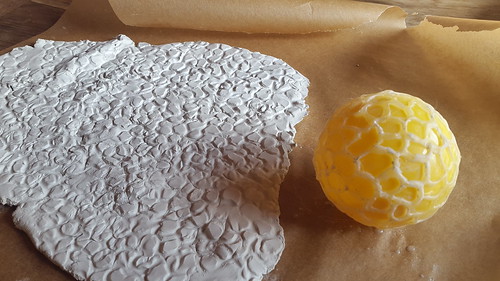 I love it! |
|
|
|
Post by l7arkness on Mar 24, 2016 13:34:35 GMT
Brilliant idea! A 2" plastic ball (hard plastic), a small glue gun and about 5 minutes of work and I had this: I love it! Thanks. Hell you could do that with a wooden dowel as well nice idea man, bricks, cobble, human muscle the skys the limit with hot glue |
|
pepebe
Paint Manipulator
Posts: 187
|
Post by pepebe on Mar 24, 2016 13:37:00 GMT
And it even works on pink foam: 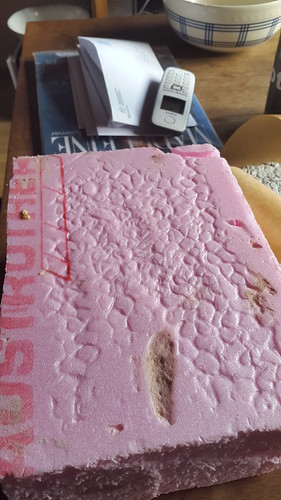 Thanks. |
|
|
|
Post by skunkape on Mar 24, 2016 14:05:29 GMT
Great ideas! Thanks for posting!
|
|
|
|
Post by curufin on Mar 24, 2016 14:07:11 GMT
A perfect example of why I just simply love this community.... Excellent work by all.
|
|
pepebe
Paint Manipulator
Posts: 187
|
Post by pepebe on Mar 24, 2016 14:10:49 GMT
If you had a piece of really hard wood, you could use a dremel tool to carve into the wood. The edges would be much sharper as the ones made from hot glue. This would make it more suitable for texturing foam board and similar stuff. I guess texturing foam board with a ball would also be easier than with a structuring roll as you can apply much more pressure to a small area. At the the same time I guess a wooden ball would stick much more to claylike materials like sculpey. In this case, a smooth plastic surface might be an advantage. |
|
|
|
Post by DnDPaladin on Mar 24, 2016 18:42:59 GMT
foamboard is a tad bit hard to make work for. its way too fragile and a just a little push dents it the wrong way. so...
but aside from that... GREAT WORK !
my uncle always said, if you dont have the tools, make em !
|
|
|
|
Post by Deleted on Mar 25, 2016 0:53:51 GMT
Brilliant idea! A 2" plastic ball (hard plastic), a small glue gun and about 5 minutes of work and I had this: I love it! Thanks. Hell you could do that with a wooden dowel as well nice idea man, bricks, cobble, human muscle the skys the limit with hot glue I actually thought that wouldn't work so well. Glad i was wrong! |
|
|
|
Post by tauster on Mar 25, 2016 7:50:35 GMT
A perfect example of why I just simply love this community.... Excellent work by all. What he said.  |
|
sotf
Advice Guru

Posts: 1,084
|
Post by sotf on Mar 25, 2016 23:17:24 GMT
Seems like the only issue would be in keeping things from overlapping wrong in messing up the pattern...
|
|
pepebe
Paint Manipulator
Posts: 187
|
Post by pepebe on Mar 26, 2016 8:50:45 GMT
Seems like the only issue would be in keeping things from overlapping wrong in messing up the pattern... I don't have any long term experience sofar, but rolling the ball like crazy all over the sculpey didn't destroy the pattern. Instead it just added details/broke down larger stones into smaller ones. The only thing that bothered me, was that the ball sticked a bit too much to the sculpey (it was the air dry one). It might be worth to experiment with some liquid (olive oil?) to make it a bit less sticky. I think that sanding the surface of the ball before glueing the pattern on top of it would be beneficial. |
|
|
|
Post by bluecloud2k2 on Mar 27, 2016 13:10:14 GMT
IIRC, water works well for keeping sculpey from sticking.
|
|
|
|
Post by sgtslag on Mar 28, 2016 16:01:10 GMT
Years ago, I used textured templates with Sculpey. There was a Sculpey web site which suggested using Armor All, a spray-on cleaner/conditioner, as a mold release agent. It worked exceptionally well. It was also water-based. I put the textured Sculpey, and the texture templates, under the sink faucet, to wash off the release agent, then I baked the Sculpey -- no ill effects whatsoever. Cheers! |
|
Akrid
Tool Gatherer
Posts: 72
|
Post by Akrid on Apr 7, 2016 3:01:35 GMT
So I'll join by saying well done pepebe, it's a beautiful idea birthed by resources at hand. I also saw mention of a wooden dowel, this was coupled with the thought of carving the wood, but wouldn't hot glue similarly applied to the dowel still function proper? Possible after a spraying with glossy enamel coating?
Also sanding the ball would give it more surface area thus increasing it's adhesion to the sculpty or other such median. I have no experience with sculpty but if if takes no solubility issues with water dampening it's surface with water may be a solution.......or creat a solution again I don't know sculpty
|
|
pepebe
Paint Manipulator
Posts: 187
|
Post by pepebe on Apr 11, 2016 7:51:40 GMT
So I'll join by saying well done pepebe, it's a beautiful idea birthed by resources at hand. I also saw mention of a wooden dowel, this was coupled with the thought of carving the wood, but wouldn't hot glue similarly applied to the dowel still function proper? Possible after a spraying with glossy enamel coating? Also sanding the ball would give it more surface area thus increasing it's adhesion to the sculpty or other such median. I have no experience with sculpty but if if takes no solubility issues with water dampening it's surface with water may be a solution.......or creat a solution again I don't know sculpty I think/hope that working with a wooden dowel or a billiard ball would create much sharper edges. I'm not sure though if this will actually enhance the effect. Apart from this, the hot glue method can also be applied to a wine bottle... 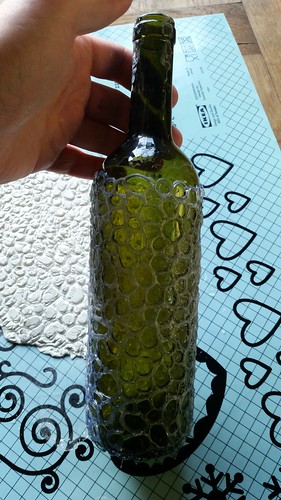 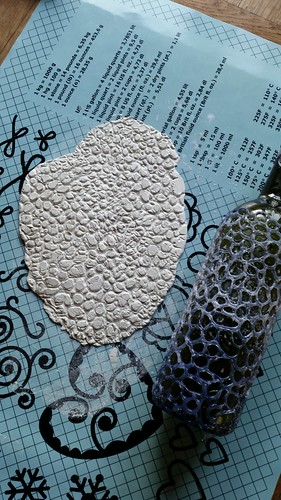  The bottle took much longer to create. I guess about an hour. It also swallowed about 10 gluesticks. The advantage of the bottle is that you don't have to be very careful rolling over the clay. The ball had a tendency to break parts of the clay away. |
|
|
|
Post by tauster on Apr 11, 2016 11:30:38 GMT
Great idea with the bottle! It is even superior to those acrylic texture pin rollers because it is much larger, so you can cover a much bigger surface. |
|
|
|
Post by sgtslag on Apr 11, 2016 14:51:44 GMT
The detail on the 'rock' surface, produced by the bottle, is superb! It will take The Dip quite well, revealing loads of cracks for details, which will give it a realistic appearance (the black/dark brown Dip will accumulate in the lowest portions, especially between the 'rocks' giving a nice appearance of rocks set into dirt). Nice! Cheers!
|
|
pepebe
Paint Manipulator
Posts: 187
|
Post by pepebe on Apr 11, 2016 16:41:44 GMT
The detail on the 'rock' surface, produced by the bottle, is superb! It will take The Dip quite well, revealing loads of cracks for details, which will give it a realistic appearance (the black/dark brown Dip will accumulate in the lowest portions, especially between the 'rocks' giving a nice appearance of rocks set into dirt). Nice! Cheers! If "The Dip" is equivalent to a "wash", I wholeheartedly agree... 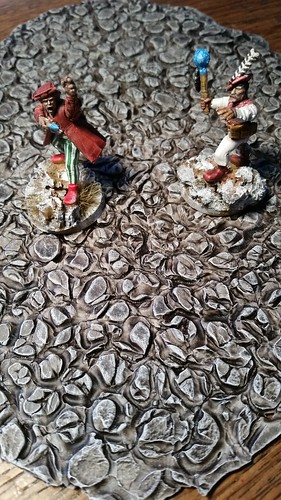 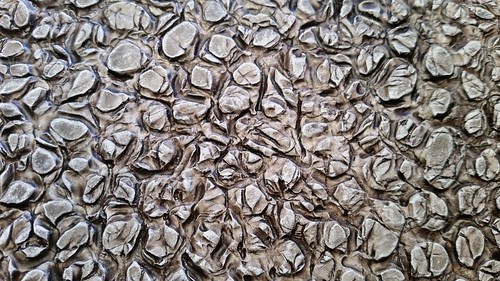 |
|


 Cheers!
 Cheers!