kris
Paint Manipulator

Posts: 164
|
Post by kris on Aug 23, 2015 10:02:47 GMT
Thanks guys! Unfortunately I haven't got much crafting done lately - so no new stuff to post ...but hopefully that won't last long  |
|
|
|
Post by skunkape on Aug 31, 2015 20:46:40 GMT
That's some really great looking terrain!
|
|
|
|
Post by chucksparanormal on Sept 3, 2015 17:44:22 GMT
That's really great stuff, you've inspired me to start up loading some of my old projects long before I found out about the 2.5 crafting!
|
|
kris
Paint Manipulator
Posts: 164
|
Post by kris on Oct 17, 2015 18:34:59 GMT
It's been a while ...but I seem to have caught the crafting bug again...  Note that I've already posted these over on the FB page ...but I thought I'd post pics here too Anyway ...here's a bunch of WIP pictures for those of you that may be interested:  The main structure of the stalagmites is kitchen towel soaked in watered down PVA/white glue.  They've then been based on pieces of vinyl floor tile (you know the sort - 12" square tiles for bathroom/kitchen floors), and had some ready mixed wall filler (spackle in the US?) rubbed over each piece (just to fill in any large cracks/holes/joins). The base has then be decorated with a bit of sand and gravel.  Then all that was left to do was to paint them (I've gone for a dark basecoat, followed by a heavy drybrush in a lighter shade, and finally a light drybrush with a cream colour) * * *
For the crystal clusters I've simply glued several pieces of aquarium gravel to a small piece of vinyl floor tile that has been cut to shape.  Then, once dry, just the 'crystals' have had a coat of gloss varnish (though to be honest I'm not 100% happy with these).  * * *
The treasure pile is pretty much self explanatory...  ...though it looks a lot betting in person.  * * *
And finally my favorite piece...  ...these mushrooms are made out of a couple of different size brads (mine are roughly 1/4" and 1/8" in diameter) - but I'm guessing thumb-tacks/drawing-pins would also do the job. * * *
And that's pretty much it. Everything here is pretty cheap and easy to make - though there is quite a bit of drying time between some of the stages :S  |
|
|
|
Post by tauster on Oct 17, 2015 18:57:39 GMT
Awesome stuff, absolutely great. That pond is stunning! You know, stalagmites were one of my entry drugs into terrain crafting. I have made a large box full of them and thought I'm through with this thing. But seeing your designs, I'll probably make some more. And the crystals of course... Must. Make. Some. Aaaand another way of making mushrooms. Simply can't resist. Every time someone shares a new way of making funghi, I positively have to try it. I have a couple of hundreds of these clips (15 years of buying books on ebay...), so I fear for the worst.  |
|
|
|
Post by skunkape on Oct 19, 2015 17:30:51 GMT
More cool looking terrain pieces!
|
|
|
|
Post by bluecloud2k2 on Oct 19, 2015 17:59:33 GMT
Very awesome.
|
|
kris
Paint Manipulator
Posts: 164
|
Post by kris on Oct 19, 2015 23:26:58 GMT
As always, thanks for the kind words guys |
|
|
|
Post by dragon722 on Oct 23, 2015 3:49:32 GMT
As always, thanks for the kind words guys What set(s) did those figures come from? I must get those two!!! |
|
kris
Paint Manipulator
Posts: 164
|
Post by kris on Nov 8, 2015 12:17:23 GMT
Sorry I didn't reply sooner to this, but I've been without an internet connection for over two weeks (thanks to the workmen down the road digging through a whole bunch of cables again!), and I'm still playing catch-up.
Anyway, the drider and the elf were from some of the old D&D pre-painted ranges (I can't remember which) - but the half-orc paladin is from the new Rage of Demons set.
|
|
kris
Paint Manipulator
Posts: 164
|
Post by kris on Nov 10, 2015 18:26:33 GMT
So ...I've been making a few more underdark/cave pieces...  ROCKS & STONES ROCKS & STONESThese are made in a similar way to the stalagmites - except that I've used a polystyrene core...  ...then covered them in small strips of kitchen towel soaked in watered down white/PVA glue, and filled in any obvious holes/cracks/joins with cheap ready-mixed filler.  Bits of grit & gravel have then been added...  ...and painted them to match my existing pieces (here they are with Roderick for scale): 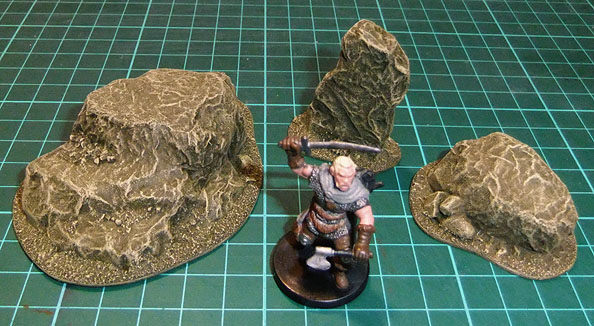 SPIDER WEBS & EGG SACKS SPIDER WEBS & EGG SACKSThe eggs are just small polystyrene 'beads' (salvaged from the off-cuts of the rocks & stones)...  ...and the web is made from a dried out baby wipe (that's been pulled apart to make a web-like texture) soaked in white/PVA glue.  BONES BONESFor the ribcage I've used pieces cut from a piece of 'oven mesh' (the same stuff I used to make some chainlink fences I posted previously) and glued them (in an offset position) two high. For the skull, I've used another 'bead' of polystyrene, and the misc. bones are nothing more than a piece of twine*  *note that I've pulled the twine apart into two pieces (as shown on the very right of the photograph) and then soaked it in PVA/white glue while twisting it tight (shown to the left of the twine). It was then a simple matter of cutting these 'bones' to size (once the glue had dried), and adding a few small pieces of polystyrene and grit to act as bits of other bones. *note that I've pulled the twine apart into two pieces (as shown on the very right of the photograph) and then soaked it in PVA/white glue while twisting it tight (shown to the left of the twine). It was then a simple matter of cutting these 'bones' to size (once the glue had dried), and adding a few small pieces of polystyrene and grit to act as bits of other bones.
WEAPONSThese are made from cocktail sticks (for the hafts), some cotton (for the wraps), and thin plastic card for the blades (in this instance I've used one of those pretend credit cards they send out as junk mail from time to time).  And for the shields I've used drawing pins (thumb tacks) with the 'pin' clipped off.  Obviously, if you have some spare multi-part plastic skeleton miniatures and/or misc. weapon sprues lying around, they would be a better (and faster) option for some of these pieces - but if you don't, I think that making them this way is a viable option (especially if you want to make lots of 'em cheaply).  SKULLS or FUNGI or EGGS SKULLS or FUNGI or EGGSThis next piece is fairly generic, and can be used to represent any of the above... 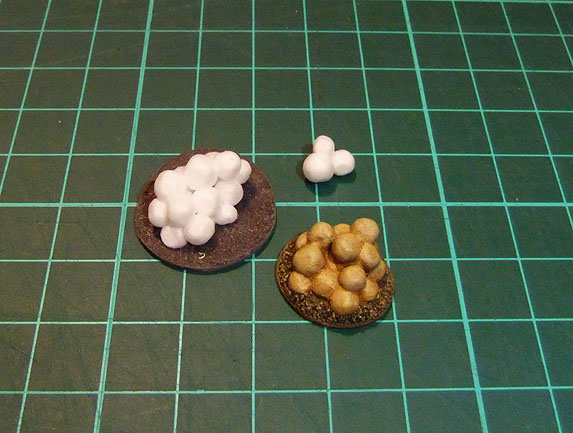 ...and as you can see, it's just a matter of pulling a few 'beads' from a sheet of polystyrene, and basing/painting them. POTS / VASESThese pots were made from a notice board pin and a plastic bead... 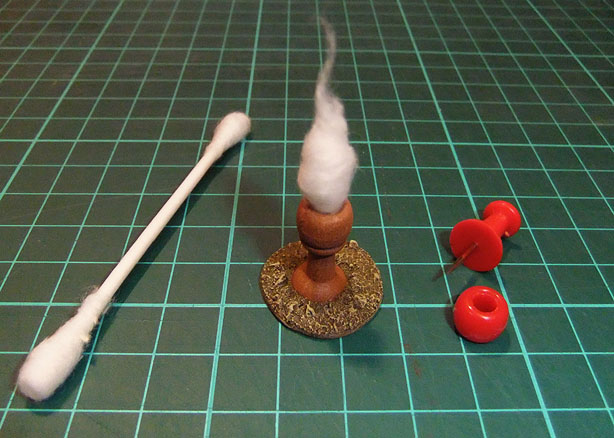 ...and while these could be left empty, or filled with glitter & gems, or similar - I've used the end of a cotton bud to simulate smoke. THE GLOWSTONEUnfortunately, I don't have any WIP pictures of this one - but, as you can (hopefully) see, I've taken a tea light apart, and built up an area around it (to hide the electronic gubbins) in a similar way to how I made the rocks and stalagmites.  I've then added some mushrooms (made from 'brads'), and used a (dissolvable) packing peanut as the 'glowstone' itself. And once it's turned on, the flickering LED from the tea light makes it look rather cool (much cooler than it looks in this picture).  * * *
So, if I take all the pieces I've made here, and combine them with the previous lot, I've got quite a collection 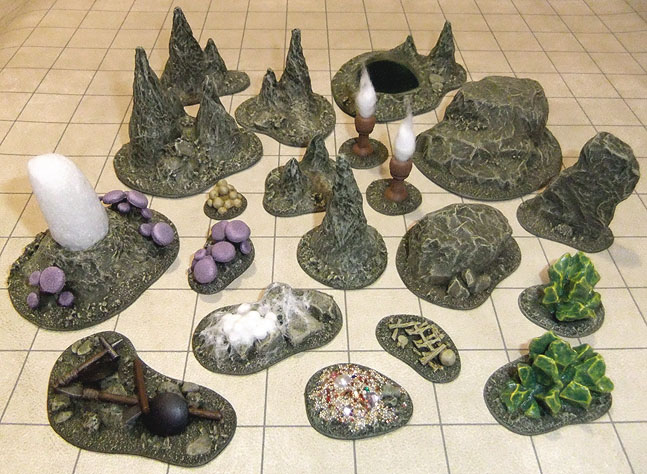 |
|
|
|
Post by curufin on Nov 10, 2015 18:46:25 GMT
Wow! Great looking stuff! Thanks for the share!
|
|
|
|
Post by tauster on Nov 10, 2015 19:02:12 GMT
Wow... that's one of the coolest underdark sets I've seen around here!
|
|
|
|
Post by ogrestamp on Nov 11, 2015 7:16:56 GMT
Where do I begin??? I would see one pic and think "That's what I will comment on" and then I see another pic! Great job all around.
My favorite, though, has to be the webbing. I've always wanted to make convincing webbing and you've done it. But then there's that glow stone...and the bones...or the egg sacks/fungi/skulls...
|
|
kris
Paint Manipulator
Posts: 164
|
Post by kris on Nov 11, 2015 11:04:47 GMT
Once again, thanks for all the feedback My favorite, though, has to be the webbing. I'm pretty pleased with the way it turned out - and I have to admit that the urge to make a large pile of bones & weapons covered in webs is becoming hard to resist |
|
|
|
Post by skunkape on Nov 11, 2015 16:12:43 GMT
Those are some great looking pieces! I'm going to have to use quite a few of them!
|
|


 Cheers!
 Cheers!