|
|
Post by Tabletop Gaming with Juce on Jan 2, 2015 2:58:51 GMT
Love these 2.5d tiles. Have you attempted chairs instead of benches yet?
|
|
kris
Paint Manipulator

Posts: 164
|
Post by kris on Jan 2, 2015 21:29:19 GMT
Thanks for all the feedback everyone ...it's great to know that the PDFs will be put to good use  Love these 2.5d tiles. Have you attempted chairs instead of benches yet? I've not made any yet ...but I have an idea that might work (using the same wood textures as the benches/tables) - so I'll see if I can find time this weekend to give it a try |
|
kris
Paint Manipulator
Posts: 164
|
Post by kris on Jan 3, 2015 18:44:31 GMT
Here's the simple chair design I mentioned in my last post...  ...and here's how I made them. Cut three pieces of thin (single corrugated) cardboard to the following sizes: ½" wide by 1" long (for the chair back) ½" square (for the seat) ½" wide by ¼" long (for the front legs) Then, using the wood textures from my previous ' table & bench' instructions, cut out a 'plain' 1½" square for the back, a 'lined' 1" square for the seat, and a 'plain' strip ¼" wide x 1½" long for the legs. Next, glue the back & seat textures to the cardboard in a similar fashion to the table top (though this time the 'back' texture needs to cover the entire piece), and glue the front leg texture around the small piece of cardboard like I did for the bench legs. Then simply glue the three pieces together as shown. And that, as they say, is that |
|
GM-Jen
Cardboard Collector

Posts: 24 
|
Post by GM-Jen on Jan 4, 2015 3:05:30 GMT
These are very cool and a great option for people who need something fast. Gotta say, your sets remind me of the illustrations from the original D&D rules book for some reason. It may be the light color of the stone. It feels nice and old school. I'm really impressed with the barrels and columns. Circular structures can be a pain, but I think you locked down how to get that nice even curve.
Look forward to more stuff!
|
|
|
|
Post by bloodchoke on Jan 4, 2015 23:29:13 GMT
I like your style, sir. Very nice, clean tiles. And really cool of you to share your work (pdfs) with everyone.
|
|
kris
Paint Manipulator
Posts: 164
|
Post by kris on Jan 5, 2015 14:57:00 GMT
These are very cool and a great option for people who need something fast. Thanks ...they are quite quick & easy to build (and relatively mess-free) - which also means they're pretty easy to replace if one gets damaged And really cool of you to share your work (pdfs) with everyone. That really is no problem at all ...I've got them made - so why not share them?  |
|
|
|
Post by DnDPaladin on Jan 6, 2015 1:17:44 GMT
well... it all depends if your printer is cool or if it sucks badly !
my printer has problem with colors.
|
|
|
|
Post by halloweenville on Jan 13, 2015 18:23:38 GMT
Awesome thanks for sharing!
|
|
|
|
Post by mbuchholz on Jan 14, 2015 22:27:57 GMT
Loving this thread. I like the method you've developed here. I'm inspired!
|
|
|
|
Post by dodobot on Jan 23, 2015 3:10:38 GMT
It is very inspirational. I love the look of the tile. And the furniture looks like something from a boxed game, really nice.
|
|
kris
Paint Manipulator
Posts: 164
|
Post by kris on Jan 23, 2015 15:06:09 GMT
I'm really glad that folks feel inspired by these ...in fact I can think of no greater compliment I had hoped to create a few more pieces by now (and generally be more active on the forum) ...but I've been a bit busy of late  Anyway, I've still got a few more ideas bouncing around inside my head - so there should be plenty more still to come ...eventually |
|
odinist
Paint Manipulator
Posts: 105 
|
Post by odinist on Jan 29, 2015 1:10:55 GMT
Damn dude! These are seriously incredible!!
|
|
kris
Paint Manipulator
Posts: 164
|
Post by kris on Apr 15, 2017 10:57:56 GMT
It's been a while since I've worked on anything new (or at least, anything worth posting about) for my 'print & paste' 2.5D dungeon - but that's about to change...  These are the new wooden textures I've drawn recently* ...and over the holiday weekend I'm hoping to make a few bits of 3D(ish) terrain to supplement the dungeon (though the wooden floor texture could also be used to make building interiors and the like). With any luck I'll get a few pieces made (and have some pictures to share) over the next few days (fingers crossed). *I'll share these once I've made a few test pieces and made sure that they work for the kind of things I've got planned.
|
|
sotf
Advice Guru

Posts: 1,084
|
Post by sotf on Apr 15, 2017 15:08:46 GMT
One thing that might work slightly better is to extend the wall coverings in order to cover the corrugation.
|
|
kris
Paint Manipulator
Posts: 164
|
Post by kris on Apr 15, 2017 16:14:07 GMT
One thing that might work slightly better is to extend the wall coverings in order to cover the corrugation. Yeah, that's been mentioned before (and I agree it would look better) ...but my aim with these was to get them done as quickly and easily as possible (and, to a lesser extent, to get the maximum usage out of each printout). |
|
kris
Paint Manipulator
Posts: 164
|
Post by kris on Apr 15, 2017 18:38:09 GMT
First test pieces finished...  ...and I think this might just work (though I need to layout the pdf's differently, as there's not enough of the horizontal plank texture at the moment). |
|
|
|
Post by margaret on Apr 15, 2017 21:05:46 GMT
looks great!
|
|
|
|
Post by skunkape on Apr 17, 2017 19:07:56 GMT
I think they look great! I like paper terrain too!
|
|
vepr
Tool Gatherer
Posts: 71
|
Post by vepr on Apr 17, 2017 19:37:13 GMT
Looks great. Looking forward to seeing more of it. :-)
|
|
kris
Paint Manipulator
Posts: 164
|
Post by kris on Apr 17, 2017 22:33:21 GMT
OK then ...here's the link to the new textures for the wooden walkways/balconies and stairs: drive.google.com/open?id=0B5ZeG3bjxtRQUmpvblJBYnBuemM(note that I've drawn the textures so that the distance between each individual 'horizontal plank' is one quarter of an inch - so you should be able to cut along the lines without the need to do much measuring )THE STAIRSFor the stairs, I've glued the top two textures on page one of the pdf to some thick cardboard, and then cut them out (with a box cutter) to the desired shape.  For my own steps I've chosen to make them 2" wide and three steps high (with each step being half an inch tall). I have therefore cut the 'plank' texture into three 2" x 1" sections to represent the steps, and the side texture into the shapes pictured above. Once that was done, it was a simple matter of hot-gluing them together (note that I've made it so the steps overhang the sides ever so slightly).  THE RAISED SECTIONS THE RAISED SECTIONSFor the walkways/balconies I've glued the wooden floor texture (on page 2 of the pdf) to some thick cardboard, and cut it to the desired shape (in this instance 2" x 8"). I've then made the support pillars in exactly the same way as the stone pillars (as shown on page one of this thread), except that I've used the new plain wood texture. Furthermore, I've also made a simple base for each of the pillars (using the same plain texture glued to some thin cardboard) to make the whole thing a little more stable.  And once again, it was then just a matter of hot-gluing it all together.  And that's all there is to it! Obviously you could take a little more time than I have, and wrap the wooden textures around the edges of the cardboard - but once you've laid several pieces down on the table, you hardly notice the exposed edges 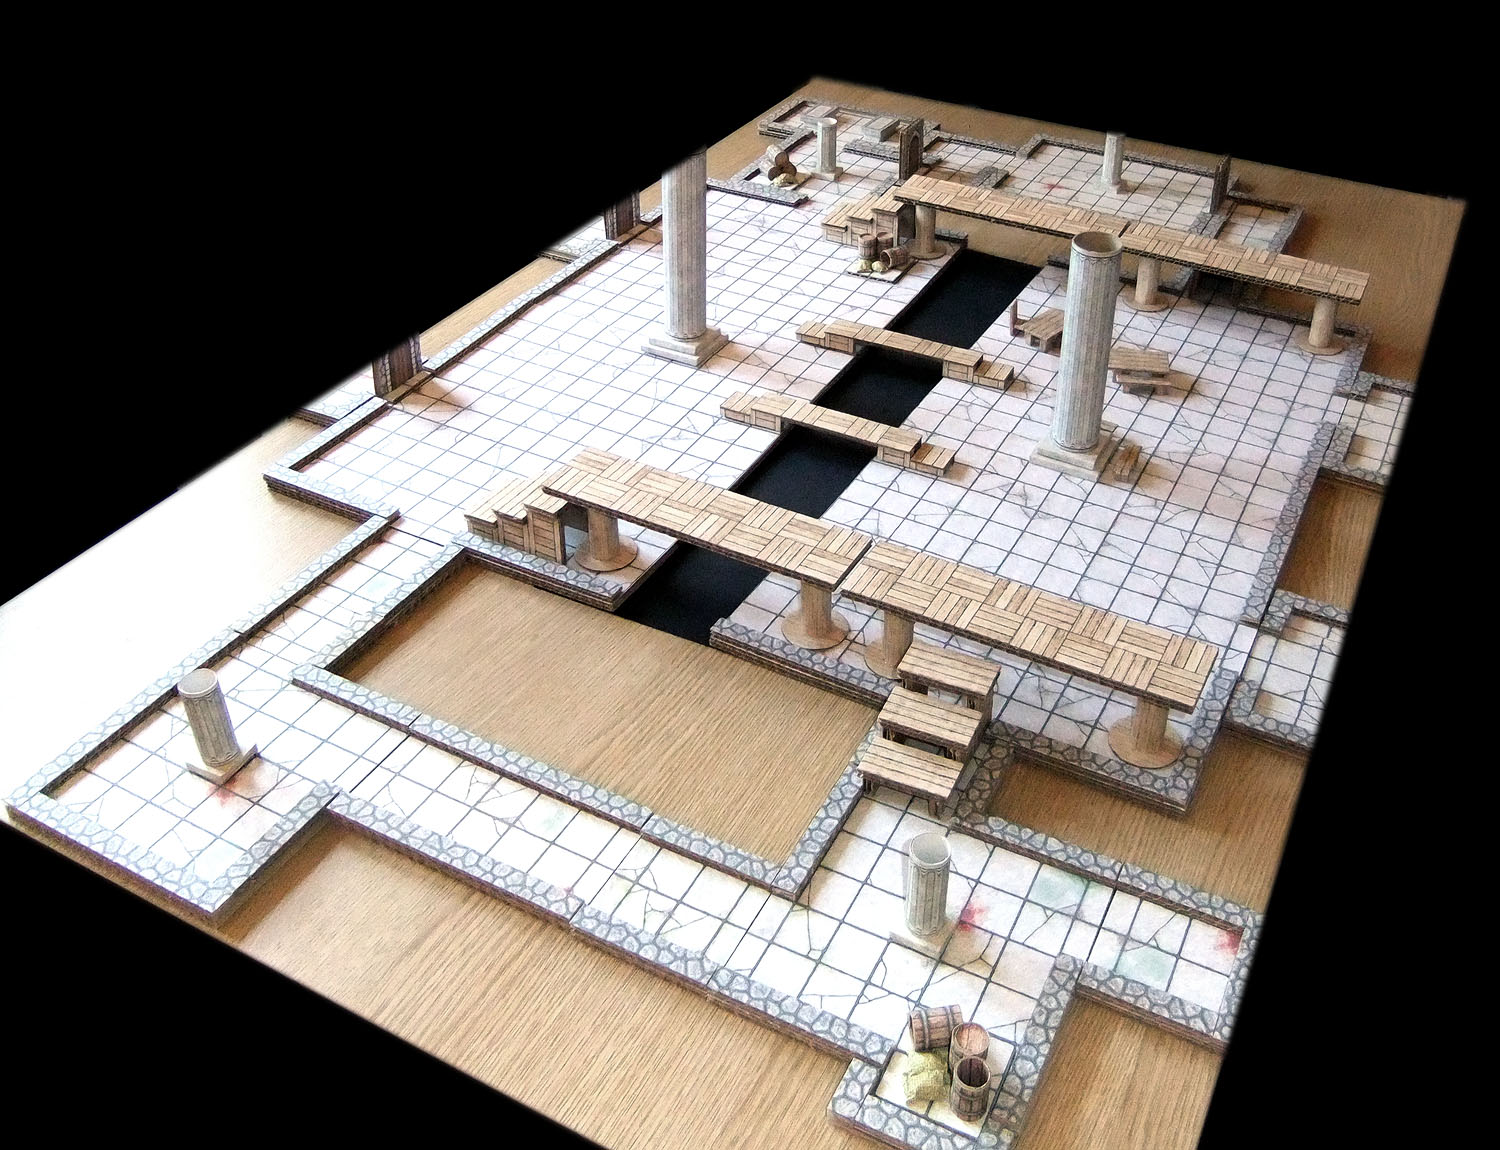 |
|


 Cheers!
 Cheers!