calem
Tool Gatherer

Posts: 81 
|
Post by calem on Mar 25, 2014 14:24:32 GMT
so i made a cart out of coffee stirrers and bamboo skewers. It looked great unpainted. Then i did this:  I tried to use the painting wood method i saw in thedmginfo video about rope bridges. Yellow, white and brown. then i tried to drybrush some dark brown on it for highlights. I screwed the pooch on the paint job. how the hell do his wooden planks look so good, and i cant make it look less than muddled wood putty? (thanks for the idea on wood color, though, dmginfo, but i just lack the talent for execution) It seems like with minis i am fine, and with things that have pre-set details, i have no problems, and maybe a little bit of talent. But fabricating details on anything is really tough for me. the barrels look okay, in my opinion, but i will likely re-try that as well. So i am thinking i should just coat the thing in dark brown and drybrush some brown/yellow on it for wood grain. I could just re-make one and start over. how should i save this? The tents also need some weathered canvas look applied to them. They are still WIP on the paint job (thanks, dmscotty, for the idea, but again, i failed in execution) thanks in advance for your tips. |
|
calem
Tool Gatherer
Posts: 81
|
Post by calem on Mar 25, 2014 14:31:07 GMT
 there it was pre-paint job. Seriously, if sanded pine was a look in the 12th century, i would have just left it. Grargh, i cant believe i screwed that up. |
|
|
|
Post by DMScotty on Mar 25, 2014 14:32:03 GMT
Watch my table vid (I show an easy way to do wood), I start from dark and drybrush to light. This may help give you the depth you are looking for. You can easily repaint these by spraying or painting them with black acrylic then washing them with dark brown (burnt umber) then drybrushing with a lighter brown of your choice.
|
|
calem
Tool Gatherer
Posts: 81
|
Post by calem on Mar 25, 2014 14:34:13 GMT
Watch my table vid (I show an easy way to do wood), I start from dark and drybrush to light. This may help give you the depth you are looking for. You can easily repaint these by spraying or painting them with black acrylic then washing them with dark brown (burnt umber) then drybrushing with a lighter brown of your choice. Wow.....advice straight from the master, i feel privelaged! Thanks, i will try that. I might also put some bands on the wheels, to add some detail to them that i can work with, instead of fabricating it. |
|
|
|
Post by DMScotty on Mar 25, 2014 14:43:34 GMT
Even lil' details like bands on the wheels can go a long way to selling it. I always try to strike a balance between detail, crafting time and playability.
|
|
|
|
Post by DungeonMasterRandom on Mar 25, 2014 15:58:15 GMT
Ugh, hate it when this happens. I feel the same about painting this kind of thing. I love painting stone and minis, but when it comes to painting wood I just make an ugly brownish yellow colored piece of cardboard.
|
|
calem
Tool Gatherer
Posts: 81
|
Post by calem on Mar 25, 2014 16:27:13 GMT
Even lil' details like bands on the wheels can go a long way to selling it. I always try to strike a balance between detail, crafting time and playability. Personally, I will be adding details because it will make it easier to paint. Like i said, a plain board is really difficult for me to detail. once it has something on it, though, then i have something to work with. Like the bands on those barrels. I have made better barrels, but those looked especially bad until i put the cardstock bands on it. Once they had details, then i had something to paint, to focus on, and to create a texture aside from the ones i have difficulty fabricating. To my credit, or in my defense, whichever makes more sense, I had intended the barrels to look disheveled. Again, my campaigns are post-war, and most of what the players find is a good 70-100 years old. Your table video looks awesome, though, and i think coating it in black first will be the key, then a brown wash to get brown deep into the cracks of the boards, and finally a brown/yellow drybrush. For reference, if anyone ever stumbles across this thread facing the same issue, here is a link to that video: Making an awesome miniature table for indoor terrain |
|
calem
Tool Gatherer
Posts: 81
|
Post by calem on Mar 25, 2014 16:29:04 GMT
Ugh, hate it when this happens. I feel the same about painting this kind of thing. I love painting stone and minis, but when it comes to painting wood I just make an ugly brownish yellow colored piece of cardboard. RITE!!!  Although i love dmscotty and thedmginfo for all of their wonderful, inspirational ideas, i cant stand how easy they make everything look. Most of my crafts look like a third grader finger painted them. In fact, that might be my new strategy....find a third grader, let them finger paint. it will probably turn out better. dmscotty, thedmg: I hate you guys so much right now. Not really. but still. you're too good! |
|
|
|
Post by Sleepy Hollow Mike on Mar 25, 2014 17:58:51 GMT
Dark to light is most definitely the key! Way back in the day I was always building something and in my zeal to "complete it" I would never Black Bomb it! Typically the results would be very dissapointing to say the least! Black spray paint or "Black Bombing" is your friend when painting this stuff up. It provides contrast and depth! I by no means am as good as DMG or DM Scotty and I have learned a ton from thier videos. Just practice on a small piece first and soon enough you will see real results! Remember black spray paint is your ally! The cheapest kind is fine Wally world sells it for like 97 cents a can. BTW I love the cart the first one I did the wheels fell off!Lol!
|
|
|
|
Post by onethatwas on Mar 25, 2014 20:49:35 GMT
Shading from dark to light is almost always easier than shading from light to dark. There are usually only a few very rare instances when you should start light (such as when creating lighting effects).
So yes, general artistic concensus is to put on a dark undercoat (does not have to be black, but definately darker than the next shades of color), and use successively lighter tones, ending with a highlight (drybrushed on usually).
For anything that has a texture, try to call to mind how that texture behaves. Wood grain is often one directional, therefore paint in single direction strokes.
Stipling is an effect that can create various spatter or blobbed effects (and I've used it to create fluid whorls with very watery paint). This is why it's effective for creating blood spatter, roughened earth, or grass paint on texture, or stone slabs via the DMG.
Drybrushing basically just pulls up small details you want to pop, but can be used to create flat (non textured) highlights too.
Hope this helps
|
|
|
|
Post by thedmg on Mar 25, 2014 22:16:49 GMT
I use the cheapest crappest popsicle sticks, the ones you'd give to naughty children because it would give them splinters...
As they are so cheap, they are not smooth. This means when you drybrush them with light colours the grain shows up.
Don't bother with expensive stuff. The cheapest yields the best results and are also easier to cut as they are gernerally softer.
For painting... Black spraypaint. Dark brown. Then dust with yellow. Now dusting is putting very little paint on the brush. Then dry brush white. Drybrushing means you must wipe the paint and any water off the brush before applying to the piece.
Always go from dark to light colours. The reason is that "light" is closer to the raised areas. The only reason to do this in reverse would be if the light source were the object. So fire should go white, yellow, red.
|
|
calem
Tool Gatherer
Posts: 81
|
Post by calem on Mar 25, 2014 23:46:32 GMT
I use the cheapest crappest popsicle sticks, the ones you'd give to naughty children because it would give them splinters... As they are so cheap, they are not smooth. This means when you drybrush them with light colours the grain shows up. Don't bother with expensive stuff. The cheapest yields the best results and are also easier to cut as they are gernerally softer. For painting... Black spraypaint. Dark brown. Then dust with yellow. Now dusting is putting very little paint on the brush. Then dry brush white. Drybrushing means you must wipe the paint and any water off the brush before applying to the piece. Always go from dark to light colours. The reason is that "light" is closer to the raised areas. The only reason to do this in reverse would be if the light source were the object. So fire should go white, yellow, red. right...these are all tactics I commonly use on minis. Black wash...then anything dark grey or with a lot of ink in the dyes (purple, blue, deep reds) then up through the spectrum to flesh colors. Drybrush in some steel color on armor...highlight the cheekbones, make worn patches on the old traveling bard's threadbare knees etc. Granted...I'm no pro...but they are all game-table worthy. Although I will he doing this with the cart to salvage my butchery.....could you shed some light on what you did with the rope bridge? In that video it seemed as simple as squirt together some brown, yellow and white....apply liberally and voila...perfection. of course I'm sure there is some acquired skill behind those brush strokes, but still...you went from unpainted popsicle sticks to weathered, aged bridge in no time flat (boots of speed accounted for). Huge admirer of both yours and scotty's work, BTW. Wonderful to speak to both of you and get your feedback. Gentlemen & scholars, both. |
|
calem
Tool Gatherer
Posts: 81
|
Post by calem on Mar 26, 2014 5:21:14 GMT
Alright guys, as close as i could get to having it resolved..... Start:  Coated in the darkest brown i have (behr flat exterior dark umber....same color as the chair im sitting in to paint, honestly   After some dry time, they (including the barrels) got a touch of the standard walmart brown, very lightly. This is when i started having camera problems (seriously....my phone and i often don't get along). That pic completely failed But i did snap this pic...after a dry brush with the yellow/brown/white mix i had originally tried yesterday. Unfortunately that front panel is all blurry in the photo, but i think you can get the gist of it...  The wheels turned out a little weird. I used some white glue to put on some cardstock bands...and they fell off. After peeling, though, they did leave the trails of glue that had dried. I filled in the glue-trails with grey paint, and it made good enough bands from a distance. At least i didnt have to replace the wheels. Yes, that central band is weirdly shaped, but i fixed if after looking at this pic. So thats that...seems to be fixed. There is a good wood grain texture to it. It helped that i took my utility knife and shaved parts of the coffee stirrers, making some really rough-looking pieces, and some cracks in the wood that the dark umber filled in nicely. Some forced distressing, i guess, is a good way to say it. Anywho...thanks for the help, everyone! Oh! The barrels...so they did even better than the cart. I wanted them to look distressed. The players will find them in a dungeon, with some great, 100 year old dwarven spirits in one, whiskey in another. There is a goblin traitor (an opportunist named splug who is willing to turn-coat, and has helped the party out a few times. The whiskey is for him, to recruit his and his fellow goblins' help against some orcs and necromancers nearby. That is, if they follow through on that part.
So the distressing...i carved them up even worse than the wagon, and then used a little more of the yellow/brown/white mix on them, which made it really more grey than brown...like old barn wood. So yeah, i'm pretty happy with them. I am going to dry brush some rust onto the bands to make them look even more old and decrepit.
|
|
|
|
Post by Sleepy Hollow Mike on Mar 26, 2014 9:50:35 GMT
Wow! Nice improvement! I often will scribe extra detail into the wood! It makes for a more interesting model (IMO)! As to the barrels I like yours better than my own.
|
|
|
|
Post by thedmg on Mar 26, 2014 13:15:33 GMT
In my rope bridge video I was going for a dried out / charred underside look. I did not base paint it and mixed the brown and yellow and didn't bother with white. As the wooden slats were not very big, seeing the wood grain would not have been a priority, so I skipped the drybrushing and went with a haphazard approach.
I feel that less is sometimes more when it comes to detail on miniatures. The most important thing is that someone looks at it and goes - rope bridge (or cart, or bookcase, etc).
The mind fills in the blanks. I find this with DMing as well. I always sparcely describe a scene or scenario. The players imagination can fill in the blanks. That is what helps them invest in the story, especially when they ask questions that will reveal more about the place/story.
Often times something seems more impressive than it really is when you analyse it. That is the real trick.
|
|
|
|
Post by ashrothedm on Mar 26, 2014 14:04:53 GMT
A little late to the party here, but I wanted to toss my 2 cents in. My personal preference for wood is a dark/dank/grunge scheme. In the images I've posted, the camera does not convey the colors well, or at all. I start with black, then dry brush with a medium brown, wash with burnt umber, and finish with a dry brush of 1 part black, 1 part burnt umber, 1 part brown, 3+ parts white. That creates a color that a painter generally hates to see on their palette, but is nice and filthy for miniature wood. I follow that up with very diluted washes of black and burnt umber anywhere I picture water pooling or condensing. Then dab some of that wash off with a sponge while it is drying, leaving it thick at the edges. The moldy wash adds quite a bit. Just to see the type of color or tone I shoot for, check out the images here: www.google.com/search?q=old+wood There are a lot of grays there, more than browns overall, and that's the color I prefer to shoot for. (it's hard to see that in the barrel images) Any of the more vibrant browns felt to me like they didn't fit my theme. I highly recommend beating up the miniatures with washes afterwards, it can give them a "used" feel that you don't see in a clean paint job. The world is dirty, and I try to get my miniatures into the filth. I think even with your initial pine-colored cart, washes and distressing could have brought it to life. If you wash out your highlights, you can just highlight again. |
|
dmj
Paint Manipulator

Posts: 245
|
Post by dmj on Mar 26, 2014 17:36:17 GMT
If I'm painting a non wood surface for wood I base in black, then on my pallet lay out white brown and black next to each other dip a flat edge brush in different combination of those three for each board. It takes a steady hand then once I've done that outline in black it will get a aged wood look. 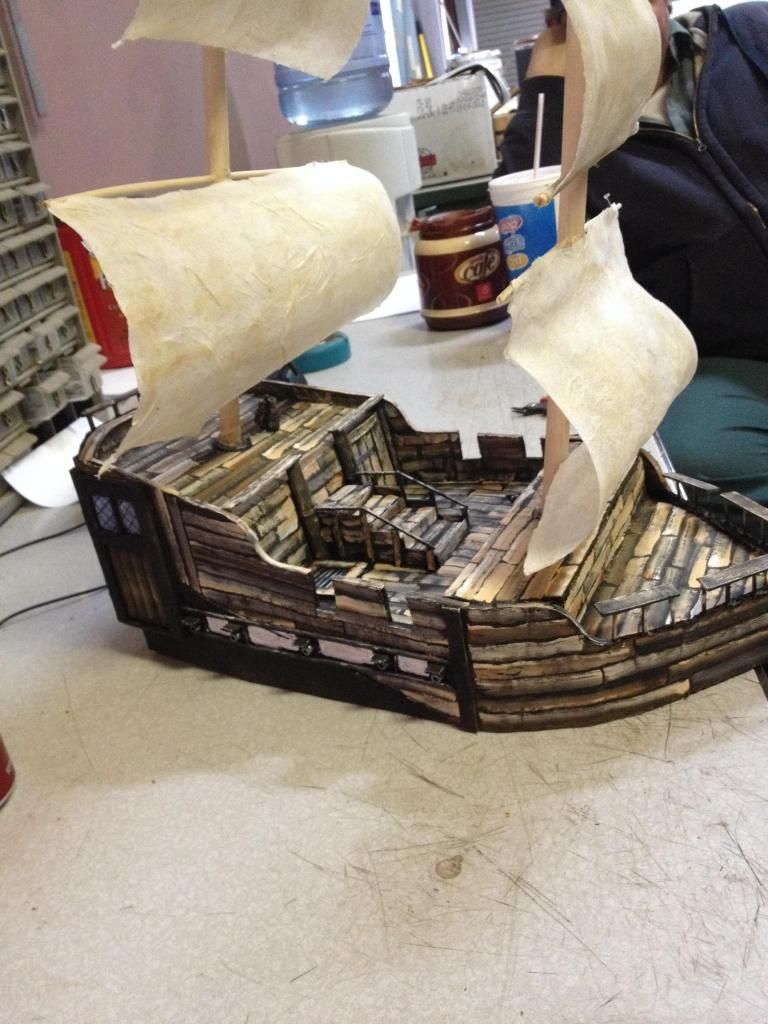 By using different combinations of the colors it helps sell the different boards. |
|
|
|
Post by runningwolf on Mar 28, 2014 21:39:17 GMT
If you need wood putty for a project like this simple, cheap and easy way (won't do any good unless you will be making a full scale project out of wood soon)..... You can also ask anybody you know who does carpentry or has a wood shop.
.... When you;re cutting a 2x4 or other kiln dried wood save some sawdust in a big zip lock bag. Mix it with some wood glue (little batches when you need them) to form a cheap wood putty.
|
|
calem
Tool Gatherer
Posts: 81
|
Post by calem on Mar 29, 2014 2:45:45 GMT
If you need wood putty for a project like this simple, cheap and easy way (won't do any good unless you will be making a full scale project out of wood soon)..... You can also ask anybody you know who does carpentry or has a wood shop. .... When you;re cutting a 2x4 or other kiln dried wood save some sawdust in a big zip lock bag. Mix it with some wood glue (little batches when you need them) to form a cheap wood putty. this is an old woodworking trick. That's what I did when I refinished my bronze rosewood floors. (For the record...its illegal to buy the rosewood they used in the 1890's at this point, as it is endangered....and anyone with bronze rosewood (official name is something along the lines of quaking brazillian rosewood, not the brazillian stuff they grow in plantations now) can tell you, it is impossible, no matter how skilled the stain & dye mixer is, to stain a new wood to that color. Pro tip I learned the hard way, use white glue instead of wood glue if your plan is to stain and polyurethane. Wood glue has brown dyes in it...white glue dries to a more gummy consistency, but is translucent enough to only carry the colors of the sawdust you use. So steal sawdust from the original wood you sanded, mix to a paste in white glue, apply as a caulking substance, and it will pick up stain the same as the surrounding wood. This is a crafting forum, though, not the trials and tribulations of the drum sander.......I digress. I actually have a sample in my living room where I tried both approaches...wood glue and white glue...if it is sunny enough this weekend I will snap a pic and show you. It is more gummy and gel-like than wood glue, so not as easy to work with...but still. If you ever need to restore something to its original color...go with white glue putty instead. |
|
|
|
Post by runningwolf on Mar 29, 2014 12:51:38 GMT
I was doing a floor (cheap pine if I remember right) so all we had on hand was the wood glue, white would do the trick as well. Also doing it with the wood I am using to do my living room (light paneling using sanded and stained lathe).....
... just figure the same technique can be used for crafting.
The saw dust could also possibly be used as grass (obviously painted). I'm not sure how cost effective it would be to sand down some Popsicle sticks or other crafting wood but good to save it if you are working on another project.... Upcycle what is essentially a waste product.
|
|


 Cheers!
 Cheers!